IBM® MQ
« Back to documentation homeQuick start
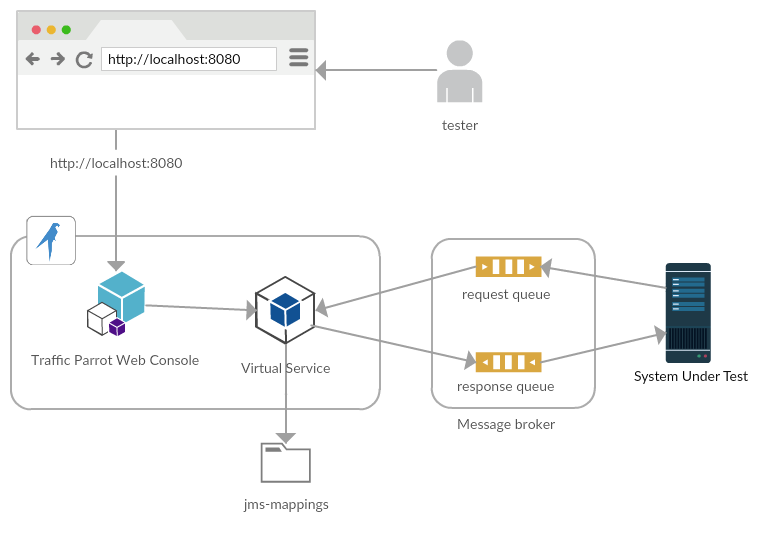
IBM® MQ virtual service architecture
A tester or developer uses a web browser to access the console. The console manages the virtual service. The system under test (application under test) connects directly to the virtual service on different ports.
Here is an example of how that could look like for a scenario where the virtual service is replaying messages to an external queue.
 Virtual service replaying IBM® MQ messages to and from a queue
Configuration
Define connections
To record from or replay to brokers you will need to tell Traffic Parrot how to connect to them.
Those connections are displayed in the dropdown menus on the record and replay panels, for example:
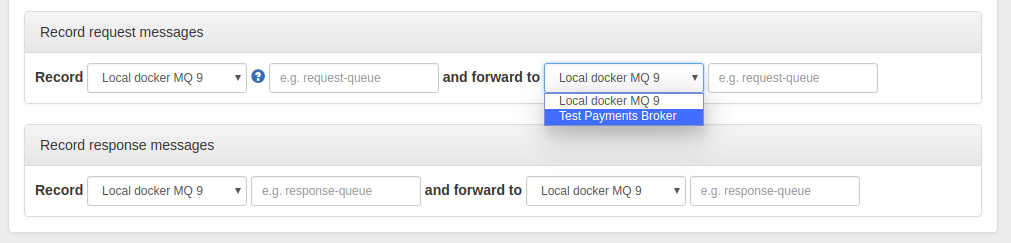
The "Internal broker" connection is available in the dropdown by default when you choose to use an internal broker in the Broker panel.
To define a new connection that will be available in the dropdown in the record and replay panels:- Open ibm-mq-connections.json file located in the main Traffic Parrot directory, using your favourite text editor
-
Add the new connections (make sure the connectionId field has a unique value!).
An example content of the file, with 2 connections defined:
[ { "connectionId": "1", "connectionName": "Test Payments Broker", "connectionData": { "ibmMqVersion": "IBM_MQ_7_5", "hostname": "mqserver.example.com", "port": 1415, "queueManager": "PAYMENT.QM", "channel": "PAYMENT.SVRCONN", "username": "payuser", "password": "paypassword222" } }, { "connectionId": "2", "connectionName": "Local docker MQ 9", "connectionData": { "ibmMqVersion": "IBM_MQ_9", "hostname": "localhost", "port": 1414, "queueManager": "QM1", "channel": "DEV.APP.SVRCONN", "username": "app", "password": "" } } ] - Supported values of ibmMqVersion are IBM_MQ_7_5, IBM_MQ_8 or IBM_MQ_9
- Save the file
- Refresh the page in Traffic Parrot to reload the dropdown list.
In the current Traffic Parrot version you edit connections directly in the ibm-mq-connections.json file. In near future you will be able to do it via the Web UI as well.
Change the location of ibm-mq-connections.json
trafficparrot.virtualservice.ibmMqConnectionsUrl=classpath:ibm-mq-connections.jsonto for example
trafficparrot.virtualservice.ibmMqConnectionsUrl=file:/home/john/git/project/trafficparrot-ibm-mq-connections.jsonThis can be useful if you would like to version control it with your application source code.
Required JARs
In order to connect to IBM® MQ you need jar files that will allow Traffic Parrot to establish connections with MQ.
Before you proceed please read these instructions to double check your actions are inline with the supported way to install WebSphere MQ Java jar files.
- com.ibm.mq.allclient.jar
Copy those files to trafficparrot-enterprise-release-x.y.z/lib/external and restart Traffic Parrot.
If you do not have the required JAR files yet, follow the instructions to obtain them. These are typically found in /opt/mqm/java/lib on a UNIX system, but may be found in a different location depending on your environment.
Recording and replaying IBM® MQ
Introduction
As with HTTP recording Traffic Parrot, during recording incoming and outgoing messages are matched up to provide mappings. Then upon playback receipt of a matching incoming message will trigger generation of an outgoing message.
Before you proceed to recording or replaying messages make sure you have installed the required libraries (required JARs) so that Traffic Parrot can connect to the broker.
Message matching
Traffic Parrot can form mappings in a number of ways.
- Time: pair messages in the order they happened in time
- Correlation ID: pair messages with matching correlation id
The default is to use time based matching. This can be changed in the advanced parameter section of the record page.
Recording and replaying IBM® MQ queues using an external broker
Traffic Parrot does not support running IBM® MQ internally. You will need to use an external broker.
You can use one of the following:- You probably already have a test environment where there is a IBM® MQ broker available. You can use that IBM® MQ instance to set up your virtual service queues, which we have described below.
- You can run a developer edition of IBM® MQ using Docker on your laptop, for more information see IBM® MQ for Developers

One system generates messages onto a queue; another system consumes these messages and puts responses onto a second queue, which the first system consumes. If our goal is to test the system-under-test in isolation, we must record these interactions in order to replay them.
Recording IBM® MQ queues using an external broker
We will create extra queues on the existing broker that will be used by the virtual service. Then we will reconfigure the system-under-test to connect to these queues instead of the original ones. Traffic Parrot will move messages between these queues and the original queues, recording and creating mappings as it does so.

Steps to perform a queue recording using an external broker
- Add the queues that will be used by the virtual service to the broker. In the example above you would add to the existing broker queues "Virtual Service Request Queue" and "Virtual Service Response Queue".
- Define connections that will be used for recording
- Start Traffic Parrot
- Go to the IBM® MQ record page
- Select "External" in the "Broker" panel
- Select "Queue"
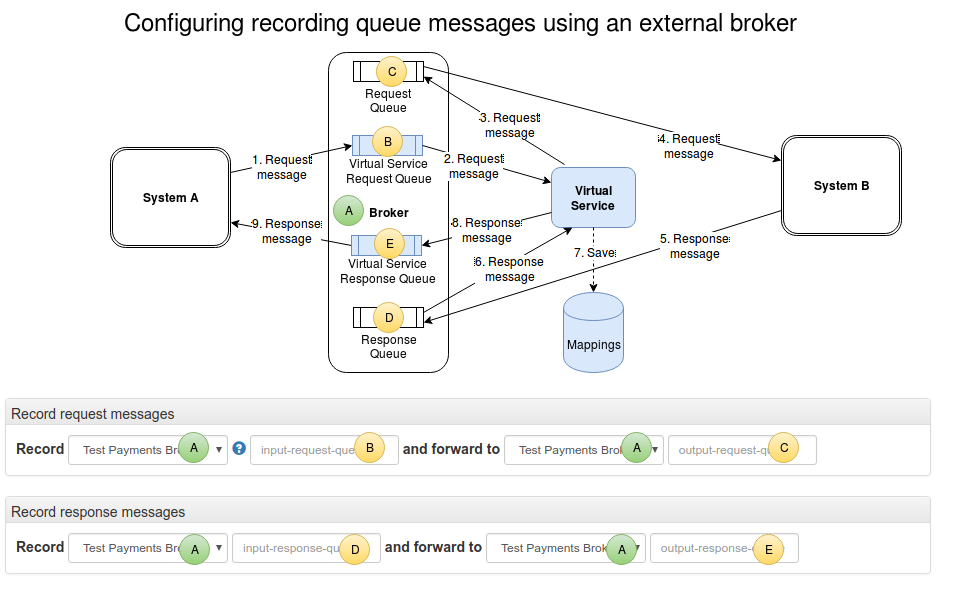
- Choose the connections to brokers, and specify the queue name where messages will be received and responses sent. Follow the diagram Configuring recording queue messages using an external broker which will guide you how to populate those fields.
- Click "Turn on"
- Reconfigure System A to connect to the virtual service queues
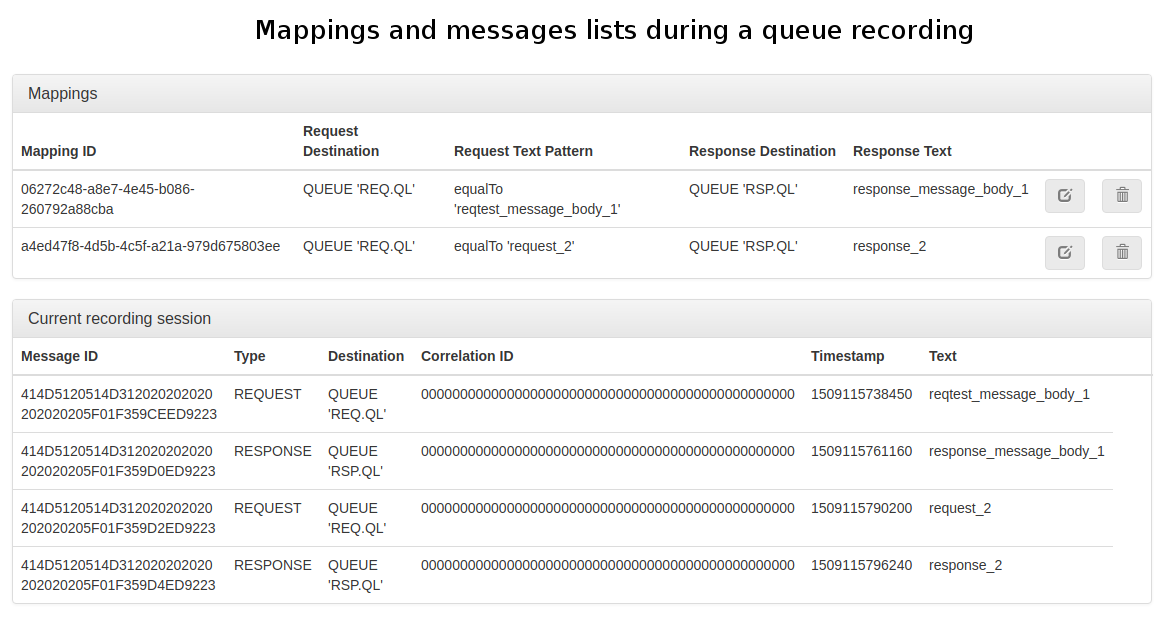
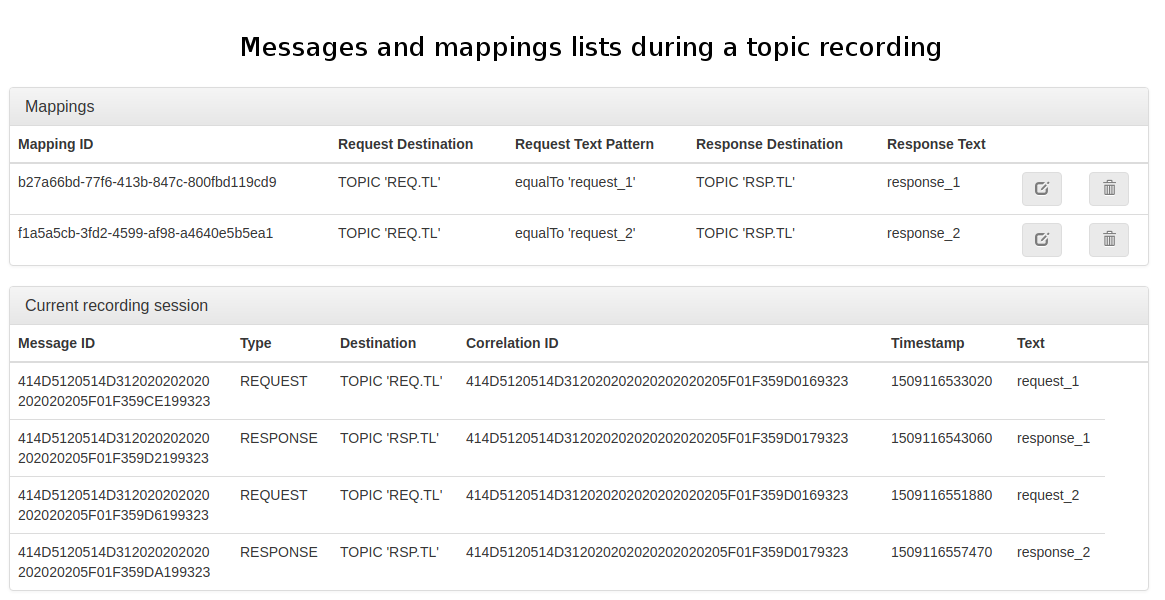
- Execute a test case via System A to allow Traffic Parrot to record requests and responses. They will appear on the Messages and Mappings lists on the web page as shown on Mappings and messages lists during recording image.
- Click "Turn off"
As the system-under-test generates messages they are listed in the bottom table 'Current recording session'. As the second system generates responses to these messages, they are also listed at the bottom, but in addition mappings are generated in the 'Mappings' table showing incoming and outgoing messages that Traffic Parrot has paired up.
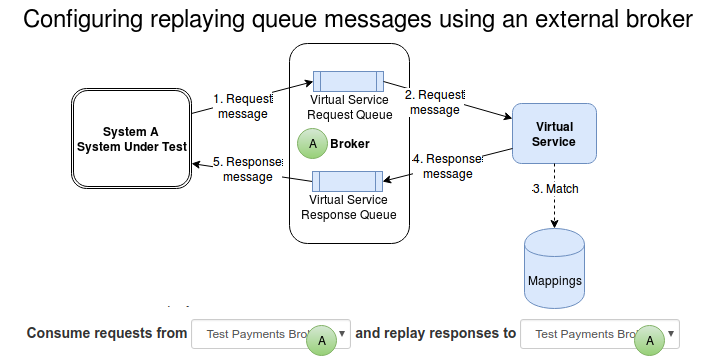
Replaying IBM® MQ queues using an external broker
To replay the recorded mappings we will need the same virtual service queues in place as shown on the image below.

Steps to perform a queue replay using an external broker
- Add the queues that will be used by the virtual service to the broker. In the example above you would add to the existing broker queues "Virtual Service Request Queue" and "Virtual Service Response Queue" (Note - depending on your broker and it's configuration these queues may be auto-created for you when the software first attempts to connect.)
- Start Traffic Parrot
- Go to the IBM® MQ replay page
- Select "External" in the "Broker" panel
- Select "Queue"
- De-select "Topic"
- Choose the connections as shown on the Configuring recording queue messages using an external broker diagram.
- Click "Turn on"
- Reconfigure System A to connect to the virtual service broker
- Execute a test case via System A to allow Traffic Parrot to consume a request message and send a response message.
- Click "Turn off"
Recording and replaying IBM® MQ topics using an external broker
Recording and playback of topics using an external broker is less intrusive than queues because Traffic Parrot can subscribe to a topic just like any other application and receive messages, without affecting the delivery of those messages to other applications.
This diagram shows how the production systems connect:
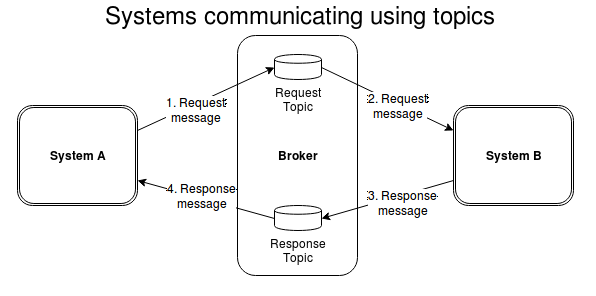
The system-under-test generates messages onto a topic which are received by a number of other systems. One of these systems generates responses onto a different topic (which are received by a number of systems, one of which is the system-under-test).
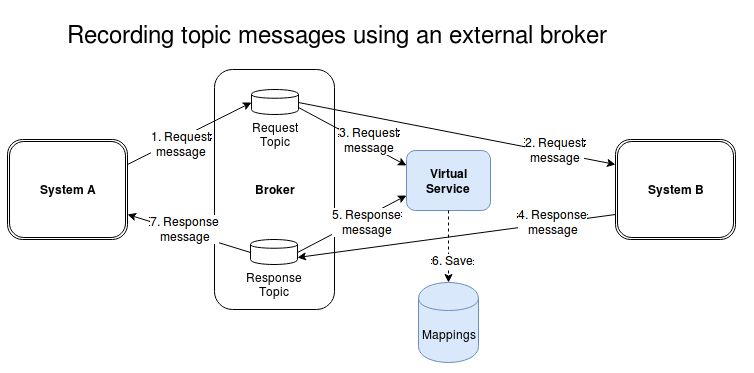
Recoding IBM® MQ topics using an external broker
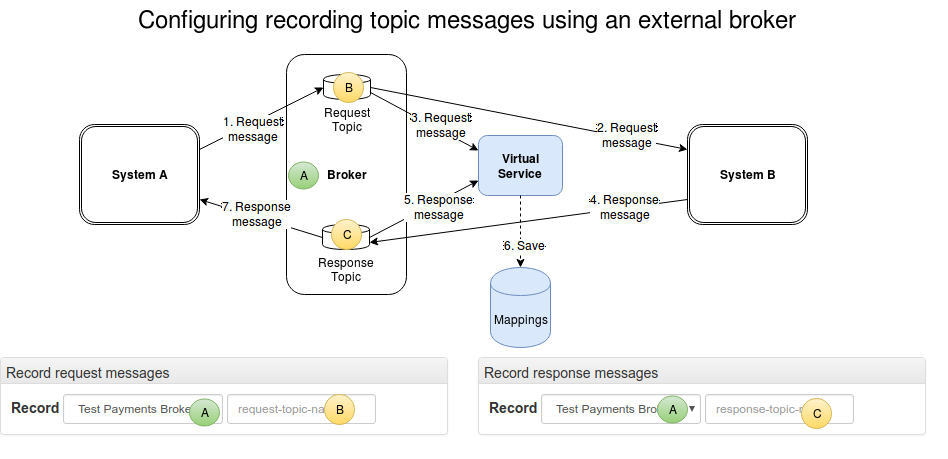
We will configure Traffic Parrot to connect to the request and response topics and record the messages appearing on both, generating mappings as it goes, as shown on diagram Recording topics using an external broker
Steps to perform a topic recording using an external broker
- Define IBM® MQ connections that will be used for recording
- Start Traffic Parrot
- Go to the IBM® MQ record page
- Select "External" in the "Broker" panel
- Select "Topic"
- Choose the connections to brokers, and specify the topic names where messages will be received and responses sent. Follow the diagram Configuring recording topics using an external broker which will guide you how to populate those fields.
- Click "Turn on"
- Reconfigure System A to connect to the virtual service queues
- Execute a test case via System A to allow Traffic Parrot to record requests and responses. They will appear on the Messages and Mappings lists on the web page as shown on Mappings and messages lists during recording image.
- Click "Turn off"
Replaying IBM® MQ topics using an external broker
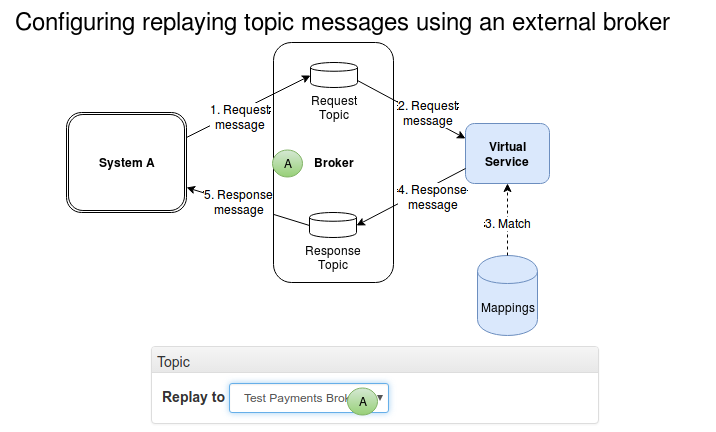
When replaying to an external broker Traffic Parrot will subscribe to the request topic and publish to the response topic as shown in the diagram Replaying topic messages using an external broker.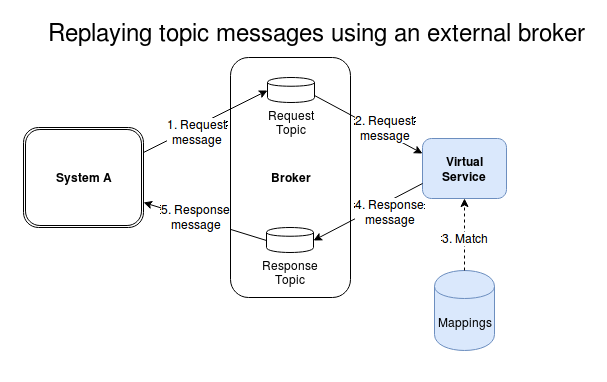
Steps to perform a topic replay using an external broker
- Start Traffic Parrot
- Go to the IBM® MQ replay page
- Select "External" in the "Broker" panel
- Select "Topic"
- De-select "Queue"
- Choose the connection as shown on the Configuring replaying topics messages using an external broker diagram.
- Click "Turn on"
- Disconnect System B from the broker so it does not produce response messages to the response topic
- Execute a test case via System A to allow Traffic Parrot to consume a request message and send a response message.
- Click "Turn off"