# JMS
## Quick start
Have a look at the [quick start to Traffic Parrot](https://trafficparrot.com/documentation/5.65.x/start.html). It covers HTTP only, but it will show you how to install the tool and explain a few basic concepts.
## Tutorial: Mocking and simulating JMS IBM® WebSphere MQ
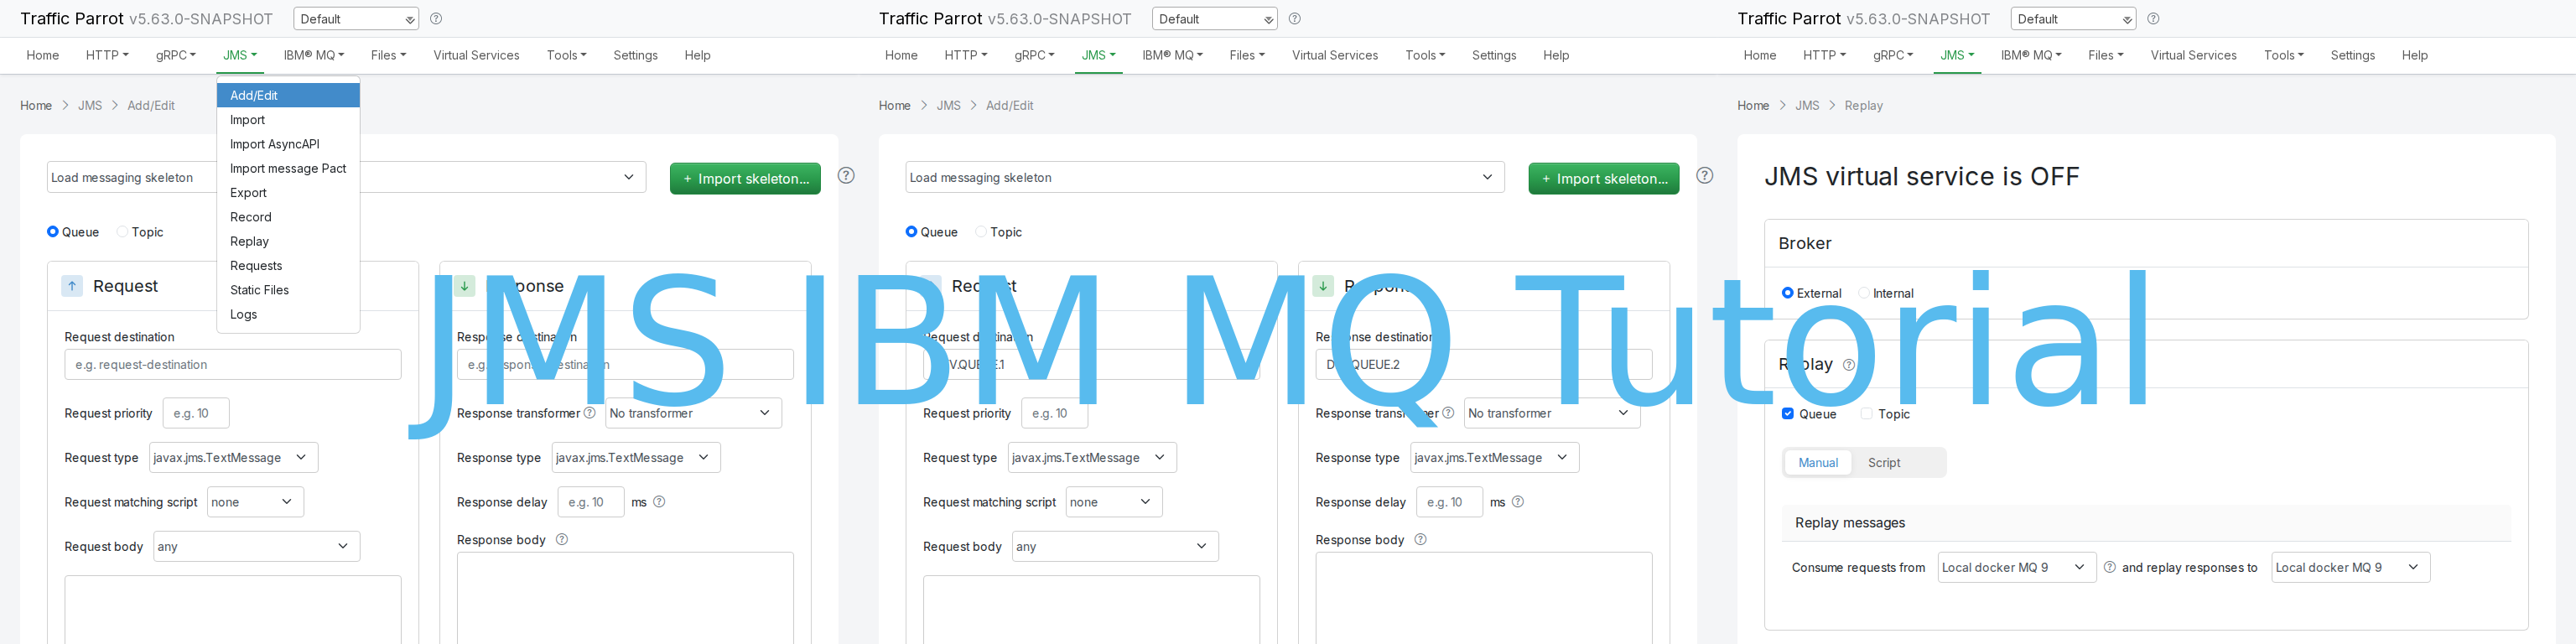
For a basic introduction with examples have a look at [Mocking and simulating JMS IBM® WebSphere MQ Tutorial](https://trafficparrot.com/tutorials/mocking-or-simulating-jms-ibm-websphere-mq.html).
[](https://trafficparrot.com/tutorials/mocking-or-simulating-jms-ibm-websphere-mq.html)
## JMS vs. Native IBM® MQ
Traffic Parrot supports IBM® MQ brokers via JMS and native IBM® MQ APIs. If you are connecting to the IBM® MQ broker via JMS, please use JMS in Traffic Parrot as well and follow the instructions below. If you are using native IBM® MQ APIs (no JMS), please follow the instructions from the [native IBM® MQ page](https://trafficparrot.com/documentation/5.65.x/ibmmq.html).
## JMS virtual service architecture
A tester uses a web browser to access the console. The console manages the virtual service. The system under test (application under test) connects directly to the virtual service on different ports.
Here is an example of how that could look like for a scenario where the virtual service is replaying messages to an external queue.
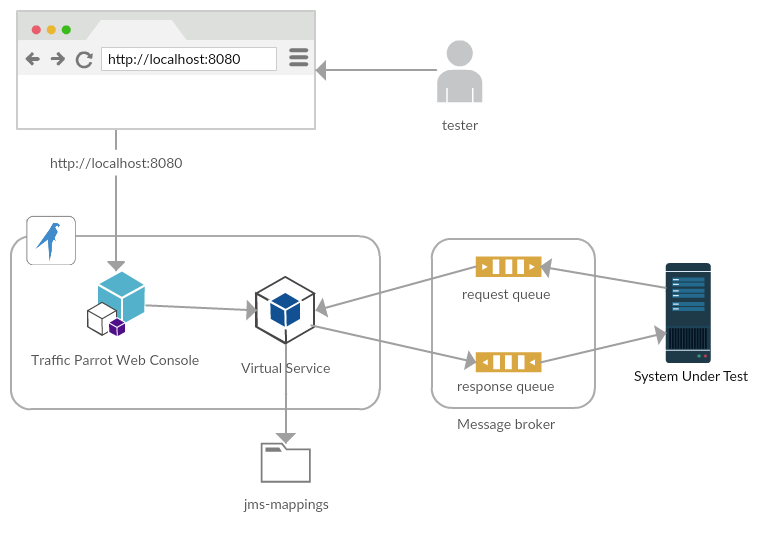 Virtual service replaying JMS messages to and from a queue
## JMS Configuration
##### Supported JMS brokers
- ActiveMQ TCP (internal broker or external broker)
- ActiveMQ AMQP 1.0 (internal broker or external broker)
- Azure AMQP 1.0 (external broker)
- RabbitMQ AMQP 0.9.1 (external broker)
- IBM® MQ (external broker)
##### Define JMS connections
To record from or replay to JMS brokers you will need to tell Traffic Parrot how to connect to them.
Those connections are displayed in the dropdown menus on the record and replay panels, for example: 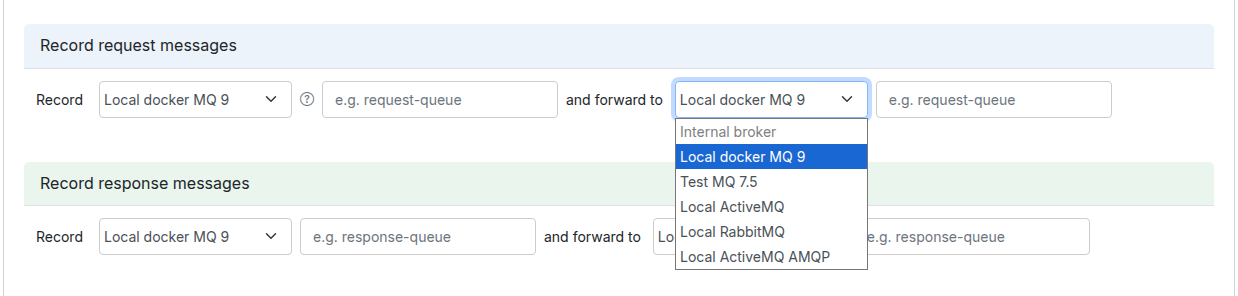
The "Internal broker" connection is available in the dropdown by default when you choose to use an internal broker in the Broker panel.
To define a new connection that will be available in the dropdown in the record and replay panels:
1. Open `jms-connections.json` file located in the main Traffic Parrot directory, using your [favourite](https://trafficparrot.com/documentation/5.65.x/faqs.html#favourite-editor) text editor
2. Add the new connections (make sure the connectionId field has a unique value!). An example content of the file, with 6 connections defined (two IBM MQ, one Active MQ TCP, one Azure AMQP 1.0, one RabbitMQ AMQP 0.9.1, one Active MQ AMQP 1.0):
```
[
{
"connectionId": "1",
"connectionName": "Test Payments Broker",
"connectionData": {
"jmsProvider": "IBM_MQ_7_5",
"hostname": "mqserver.example.com",
"port": 1415,
"queueManager": "PAYMENT.QM",
"channel": "PAYMENT.SVRCONN",
"username": "payuser",
"password": "paypassword222",
"useMQCSPAuthenticationMode": false,
"copyRequestMessageIdToResponseMessageId": false
}
},
{
"connectionId": "2",
"connectionName": "TrafficParrot External Payment Broker",
"connectionData": {
"jmsProvider": "IBM_MQ_7_5",
"hostname": "mqserver.example.com",
"port": 1414,
"queueManager": "TRAFFICPARROT.DEV.AWS.QM",
"channel": "TP.PUBLIC.JUNIT",
"username": "tpuser",
"password": "tppass333",
"useMQCSPAuthenticationMode": false,
"copyRequestMessageIdToResponseMessageId": false
}
},
{
"connectionId": "3",
"connectionName": "Test Order System Broker",
"connectionData": {
"jmsProvider": "ACTIVE_MQ",
"hostname": "localhost",
"port": 61616
}
},
{
"connectionId": "4",
"connectionName": "Azure AMQP",
"connectionData": {
"jmsProvider": "AZURE_AMQP_1_0",
"hostname": "namespace.servicebus.windows.net",
"sharedAccessKeyName": "SendListen",
"sharedAccessKey": "password"
}
},
{
"connectionId": "5",
"connectionName": "Local RabbitMQ",
"connectionData": {
"jmsProvider": "RABBIT_MQ_3",
"hostname": "localhost",
"virtualHost": "/",
"username": "guest",
"password": "guest",
"port": 5672,
"amqpCompatibilityMode": true,
"declareArguments" : {
"x-max-length": 10000,
"x-message-ttl": 60000
}
}
},
{
"connectionId": "6",
"connectionName": "Local ActiveMQ AMQP",
"connectionData": {
"jmsProvider": "ACTIVE_MQ",
"hostname": "localhost",
"port": 61617,
"protocol": "amqp"
}
}
]
```
3. `IBM_MQ_7_5`, `IBM_MQ_8` or `IBM_MQ_9` username and password are interpreted as `null` if set to `""` or `"null"` in the connection JSON configuration
- To configure a `""` value use `""`
- To configure a `"null"` value use `""`
4. Save the file
5. Refresh the page in Traffic Parrot to reload the dropdown list.
In the current Traffic Parrot version you edit JMS connections directly in the `jms-connections.json` file. In near future you will be able to do it via the Web UI as well.
###### Change the location of jms-connections.json
If you would like to change the location of the `jms-connections.json` file, [change the value of property](https://trafficparrot.com/documentation/5.65.x/user_guide.html#properties)
```
trafficparrot.virtualservice.jmsConnectionsUrl=classpath:jms-connections.json
```
to for example
```
trafficparrot.virtualservice.jmsConnectionsUrl=file:/home/john/git/project/trafficparrot-jms-connections.json
```
This can be useful if you would like to version control it with your application source code.
##### More than one broker or queue manager
To mock several brokers or IBM® MQ queue managers from one Traffic Parrot, for example one per test environment, give each its own [virtual service](https://trafficparrot.com/documentation/5.65.x/virtual_services.html#vs-configuration-jms): a folder `scenarios//` with its own `jms-connections.json`, its own `jms-mappings` and a `service.properties` naming the connection it consumes requests from and replies on. Each virtual service answers only on its own broker or queue manager, so two environments can use the same queue names and still get different replies. See the [worked example](https://trafficparrot.com/documentation/5.65.x/virtual_services.html#vs-configuration-jms-example) for two IBM® MQ queue managers.
##### Required JARs for IBM® MQ
To connect to IBM® MQ you need jar files provided by IBM that will allow Traffic Parrot to establish connections with MQ.
Before you proceed please read [these instructions](http://www-01.ibm.com/support/docview.wss?uid=swg21376217) to double check your actions are inline with the supported way to install WebSphere MQ Java jar files.
If you are running IBM® MQ version 8 and 9 you will need:
- `com.ibm.mq.jakarta.client.jar`
If you are running IBM® MQ version 7.5.x you will need:
- `com.ibm.mq.headers.jar`
- `com.ibm.mq.jar`
- `com.ibm.mq.jmqi.jar`
- `com.ibm.mqjms.jar`
- `dhbcore.jar`
- `jms.jar`
If you do not have the required JAR files yet, follow these instructions to get a copy:
- **Version 9 specific instructions:** Download the Jakarta client JAR library from [the maven central repository](https://mvnrepository.com/artifact/com.ibm.mq/com.ibm.mq.jakarta.client/), for example [com.ibm.mq.jakarta.client-10.0.0.5.jar](https://repo1.maven.org/maven2/com/ibm/mq/com.ibm.mq.jakarta.client/10.0.0.5/com.ibm.mq.jakarta.client-10.0.0.5.jar)
- **Version 8 specific instructions:** If you are using IBM MQ version 8.0.0.4 or later, you can also [download the redistributable client images](https://www.ibm.com/support/pages/downloading-ibm-mq-8004).
> **Upgrading from a previous version of Traffic Parrot?** Replace `com.ibm.mq.allclient.jar` with `com.ibm.mq.jakarta.client.jar` in your `lib/external/` folder. Existing javax.jms plugins continue to work without source changes. Note: support for javax-based plugins will be removed in a future major release; migrating your plugins to jakarta.jms is recommended as a next step.
> **Will my existing javax-based client applications still connect to Traffic Parrot?** **Yes.** The `javax.jms` → `jakarta.jms` change is an *API-level rename* only; the underlying IBM® MQ wire protocol is unchanged. Your customer applications built against `javax.jms` (with IBM's `com.ibm.mq.allclient.jar`) send the same bytes on the wire as applications built against `jakarta.jms` (with `com.ibm.mq.jakarta.client.jar`). Traffic Parrot using the Jakarta client will accept connections from javax clients, jakarta clients, .NET clients, and native MQI clients against the same queue manager, with no client-side changes required. See the [IBM MQ Classes for Jakarta Messaging overview](https://www.ibm.com/docs/en/ibm-mq/latest?topic=messaging-mq-classes-jakarta-overview) for background.
If you have any issues with obtaining the jar files please [contact us](https://trafficparrot.com/documentation/5.65.x/faqs.html#email-help).
Copy those files to `trafficparrot-x.y.z/lib/external` and restart Traffic Parrot.
##### Performance monitoring
You can enable additional logging that displays total processing time of JMS messages.
To enable set property:
```
trafficparrot.jms.monitorPerformance=true
```
You should then see INFO log lines that contain `"Total processing time"`, for example:
```
2026-10-07 08:42:34,440 INFO QueueReplayService-jms-vs-Default-10 Request JMS message 'ID:9cd5a1f0-6b2e-4c7d-8e9f-0a1b2c3d4e5f-1:1:1:1:1' was received on '2026-10-07T07:42:34.418311765Z' from 'QUEUE:DEV.QUEUE.1'. Request message putDateTime is '2026-10-07T07:42:34.413Z'. Response JMS message 'ID:9cd5a1f0-6b2e-4c7d-8e9f-0a1b2c3d4e5f-6:1:7:1:1' was sent on '2026-10-07T07:42:34.439522256Z' to 'QUEUE:DEV.QUEUE.2'. Total processing time 21ms
```
You can increase the logging level by setting it to DEBUG or TRACE, add this line at the end of `trafficparrotserver.log4j.properties`:
```
log4j.category.com.trafficparrot.messaging.jms.connection.monitor.ReportingJmsPerformanceMonitor=DEBUG
```
## Recording and replaying JMS
### Introduction
As with HTTP recording Traffic Parrot, during recording incoming and outgoing messages are matched up to provide mappings. Then upon playback receipt of a matching incoming message will trigger generation of an outgoing message.
### Message matching
Traffic Parrot can form mappings in a number of ways.
- Time: pair messages in the order they happened in time
- Correlation ID: pair messages with matching correlation id
The default is to use time based matching. This can be changed in the advanced parameter section of the record page.
### Recording and replaying JMS Queues using an internal broker
The method which requires least configuration is to use Traffic Parrot's internal broker. Via this method you can record traffic to and from your application by just modifying the broker URL to which your application connects.
This diagram shows how two production systems connect:
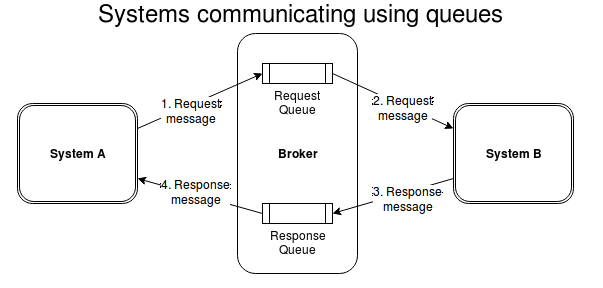
One system generates messages onto a queue; another system consumes these messages and puts responses onto a second queue, which the first system consumes. If our goal is to test the system-under-test in isolation, we must record these interactions in order to replay them.
### Recording JMS Queues using an internal broker
As you can see in the diagram, the recording simply introduces two extra queues, to which the system under test connects, as shown in the diagram below:
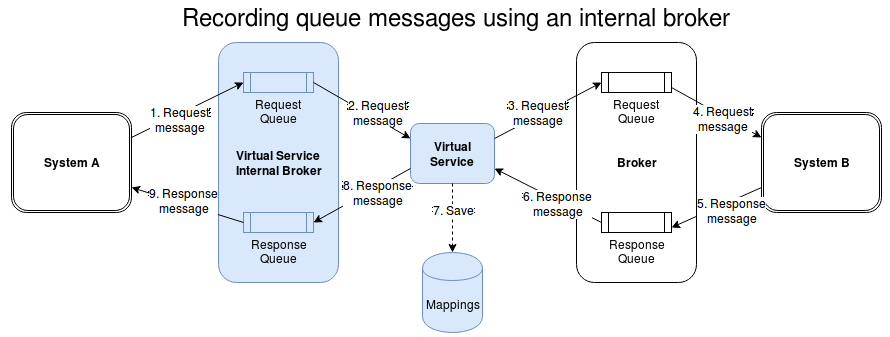
##### Steps to perform a queue recording using an internal broker
1. [Define JMS connections](#define-jms-connections) that will be used for recording
2. [Start](https://trafficparrot.com/documentation/5.65.x/user_guide.html#start-and-stop) Traffic Parrot
3. Go to the [JMS record page](http://localhost:8080/jms/record.html)
4. Select "Internal" in the "Broker" panel
5. Select "Queue"
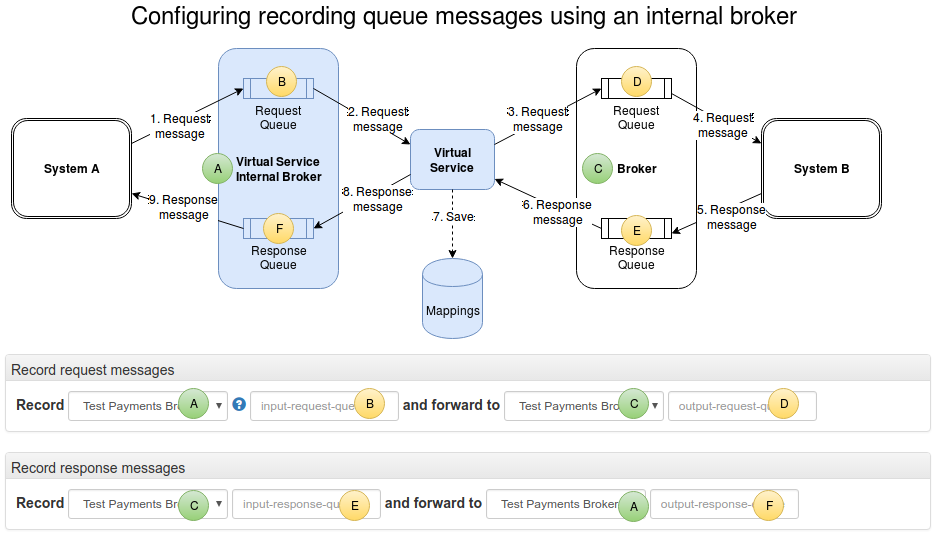
6. Choose the jms connections to brokers, and specify the queue name where messages will be received and responses sent. Follow the diagram [Configuring recording queue messages using an internal broker](#configuring_recording_queue_messages_using_internal_broker) which will guide you how to populate those fields.
7. Click "Turn on"
8. Reconfigure System A to connect to the virtual service broker
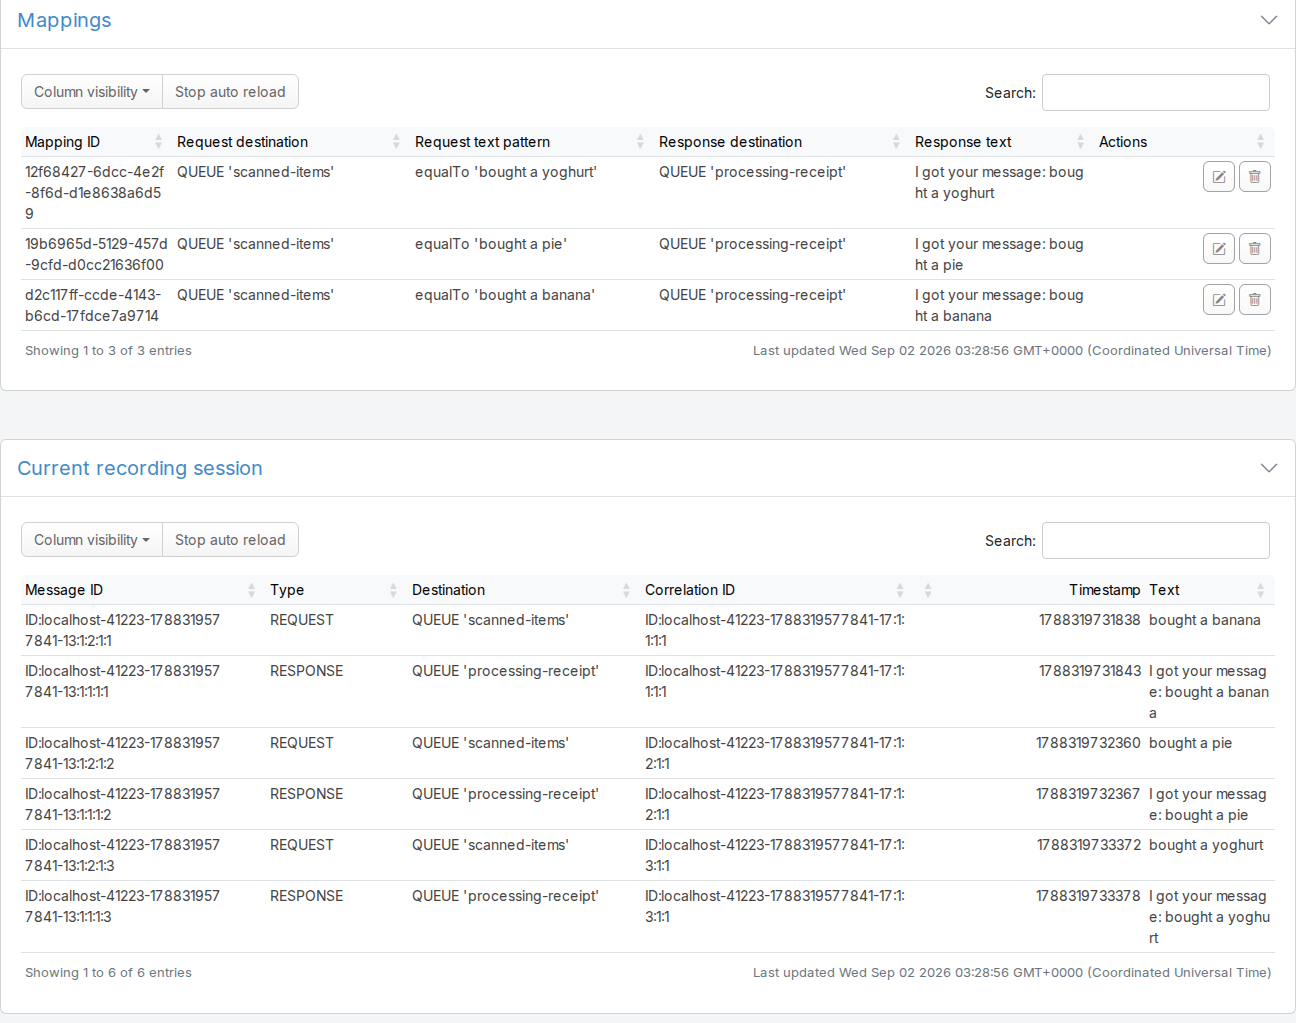
9. Execute a test case via System A to allow Traffic Parrot to record requests and responses. They will appear on the Messages and Mappings lists on the web page as shown on [Mappings and messages lists during recording](#mappings-and-messages-lists-during-queue-recording) image.
10. Click "Turn off"
As the system-under-test generates messages they are listed in the bottom table 'Current recording session'. As the second system generates responses to these messages, they are also listed at the bottom, but in addition mappings are generated in the 'Mappings' table showing incoming and outgoing messages that Traffic Parrot has paired up.
##### Mappings and messages lists during a queue recording
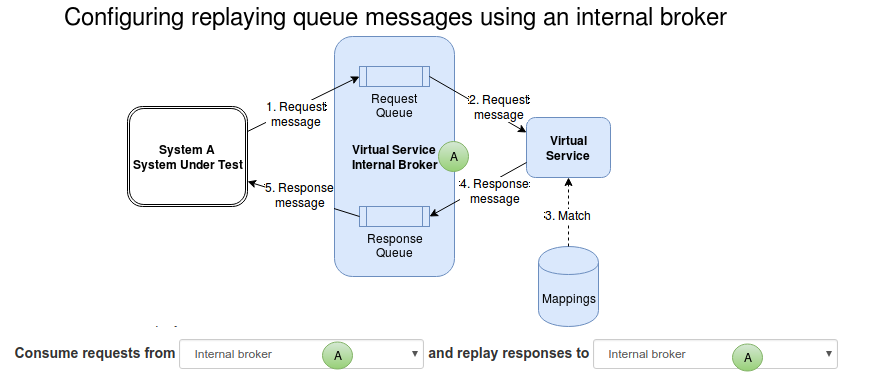
### Replaying JMS Queue messages using an internal broker
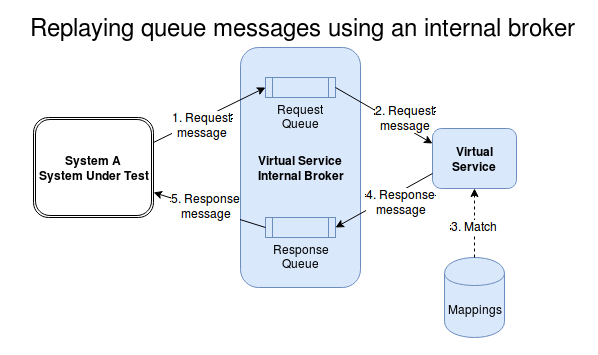
To replay the recorded mappings we will use the internal broker and connect the system under test to it.
##### Steps to perform a queue replay using an internal broker
1. [Start](https://trafficparrot.com/documentation/5.65.x/user_guide.html#start-and-stop) Traffic Parrot
2. Go to the [JMS replay page](http://localhost:8080/jms/replay.html)
3. Select "Internal" in the "Broker" panel
4. Select "Queue"
5. Choose the jms connections to broker "Internal broker" as shown on the [Configuring recording queue messages using an internal broker](#configuring_replaying_queue_messages_using_internal_broker) diagram.
6. Click "Turn on"
7. Reconfigure System A to connect to the virtual service broker
8. Execute a test case via System A to allow Traffic Parrot to consume a request message and send a response message.
9. Click "Turn off"
### Recording and replaying JMS Queues using an external broker
In this scenario we don't want to use Traffic Parrot's internal broker - we want Traffic Parrot to work with an existing external broker. This scenario is useful mainly when you would like to work with brokers that are unsupported internally by Traffic Parrot, for example IBM® MQ.
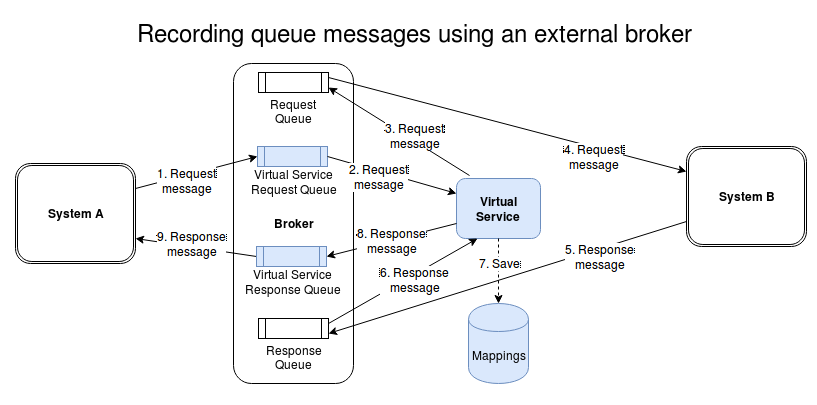
### Recording JMS Queues using an external broker
Instead of pointing the system under test at a different broker, we will create extra queues on our existing broker that will be used by the virtual service. Then we will reconfigure the system-under-test to connect to these queues instead of the original ones. Traffic Parrot will move messages between these queues and the original queues, recording and creating mappings as it does so.
##### Steps to perform a queue recording using an external broker
1. Add the queues that will be used by the virtual service to the broker. In the example above you would add to the existing broker queues "Virtual Service Request Queue" and "Virtual Service Response Queue" (Note - depending on your broker and it's configuration these queues may be auto-created for you when the software first attempts to connect.)
2. [Define JMS connections](#define-jms-connections) that will be used for recording
3. [Start](https://trafficparrot.com/documentation/5.65.x/user_guide.html#start-and-stop) Traffic Parrot
4. Go to the [JMS record page](http://localhost:8080/jms/record.html)
5. Select "External" in the "Broker" panel
6. Select "Queue"
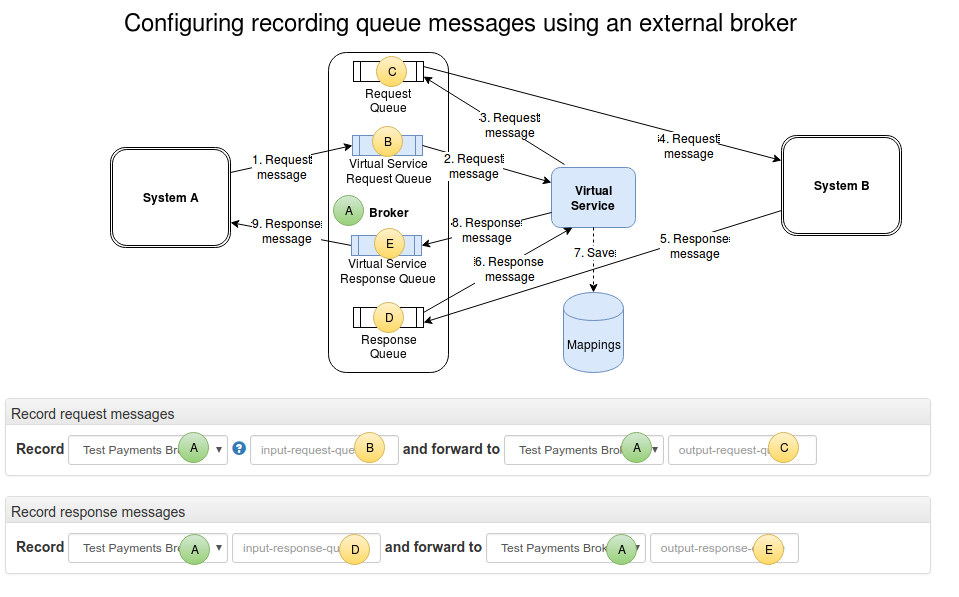
7. Choose the jms connections to brokers, and specify the queue name where messages will be received and responses sent. Follow the diagram [Configuring recording queue messages using an external broker](#configuring_recording_queue_messages_using_an_external_broker) which will guide you how to populate those fields.
8. Click "Turn on"
9. Reconfigure System A to connect to the virtual service queues
10. Execute a test case via System A to allow Traffic Parrot to record requests and responses. They will appear on the Messages and Mappings lists on the web page as shown on [Mappings and messages lists during recording](#mappings-and-messages-lists-during-queue-recording) image.
11. Click "Turn off"
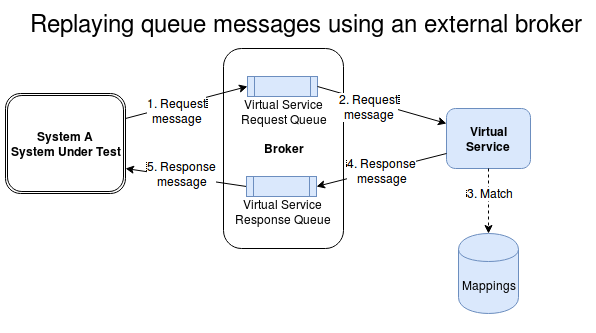
### Replaying JMS Queues using an external broker
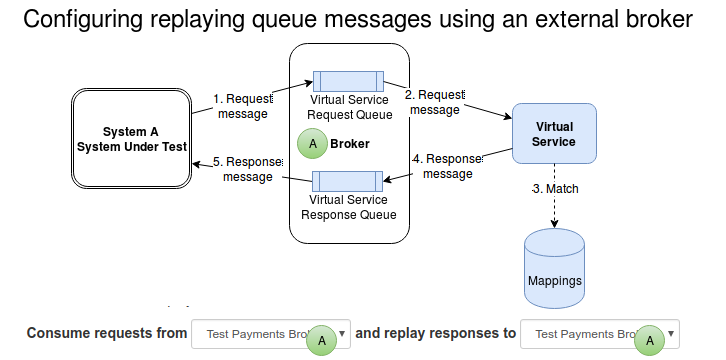
To replay the recorded mappings we will need the same virtual service queues in place as shown on the image below.
##### Steps to perform a queue replay using an external broker
1. Add the queues that will be used by the virtual service to the broker. In the example above you would add to the existing broker queues "Virtual Service Request Queue" and "Virtual Service Response Queue" (Note - depending on your broker and it's configuration these queues may be auto-created for you when the software first attempts to connect.)
2. [Start](https://trafficparrot.com/documentation/5.65.x/user_guide.html#start-and-stop) Traffic Parrot
3. Go to the [JMS replay page](http://localhost:8080/jms/replay.html)
4. Select "External" in the "Broker" panel
5. Select "Queue"
6. Choose the jms connections as shown on the [Configuring recording queue messages using an external broker](#configuring_replaying_queue_messages_using_an_external_broker) diagram.
7. Click "Turn on"
8. Reconfigure System A to connect to the virtual service broker
9. Execute a test case via System A to allow Traffic Parrot to consume a request message and send a response message.
10. Click "Turn off"
### Recording and replaying JMS Topics using an internal broker
You can use Traffic Parrot's internal broker to record and replay topic messages. For the purpose fo the examples below, we will use a configuration where the production systems connect in a way described on the diagram below:
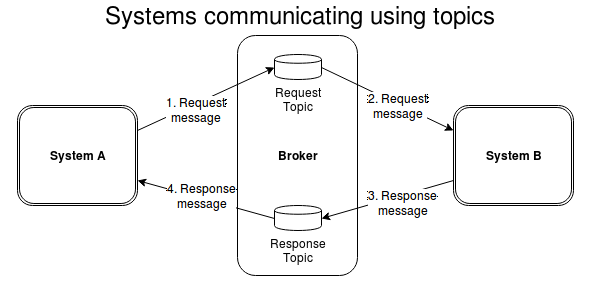
The system-under-test generates messages onto a topic which are received by a number of other systems. One of these systems generates responses onto a different topic (which are received by a number of systems, one of which is the system-under-test).
### Recoding JMS topics using an internal broker
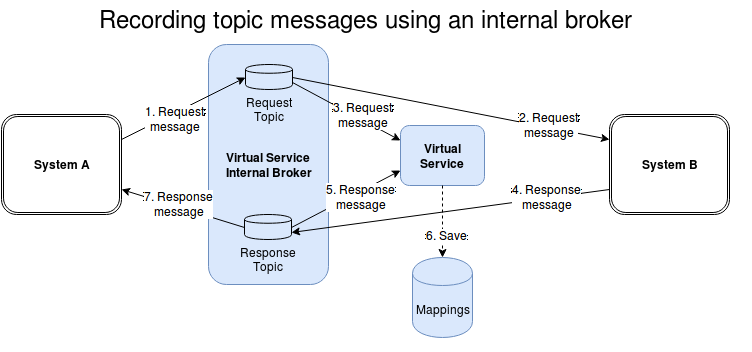
We will configure Traffic Parrot to connect to the request and response topics and record the messages appearing on both, generating mappings as it goes, as shown on diagram [Recording topics using an internal broker](#recording_topics_using_an_internal_broker)
##### Steps to perform a topic recording using an internal broker
1. [Define JMS connections](#define-jms-connections) that will be used for recording
2. [Start](https://trafficparrot.com/documentation/5.65.x/user_guide.html#start-and-stop) Traffic Parrot
3. Go to the [JMS record page](http://localhost:8080/jms/record.html)
4. Select "Internal" in the "Broker" panel
5. Select "Topic"
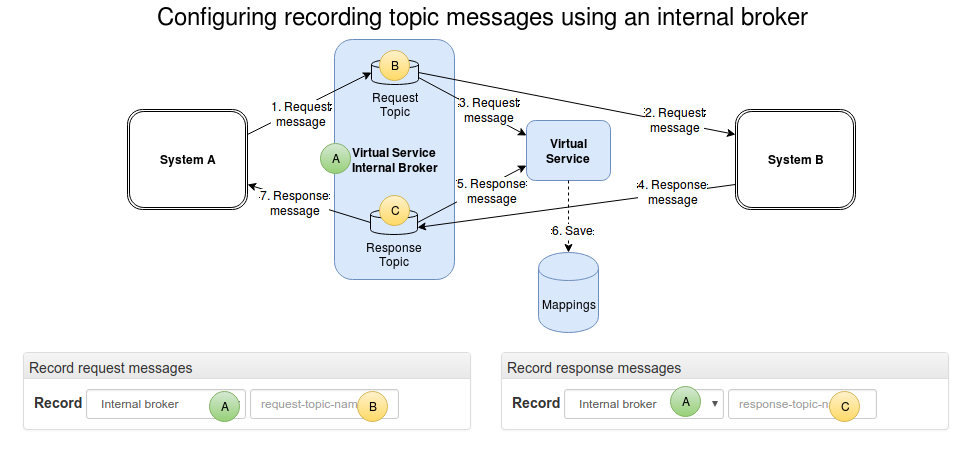
6. Choose the jms connection to the "Internal broker", and specify the topic names where messages will be received and responses sent. Follow the diagram [Configuring recording topics using an internal broker](#configuring_recording_topics_using_an_internal_broker) which will guide you how to populate those fields.
7. Click "Turn on"
8. Reconfigure System A to connect to the virtual service queues
9. Execute a test case via System A to allow Traffic Parrot to record requests and responses. They will appear on the Messages and Mappings lists on the web page as shown on [Mappings and messages lists during topic recording](#mappings-and-messages-lists-during-topic-recording) image.
10. Click "Turn off"
#### Replaying JMS Topics using an internal broker
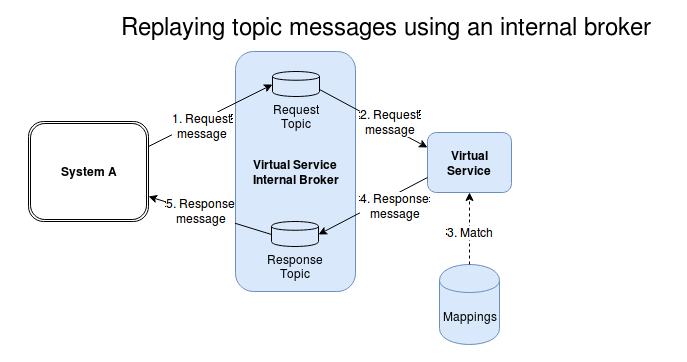
When replaying to an internal broker Traffic Parrot will subscribe to the request topic and publish to the response topic as shown in the diagram [Replaying topic messages using an internal broker](#replaying_topics_using_an_internal_broker).
##### Steps to perform a topic replay using an internal broker
1. [Start](https://trafficparrot.com/documentation/5.65.x/user_guide.html#start-and-stop) Traffic Parrot
2. Go to the [JMS replay page](http://localhost:8080/jms/replay.html)
3. Select "Internal" in the "Broker" panel
4. Select "Topic"
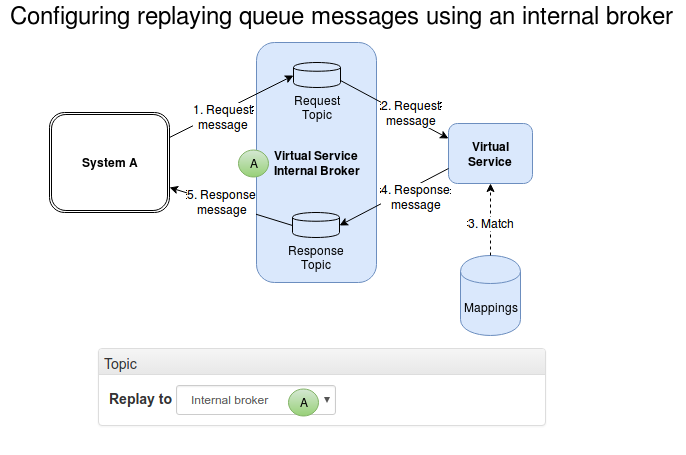
5. Choose the jms connection as shown on the [Configuring replaying topics messages using an internal broker](#configuring_replaying_topics_messages_using_an_internal_broker) diagram.
6. Click "Turn on"
7. Disconnect System B from the broker so it does not produce response messages to the response topic
8. Execute a test case via System A to allow Traffic Parrot to consume a request message and send a response message.
9. Click "Turn off"
### Recording and replaying JMS Topics using an external broker
Recording and playback of topics using an external broker is less intrusive than queues or internal broker topics, because Traffic Parrot can subscribe to a topic just like any other application and receive messages, without affecting the delivery of those messages to other applications.
This diagram shows how the production systems connect:

The system-under-test generates messages onto a topic which are received by a number of other systems. One of these systems generates responses onto a different topic (which are received by a number of systems, one of which is the system-under-test).
### Recoding JMS topics using an external broker
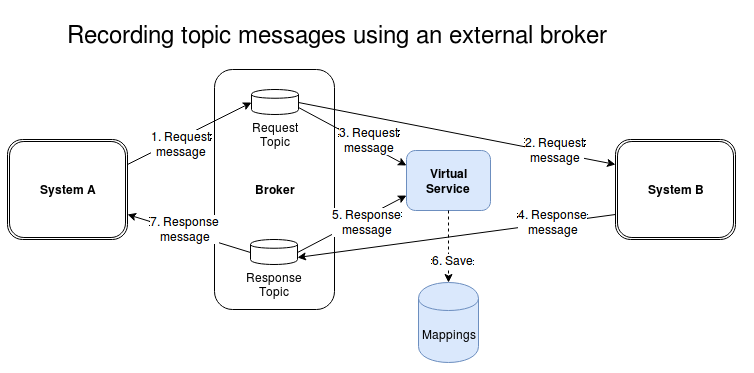
We will configure Traffic Parrot to connect to the request and response topics and record the messages appearing on both, generating mappings as it goes, as shown on diagram [Recording topics using an external broker](#recording_topics_using_an_external_broker)
##### Steps to perform a topic recording using an external broker
1. [Define JMS connections](#define-jms-connections) that will be used for recording
2. [Start](https://trafficparrot.com/documentation/5.65.x/user_guide.html#start-and-stop) Traffic Parrot
3. Go to the [JMS record page](http://localhost:8080/jms/record.html)
4. Select "External" in the "Broker" panel
5. Select "Topic"
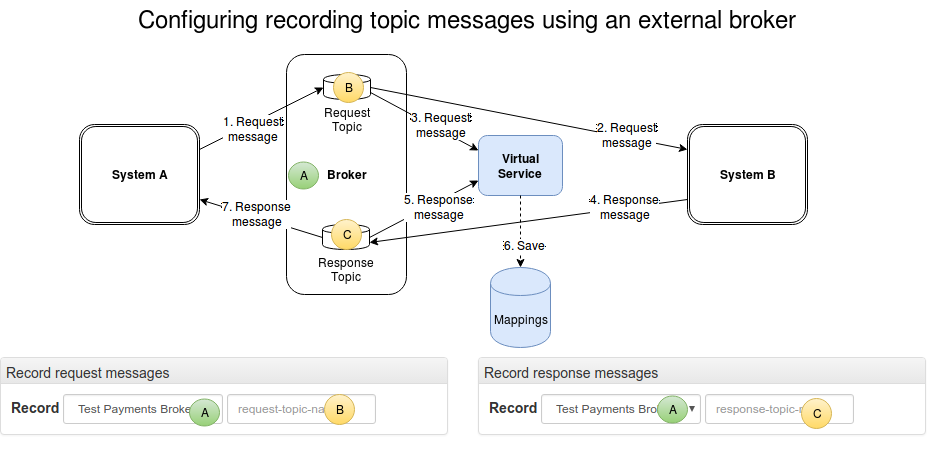
6. Choose the jms connections to brokers, and specify the topic names where messages will be received and responses sent. Follow the diagram [Configuring recording topics using an external broker](#configuring_recording_topics_using_an_external_broker) which will guide you how to populate those fields.
7. Click "Turn on"
8. Reconfigure System A to connect to the virtual service queues
9. Execute a test case via System A to allow Traffic Parrot to record requests and responses. They will appear on the Messages and Mappings lists on the web page as shown on [Mappings and messages lists during recording](#mappings-and-messages-lists-during-topic-recording) image.
10. Click "Turn off"
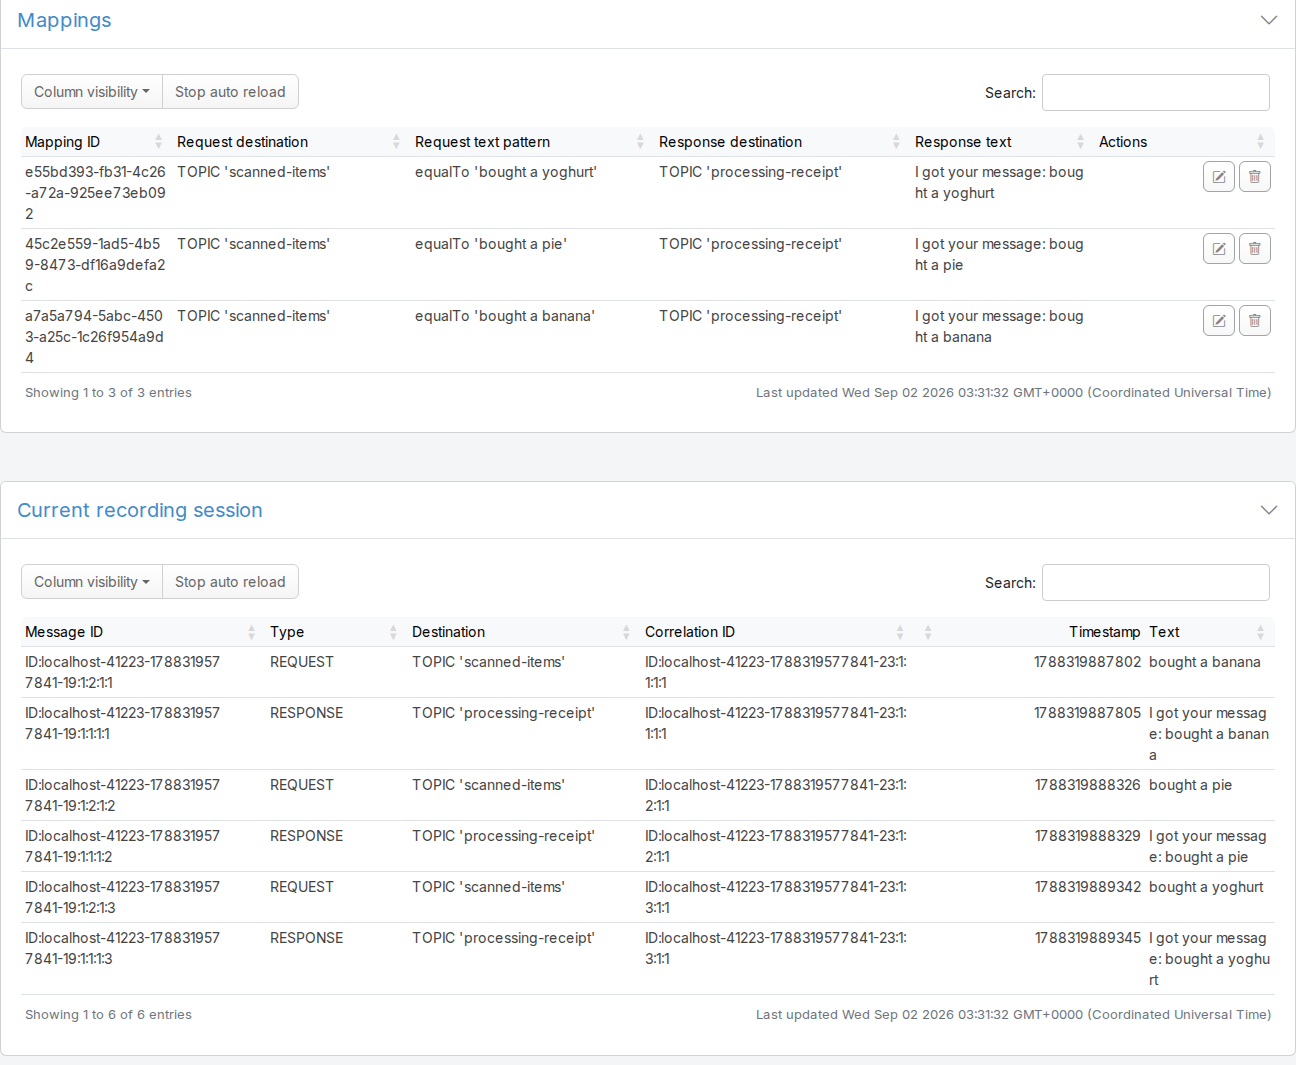
As the system-under-test generates messages they are listed in the bottom table 'Current recording session'. As the second system generates responses to these messages, they are also listed at the bottom, but in addition mappings are generated in the 'Mappings' table showing incoming and outgoing messages that Traffic Parrot has paired up.
##### Mappings and messages lists during a topic recording
#### Replaying JMS Topics using an external broker
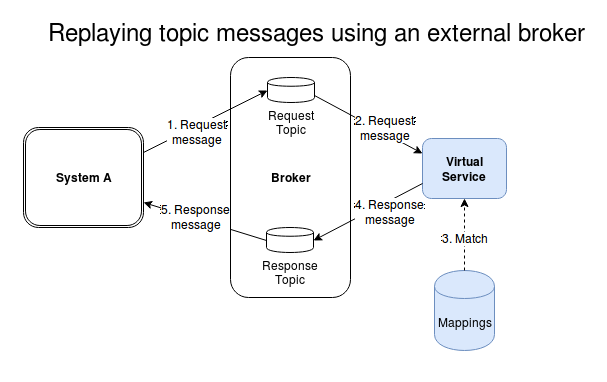
When replaying to an external broker Traffic Parrot will subscribe to the request topic and publish to the response topic as shown in the diagram [Replaying topic messages using an external broker](#replaying_topics_using_an_external_broker).
##### Steps to perform a topic replay using an external broker
1. [Start](https://trafficparrot.com/documentation/5.65.x/user_guide.html#start-and-stop) Traffic Parrot
2. Go to the [JMS replay page](http://localhost:8080/jms/replay.html)
3. Select "External" in the "Broker" panel
4. Select "Topic"
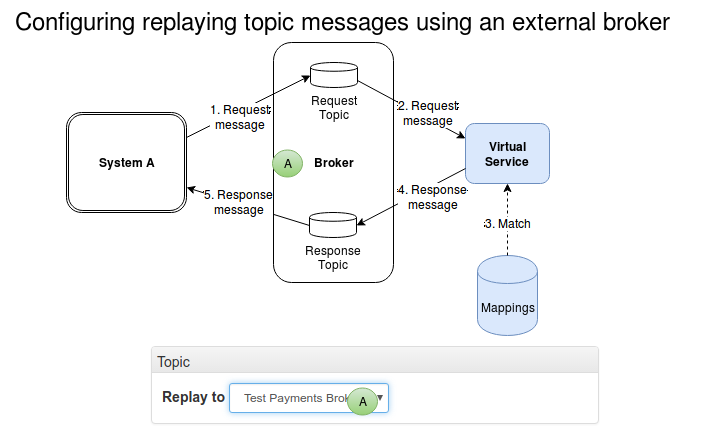
5. Choose the jms connection as shown on the [Configuring replaying topics messages using an external broker](#configuring_replaying_topics_messages_using_an_external_broker) diagram.
6. Click "Turn on"
7. Disconnect System B from the broker so it does not produce response messages to the response topic
8. Execute a test case via System A to allow Traffic Parrot to consume a request message and send a response message.
9. Click "Turn off"
## Import and export JMS mappings
### How to export
Go to JMS in the top navigation bar and then click Export. Click the button to download a ZIP file that contains all of the JMS mappings and data files.
The ZIP file contains the following directories:
- `mappings/`: JMS stub mappings in JSON format
- `data/`: data directory files
### How to import
Go to JMS in the top navigation bar and then click Import. Select a ZIP file that was previously exported and it will be uploaded and the mappings and data files will be restored.
## Import an AsyncAPI specification
[AsyncAPI](https://www.asyncapi.org/) is an open specification for describing event-driven and message-based APIs (its channels, operations and message schemas) in the same way that OpenAPI describes HTTP APIs. If your team already documents its messaging APIs with AsyncAPI, you can create JMS mappings directly from that document instead of writing them by hand.
Go to **JMS** in the top navigation bar and then click **Import AsyncAPI**. Upload a JSON or YAML **AsyncAPI 2.x or 3.0** document and Traffic Parrot generates one JMS mapping per importable channel operation, each serving an example payload generated from the operation's message schema.
### Preview and select before importing
After you upload the document, Traffic Parrot shows a preview of the mappings it would create so you can review and select exactly which ones to import.
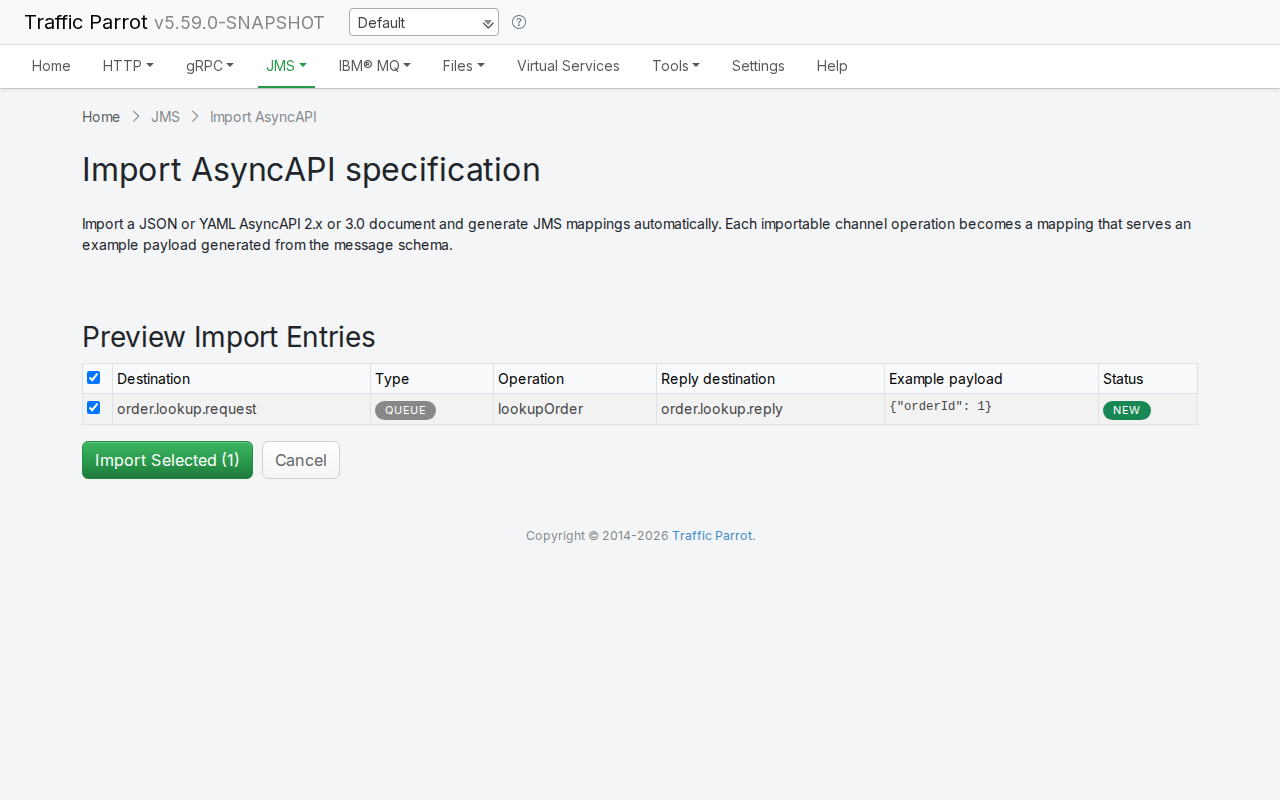
The preview table lists one row per importable operation, with the following columns:
- **Destination**: the channel name the operation maps to
- **Type**: `QUEUE` or `TOPIC`, taken from the channel's `jms` or `ibmmq` binding
- **Operation**: the AsyncAPI operation id (for example `publishOrderCreated`)
- **Reply destination**: for an AsyncAPI 3.0 request-reply operation (one that carries a `reply` object), the reply channel the response is published to; blank for a one-way operation
- **Example payload**: the example message generated from the operation's message schema
- **Status**: a green **New** badge for an operation that does not match an existing mapping
Each row has a checkbox. Use the header checkbox to select or deselect all rows at once, or toggle individual rows. The **Import Selected** button shows the count of selected rows. Click it to create JMS mappings only for the checked operations, or click **Cancel** to discard the preview and return to the file selector.
If the document is malformed, is not a supported AsyncAPI version, or contains no importable operations, the page reports a clear error and no mappings are created.
### What gets created
Each selected operation becomes a JMS mapping whose request matches any message on the channel destination and whose response is the example payload generated from the message schema. You can then open the mapping in the [JMS editor](#edit-jms) to refine the request matchers, response body, properties or delay just like any other JMS mapping.
For an AsyncAPI 3.0 operation that carries a `reply` object, Traffic Parrot creates a **request-reply** mapping instead: it still receives the request on the operation's own channel, but it publishes the response on the **reply channel's** destination (shown in the **Reply destination** column of the preview), and the response is the example payload generated from the **reply** message's schema. A one-way operation continues to echo its example back on the same channel as before.
The same import flow is also available for native IBM® MQ; see [Import an AsyncAPI specification](https://trafficparrot.com/documentation/5.65.x/ibmmq.html#import-asyncapi-mq) on the native IBM® MQ page.
##### Supported scope
Traffic Parrot supports both **AsyncAPI 2.x** and **AsyncAPI 3.0** documents with the **JMS** and **IBM® MQ** channel bindings. For a 3.0 document, the destination is taken from the channel's `address` (falling back to the channel name). The destination **type** is taken from the channel binding: it is a `TOPIC` when either the `jms` or the `ibmmq` binding declares `destinationType: topic` (case-insensitive); otherwise it defaults to a `QUEUE` (so a document with no binding, or one whose `destinationType` is absent, empty or unrecognised, imports as a queue). Both one-way publish/subscribe operations (`send` and `receive`) and request-reply operations (those that carry a `reply` object) are imported; a request-reply operation publishes the reply message's example on the reply channel's destination.
Other channel bindings (AMQP, Kafka, MQTT) and AsyncAPI 4.x are not yet supported. Message payload schemas use JSON Schema (draft-07 for 2.x, draft 2020-12 for 3.0); Traffic Parrot generates an example from common schema constructs, and renders a placeholder payload for advanced constructs it cannot yet turn into an example (for example `$defs` with internal `$ref`, `patternProperties`, `prefixItems`, `const`, `if`/`then`/`else` and `additionalProperties`). You can edit any generated payload in the editor afterwards.
## Messaging skeletons
Messaging skeletons offer a quick way to pre-fill a JMS mapping form from an operation declared in an imported [AsyncAPI](https://www.asyncapi.org/) specification, in the same way the [HTTP skeletons](https://trafficparrot.com/documentation/5.65.x/http.html#http-skeletons) and gRPC skeletons dropdowns pre-fill their forms. Where [Import AsyncAPI](#import-asyncapi-jms) creates mappings for many operations at once, the skeletons dropdown is for hand-crafting a single mapping that starts from a declared operation.
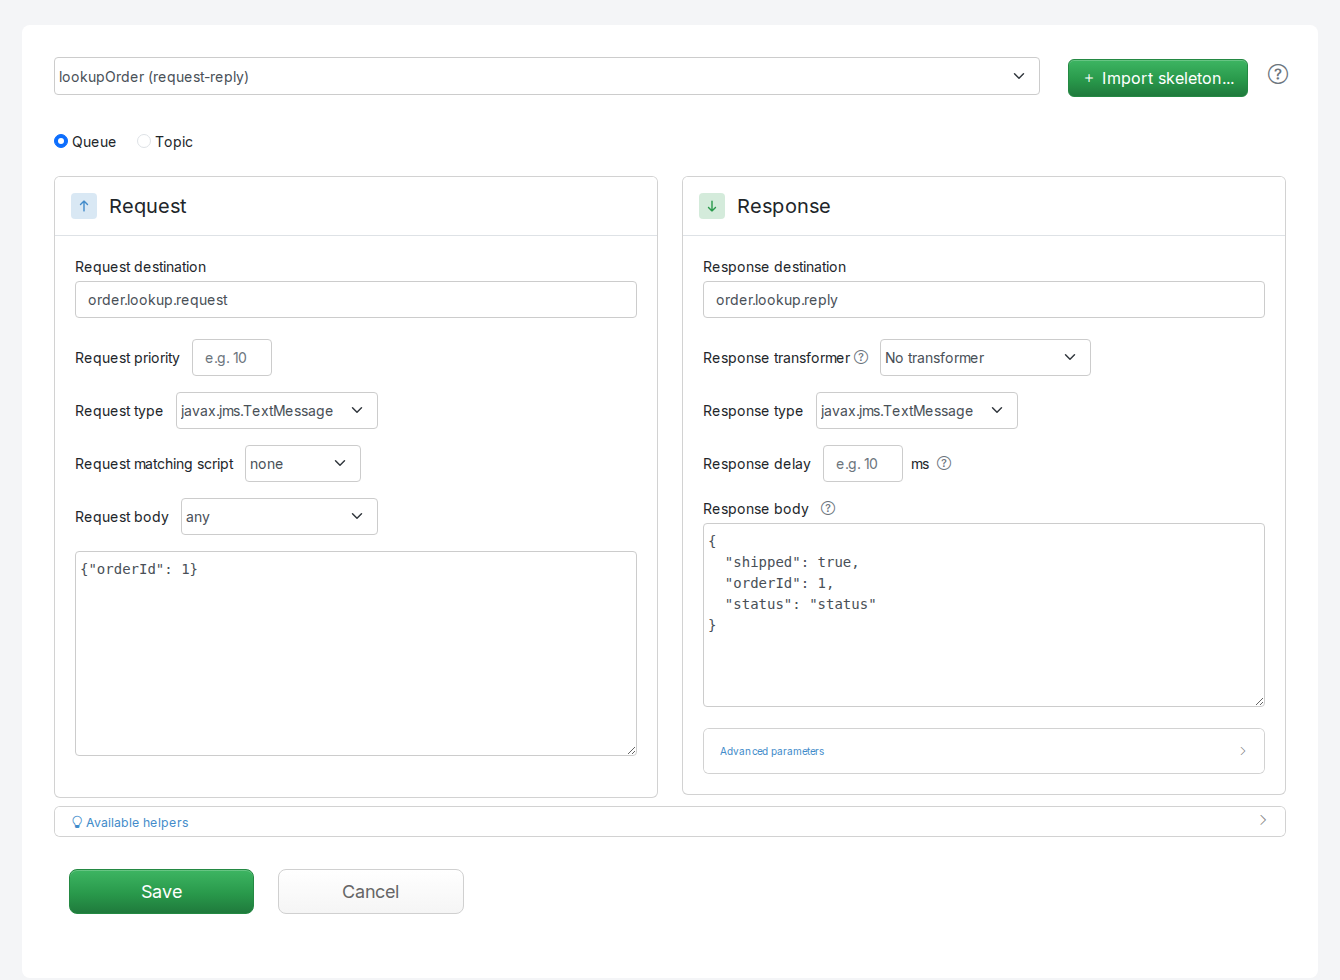
On the JMS **Add/Edit** page, pick an operation from the **skeletons** dropdown above the form. The form's destination name, destination type (the **Queue** / **Topic** radio) and request body/payload pre-fill from the selected operation. You can then edit any field before saving, just like a mapping you wrote by hand.
To edit the list of operations on the skeletons dropdown, place [AsyncAPI specifications](https://www.asyncapi.org/) (JSON or YAML, AsyncAPI 2.x or 3.0) into the `trafficparrot-x.y.z/asyncapi` configuration directory, the same directory the [messaging coverage check](#validate-messaging) reads. Each declared operation becomes an entry in the dropdown.
Alternatively, you can use the import button beside the dropdown to upload an AsyncAPI specification directly. If you import a file with the same name as a file that was previously imported, it will be overwritten.
### Request-reply operations
For a request-reply operation the dropdown option is labelled ` (request-reply)`, and selecting it pre-fills **both** the request side (destination name, type and request body) **and** the reply side (a cloned response row carrying the reply destination name and reply body). This works for AsyncAPI 3.0-native `reply` operations and for AsyncAPI 2.x operations paired by a shared correlation id.
## Messaging coverage check
The headless `trafficparrot.sh validate` command (`trafficparrot.exe validate` on Windows) also checks your **messaging** mappings against your imported [AsyncAPI](https://www.asyncapi.org/) specifications, so you can run it as a step in a continuous integration pipeline. AsyncAPI is the messaging contract, exactly as OpenAPI is the contract for HTTP and proto files are for gRPC. The same command also validates HTTP mappings against OpenAPI specifications and gRPC mappings against proto files, and checks every JMS, native IBM® MQ, file message and HTTP mapping file against the [mapping schema](https://trafficparrot.com/documentation/5.65.x/generate-mocks-with-ai-agent.html#agents-md) for its format (see [Checking mappings against their schemas](https://trafficparrot.com/documentation/5.65.x/http.html#validate-cli-mapping-schema)); for the shared usage, exit codes, and CI-pipeline details see the full [validate CLI reference](https://trafficparrot.com/documentation/5.65.x/http.html#validate-cli).
### Messaging under-coverage
The command enumerates the operations declared in your imported AsyncAPI specifications and reports any declared operation that has no backing messaging mapping, whether JMS, native IBM® MQ or file-message. This means a partially-mocked messaging API cannot silently drift from its contract. The AsyncAPI specifications are read from `/asyncapi/` (the messaging analogue of the HTTP `openapi/` and gRPC `proto/` directories; JSON or YAML, AsyncAPI 2.x or 3.0; all files in the directory are aggregated before the check runs). For example, a specification declaring an operation on the `orders` queue with no mapping that backs it reports:
```
Some AsyncAPI operations have no backing messaging mapping (under-coverage): (1)
No mapping covers AsyncAPI operation: QUEUE:orders
To intentionally leave a messaging destination unmocked, list it in messaging-coverage.properties (alongside the mappings) under exclude.destinations, e.g. exclude.destinations=QUEUE:orders, TOPIC:events
```
A declared operation is matched to a mapping by its **destination identity**: the destination name and type written as `TYPE:name`, where `TYPE` is `QUEUE` or `TOPIC` (for example `QUEUE:orders` or `TOPIC:events`). The same identity is used in the report and in the allowlist below. A `TOPIC` mapping never covers a `QUEUE` operation of the same name, and the reverse.
For a request-reply operation, coverage is measured on the **inbound (request)** destination only; the reply destination is the mock's output, not a coverage target.
If there are no AsyncAPI specifications (no declared operations), the messaging under-coverage check contributes nothing and passes silently.
### Allowlisting destinations you do not mock
If your virtual service intentionally mocks only part of a messaging API, you can mark the remaining destinations as deliberately unmocked so that they do not fail the under-coverage check. Create a file named `messaging-coverage.properties` in the files-root directory (alongside the mappings and the `asyncapi/` directory) and list the excluded destinations in the `exclude.destinations` property:
```
exclude.destinations=QUEUE:orders, TOPIC:events
```
Each entry is a `TYPE:name` destination token, where `TYPE` is `QUEUE` or `TOPIC`, written exactly as it appears in the report. Entries are separated by commas. If the file is absent, no destinations are excluded.
To stop the allowlist from quietly going stale, an `exclude.destinations` entry for a destination that is not present in any AsyncAPI specification is itself reported as drift and causes a non-zero exit code, with the message `Allowlist excludes a destination not present in the AsyncAPI specification: `. Remove or correct an entry once the destination it refers to no longer appears in the specifications.
### Using it in a CI pipeline
Messaging drift participates in the same report and the same exit codes as the HTTP and gRPC checks: a declared operation with no backing mapping fails the build (exit code `1`) the same way a renamed or removed HTTP endpoint does. Run the command as a pipeline step and check its exit status, exactly as described in [Using it in a CI pipeline](https://trafficparrot.com/documentation/5.65.x/http.html#validate-cli-ci) in the validate CLI reference.
## Import a message Pact contract
[Pact](https://docs.pact.io/) is a consumer-driven contract format. As well as the HTTP interactions you can [import as HTTP stubs](https://trafficparrot.com/documentation/5.65.x/http.html#import-http-pact), a Pact contract can describe **asynchronous message** interactions: the messages a provider publishes for a consumer to handle. If your team captures its messaging contracts as Pact files, you can create JMS mappings directly from them instead of writing them by hand.
Go to **JMS** in the top navigation bar and then click **Import message Pact**. Upload a Pact `.json` file and Traffic Parrot generates one JMS mapping per message interaction in the contract, each publishing the message's example payload.
> **Two contract shapes are accepted.** A Pact specification **v3** contract carries its messages in a top-level `messages[]` array. A specification **v4** contract carries them as `interactions[]` entries whose `type` is `Asynchronous/Messages`. Both are detected automatically. An HTTP-only Pact contract (one with no message interactions) is rejected with a message pointing you to the [HTTP Pact import](https://trafficparrot.com/documentation/5.65.x/http.html#import-http-pact) instead.
### Preview and select before importing
After you upload the file, Traffic Parrot shows a preview of the mappings it would create so you can review and select exactly which ones to import.
The preview table lists one row per message interaction, with the following columns:
- **Destination**: the queue or topic the message is published to, [derived](#import-message-pact-jms-destination) from the contract
- **Type**: `QUEUE` or `TOPIC` (see [how the destination is derived](#import-message-pact-jms-destination))
- **Operation**: the message's `description` from the contract, used as the operation id
- **Reply destination**: always blank for a message Pact, because message interactions are [one-way](#import-message-pact-jms-result) (there is no reply)
- **Example payload**: the message's example `contents` from the contract, which is what the mapping will publish
- **Status**: a green **New** badge for a message whose derived destination does not match an existing mapping, or a **Duplicate** badge when it does
Each row has a checkbox. New rows are checked by default and duplicate rows are left unchecked. Use the header checkbox to select or deselect all rows at once, or toggle individual rows. The **Import Selected** button shows the count of selected rows. Click it to create JMS mappings only for the checked messages, or click **Cancel** to discard the preview and return to the file selector.
If the file cannot be parsed as JSON, or contains no message interactions, the page reports a clear error and no mappings are created.
### How the destination is derived
A Pact message interaction describes *what* a provider publishes, but not the queue or topic it is published to; a message contract carries no transport binding. Traffic Parrot therefore derives a destination for each message:
- **From the message metadata, when present.** If the message's `metadata` object has a `destination`, `queue` or `topic` key, its value is used as the destination (the keys are checked in that order). A `topic` key makes the destination a **TOPIC**; otherwise the destination is a **QUEUE**.
- **From the message description otherwise.** When the metadata has none of those keys, the destination is generated from the message's `description`: lower-cased, with each run of non-alphanumeric characters replaced by a dot (so `Order Created event` becomes `order.created.event`). A description-derived destination is always a **QUEUE**.
> **Review a derived destination before importing.** When a destination is derived from the description rather than taken from explicit metadata, the preview shows a **warning** banner above the table listing each affected message, because the generated name is a best guess and may not match the queue or topic your system under test actually uses. Confirm the contract carries the right metadata, or correct the destination on the imported mapping in the [JMS editor](#edit-jms) afterwards, so the mapping listens on the destination you expect.
### What gets created
Each selected message becomes a **one-way publish** JMS mapping. It matches any message on the derived destination and, on receipt, publishes the message's example `contents` back on that same destination. You can then open the mapping in the [JMS editor](#edit-jms) to refine the request matchers, response body, properties or delay just like any other JMS mapping.
> **Message Pact imports are one-way only.** A Pact message interaction is a fire-and-forget message a provider publishes; the contract has no request that selects it and no reply. The imported mapping therefore just publishes the example payload; it is *not* a request-matching, request-reply stub. (Request-reply mappings are created only by an [AsyncAPI](#import-asyncapi-jms) operation that carries a `reply` object.)
#### A worked example
Given this minimal Pact specification v3 contract with a single message in its `messages[]` array, where the destination is taken from the message metadata:
```
{
"consumer": { "name": "OrderConsumer" },
"provider": { "name": "OrderProvider" },
"messages": [
{
"description": "an Order Created event",
"metadata": { "queue": "orders.created" },
"contents": { "orderId": "1001", "status": "CREATED" }
}
]
}
```
importing it on the JMS page creates a one-way mapping that listens on the `orders.created` **QUEUE** and publishes `{"orderId":"1001","status":"CREATED"}` on receipt of any message there. Importing the same contract on the [IBM® MQ page](https://trafficparrot.com/documentation/5.65.x/ibmmq.html#import-message-pact-mq) instead creates the equivalent native IBM® MQ mapping.
Had the message carried no `metadata` destination key, the destination would have been derived from the description as `an.order.created.event` and the preview would have shown a warning to review it before importing.
The same import flow is also available for native IBM® MQ; see [Import a message Pact contract](https://trafficparrot.com/documentation/5.65.x/ibmmq.html#import-message-pact-mq) on the native IBM® MQ page.
##### Supported scope and licensing
**Import message Pact** is part of the JMS support and is available on a JMS licence, the same as the rest of the JMS functionality; the menu link does not appear without it. Pact specification **v3** (`messages[]`) and **v4** (`Asynchronous/Messages` interactions) message contracts are supported. For a v4 contract the example body is read from the message's `contents.content` envelope. The example `contents` is imported as-is; you can edit any imported payload in the editor afterwards.
## Edit JMS mappings
### Introduction
On the following JMS pages, the edit button  will allow you to edit an existing mapping:
- Add/Edit
- Record
- Replay
Traffic Parrot supports the following JMS message types:
- `javax.jms.TextMessage`
- `javax.jms.BytesMessage` (any bytes message, with [special support](#edit-jms-java-objects) for `java.io.Serializable` objects)
### Response delay
Traffic Parrot supports postponing the delivery of a JMS message. This can be useful to better simulate a more realistic scenario where the responding system does not send a response message immediately after receiving the request message.
Use the  field on the edit mapping panel to specify the delay in milliseconds.
##### Supported brokers
- [ActiveMQ 5.4+](http://activemq.apache.org/delay-and-schedule-message-delivery.html) when `schedulerSupport` is enabled
- [IBM®MQ 8+](https://www.ibm.com/support/knowledgecenter/en/SSFKSJ_8.0.0/com.ibm.mq.dev.doc/q119200_.htm)
### Response properties
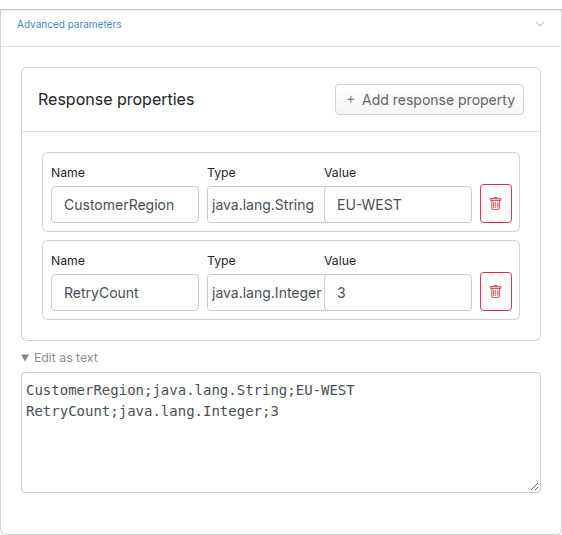
Sometimes, the response headers or properties of a message are crucial to the system under test. Use **Add response property** to add one, then give it a name, a type and a value. A property is saved only once it has both a name and a value.
Click **Edit as text** below the rows to show the text area, which holds the same properties, one `name;type;value` line each. The rows and the text area stay in step, so you can edit whichever suits you, for example to paste several properties at once:
```
CustomerRegion;java.lang.String;EU-WEST
RetryCount;java.lang.Integer;3
```
A value may itself contain `;`: everything after the second `;` on a line is the value, so `Region;java.lang.String;EU;WEST` sets the value `EU;WEST`. A line without a type or a value is refused, and the message names the line.
The type list offers the common JMS types. It is a convenience rather than a closed set: any class with a public constructor taking a single `String` works, and a mapping already using one keeps it.
##### RabbitMQ Content Type
For RabbitMQ, the content type can be specified for example as:
```
ContentType;java.lang.String;application/x-java-serialized-object
```
### Priority
The request priority can be set in order to set up a preference order for matching mappings.
The highest priority value is `1`. If two or more mappings both match a request, the mapping with the higher priority will be used to provide the response. The default priority is `5`.
This can be useful, if you want a "catch-all" mapping that returns a general response for most requests and specific mappings on top that return more specific responses.
### Text messages
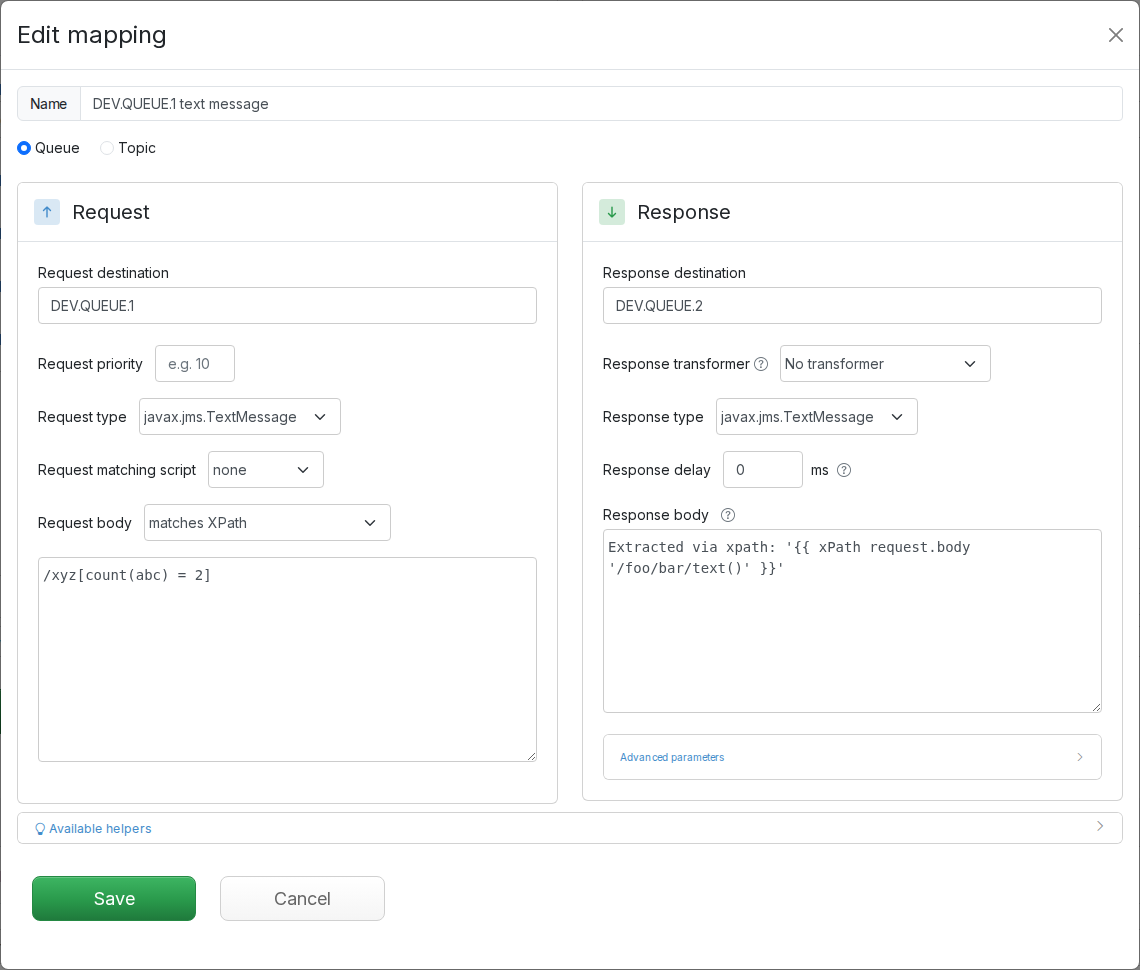
Traffic Parrot is able to record and replay a `javax.jms.TextMessage` which could contain text in a variety of formats e.g. JSON, XML or plain text.
##### Supported features
- Edit the response body
- Serve the response body from a file in `__files/` instead of typing it inline (see [Response body from a file](#edit-jms-response-body-file))
- Use parts of the request body in the response body by [extracting from the request](https://trafficparrot.com/documentation/5.65.x/dynamic.html#extract-data)
- Use [helpers](https://trafficparrot.com/documentation/5.65.x/dynamic.html#extension-functions) in the response body
- Programmatically transform the response using [JMS response transformers](https://trafficparrot.com/documentation/5.65.x/dynamic.html#custom-jms-response-transformers)
- Match requests using the request body matchers (e.g. JsonPath, contains, regexp)
- Use priority to set up a preference order for matching mappings
### Response body from a file
Instead of typing a text response body inline, you can keep the body in a separate file and point the mapping's response at it with a `bodyFileName` attribute, the same [file-backed response](https://trafficparrot.com/documentation/5.65.x/http.html#file-backed-responses) convention Traffic Parrot uses for HTTP. This is useful when the response is large, is generated by a build step, or is shared between more than one mapping, and it keeps your `jms-mappings/*.json` files small.
In a JMS mapping's `response`, set `bodyFileName` to a path under the `__files` directory in place of an inline `text` value:
```
{
"request": {
"destination": { "name": "request.queue.text", "type": "QUEUE" },
"bodyMatcher": { "equalTo": "hello" }
},
"response": {
"destination": { "name": "response.queue.text", "type": "QUEUE" },
"bodyFileName": "responses/reply.txt"
}
}
```
with the response body stored in the sibling `__files` directory:
```
trafficparrot-x.y.z/
|-- jms-mappings/
| `-- greeting.json <- "response": { "bodyFileName": "responses/reply.txt" }
`-- __files/
`-- responses/
`-- reply.txt <- the response body that is sent
```
The `bodyFileName` is resolved relative to the `__files` directory that sits next to the mapping's `jms-mappings` directory (each scenario has its own `__files` for scenario-scoped mappings), exactly as for an [HTTP file-backed response](https://trafficparrot.com/documentation/5.65.x/http.html#file-backed-responses-convention). Nested paths such as `responses/reply.txt` are allowed. A `bodyFileName` that would resolve outside the `__files` directory, whether by climbing out with `..` or by giving an absolute path, is rejected.
##### What to know
- **Text only.** In this release a `bodyFileName` response is read as UTF-8 text and is supported for [text messages](#edit-jms-text) only. A [bytes message](#edit-jms-bytes) response body must still be provided inline.
- **One or the other.** A response sets either an inline `text` value or a `bodyFileName`, not both.
- **Templated at reply time.** The file's contents are run through the same [Handlebars templating](https://trafficparrot.com/documentation/5.65.x/dynamic.html#extract-data) as an inline text body, so a body file can reference the incoming request (for example `{{request.body}}`) and use the response [helpers](https://trafficparrot.com/documentation/5.65.x/dynamic.html#extension-functions). This applies to the built-in templating; a [custom JMS response transformer](https://trafficparrot.com/documentation/5.65.x/dynamic.html#custom-jms-response-transformers) that reads the response's `text` field directly sees no value for a file-backed response, because the body lives in the file rather than in `text`.
- **A bad reference stops the whole mappings list from loading.** Setting both `text` and `bodyFileName`, or referencing a file that does not exist under the resolved `__files` directory, is rejected when mappings are loaded. This is deliberate fail-fast behaviour, and it is not limited to the offending mapping: your messaging mappings fail to load until the mapping is corrected, rather than that one mapping being skipped or an empty reply being sent at run time. The error names the mapping and the missing file.
> The [Static Files](https://trafficparrot.com/documentation/5.65.x/http.html#static-files-browser) page counts a file referenced by a JMS mapping as in use, whether the mapping reads it as a response body or as a [request matcher value](#edit-jms-request-body-file), so it is not shown as orphaned and deleting or renaming it from that page is refused while the mapping references it. Combined with the fail-fast behaviour above, that is what keeps a deletion from stopping your messaging mappings from loading.
##### Editing a file-backed response
When you open a file-backed mapping in the JMS mapping editor, a read-only note reading **Response from file:** followed by the file name is shown above the response body field, and the field is pre-filled with the file's current contents so you can edit it in place. When you click **Save**, Traffic Parrot writes your changes back to the file in `__files`; the mapping keeps its `bodyFileName` reference, so the body stays in the file rather than being copied inline.
[Exporting](#import-export-jms-mappings) a scenario that contains a file-backed JMS mapping bundles the referenced `__files` body file into the export, and importing it restores the file, so file-backed JMS mappings move between environments intact.
> File-backed response bodies are available for **JMS**, [file-message](https://trafficparrot.com/documentation/5.65.x/filemessage.html#add-edit-file-message-mappings) and native [IBM® MQ](https://trafficparrot.com/documentation/5.65.x/ibmmq.html#edit-mq-response-body-file) mappings. Support for binary (bytes) response bodies read from a file will follow.
### Request body matcher value from a file
Instead of typing the expected value of the request `bodyMatcher` inline, you can keep it in a file under the `__files` directory and replace the matcher's value with a `bodyFileName` object, the same convention as a [response body from a file](#edit-jms-response-body-file) and as an [HTTP file-backed request body matcher](https://trafficparrot.com/documentation/5.65.x/http.html#request-body-file). This is useful when the expected message is large or is generated by a build step. For example
```
{
"request": {
"destination": { "name": "request.queue.text", "type": "QUEUE" },
"bodyMatcher": { "equalToXml": { "bodyFileName": "requests/expected-order.xml" } }
},
"response": {
"destination": { "name": "response.queue.text", "type": "QUEUE" },
"text": "OK"
}
}
```
The file is read as UTF-8 text when the mappings are loaded, resolved relative to the `__files` directory beside the mapping's `jms-mappings` directory (per scenario for scenario-scoped mappings), and matched against exactly as an inline value would be. A `bodyFileName` that names a file which does not exist, or that would resolve outside `__files`, is rejected when the mappings load, with an error naming the mapping and the file, and the messaging mappings fail to load until it is corrected, as for a bad response file reference above.
##### What to know
- **Top-level matcher only.** Only the `bodyMatcher` itself reads its value from a file. A `bodyFileName` nested inside an `and`, `or` or `not` operator is refused when the mappings load, with an error naming the mapping file, the matcher and the file: move the file reference to the top level, or write that value inline.
- **Text matchers.** The file form is available for the [matchers](#edit-jms-mapping-json) whose value is a text, JSON or XML document: `equalTo`, `contains`, `doesNotContain`, `matches`, `doesNotMatch`, `equalToXml`, `matchesXml`, `matchesXPath`, `equalToJson`, `matchesJson`, `matchesJsonPath`, `matchesJsonSchema`, `matchesGraphQL`, `matchesSwiftField` and `matchesFixField`. A `binaryEqualTo` matcher keeps its bytes inline.
- **The file holds the value, not the matcher.** It contains the expected value of that one matcher and nothing else; the matcher and any `and`, `or` or `not` structure always live in the mapping.
- **Exported with the scenario, and protected.** [Exporting](#import-export-jms-mappings) a scenario bundles the files referenced by request matchers as well as those referenced by response bodies, and the [Static Files](https://trafficparrot.com/documentation/5.65.x/http.html#static-files-browser) page counts both as in use, so a file that backs a request matcher cannot be deleted or renamed from there while a mapping references it.
- **The editor keeps the file reference.** The mapping editor shows a file-backed request matcher as its `bodyFileName` object, as JSON text, in the request body field, and the mappings list shows the same text in its request pattern column. Saving the form with that text unchanged keeps the file reference and the matcher's other options, such as `caseInsensitive`; a reference to a file that does not exist, or is outside `__files`, is refused and nothing is saved. Replacing the text with a value saves that value as the matcher's inline value and keeps the other options. Changing the matcher type in the editor saves the reference's JSON text as the new matcher's inline value and drops the other options, so change the matcher of a file-backed request on disk or through the REST API.
The [mapping schema](https://trafficparrot.com/documentation/5.65.x/generate-mocks-with-ai-agent.html#agents-md) served at `/schemas/jms-mapping.schema.json` describes the file form, so `trafficparrot.sh validate`, which checks each mapping file against it, reports a misplaced file reference before the mapping is loaded.
### Bytes messages
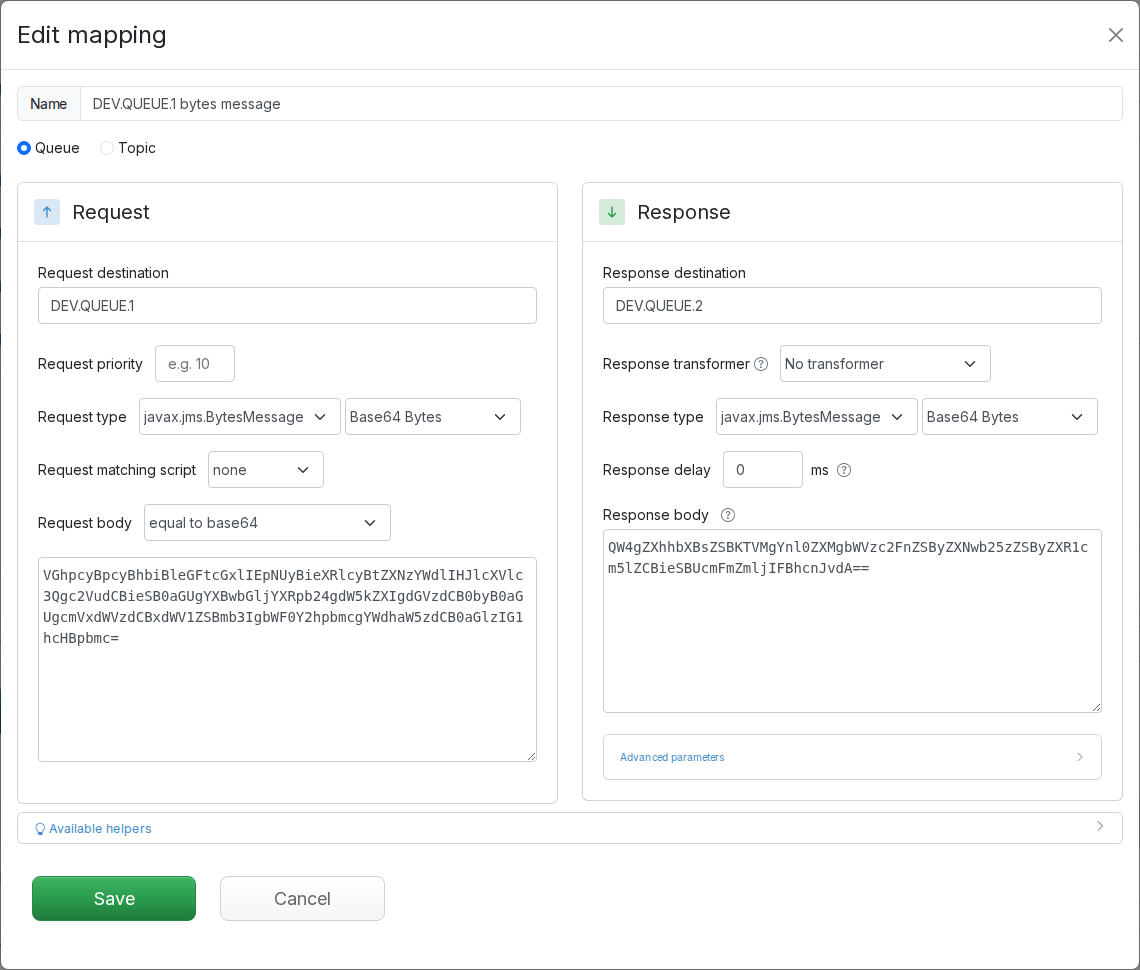
Traffic Parrot is able to record and replay a `javax.jms.BytesMessage` that could contain bytes in any format.
##### Supported features
- Edit Base64 representation of the response body
- Edit Base64 representation of the request body to match
- Match requests using byte equality only
- Use priority to set up a preference order for matching mappings
### Printable character messages
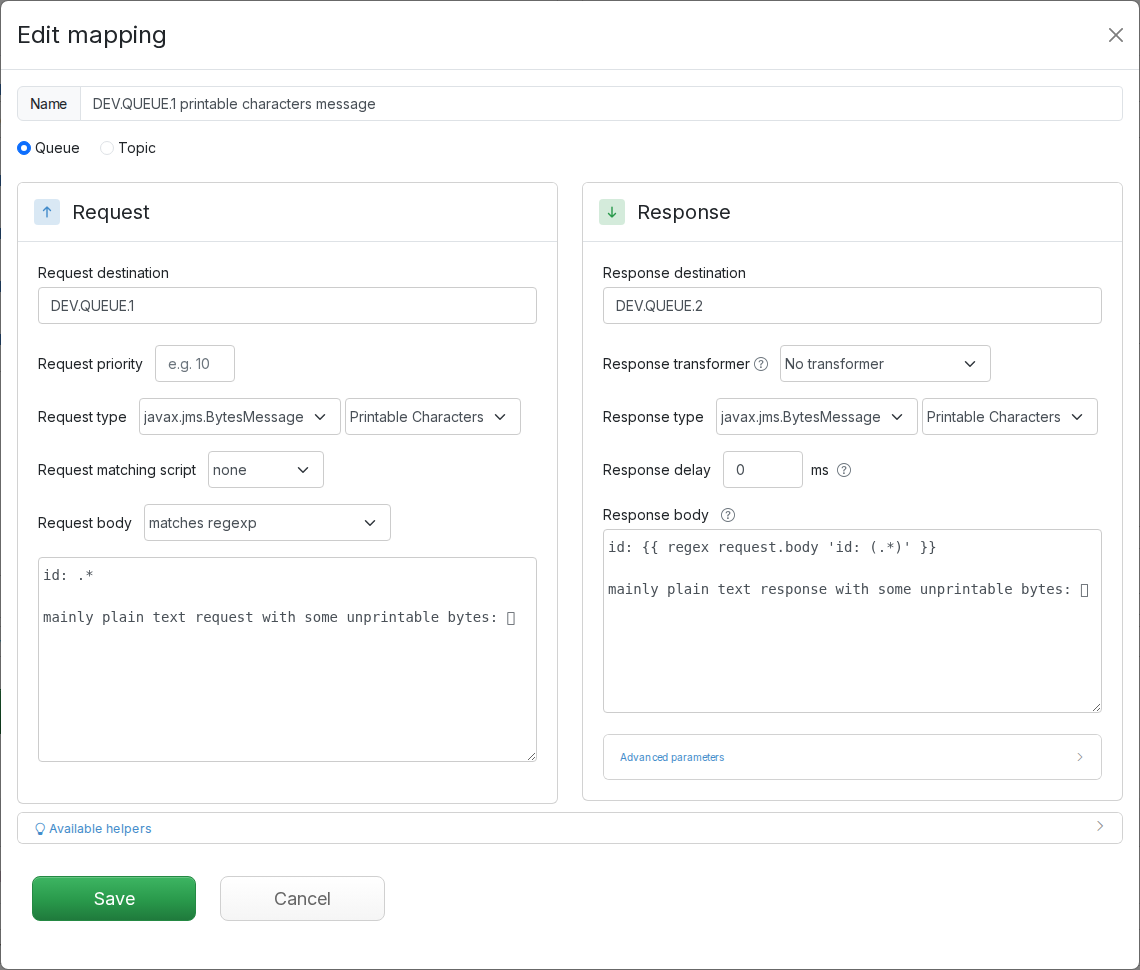
If the bytes of a `javax.jms.BytesMessage` are found to contain at least 95% printable characters (e.g. letters, digits, special characters), it will be displayed in plain text in the user interface.
This is configurable using the `trafficparrot.mostly.printable.characters.threshold=0.95` [property](https://trafficparrot.com/documentation/5.65.x/user_guide.html#configuration).
Non printable bytes will typically be displayed by the browser as a small box, as you can see in the screenshot below.
##### Supported features
- Edit plain text representation of the response body
- Edit plain text representation of the request body to match
- Use parts of the request body in the response body by [extracting from the request](https://trafficparrot.com/documentation/5.65.x/dynamic.html#extract-data)
- Use [helpers](https://trafficparrot.com/documentation/5.65.x/dynamic.html#extension-functions) in the response body
- Match requests using any of the request body matchers (e.g. contains, regexp)
- Use priority to set up a preference order for matching mappings
### Java object messages
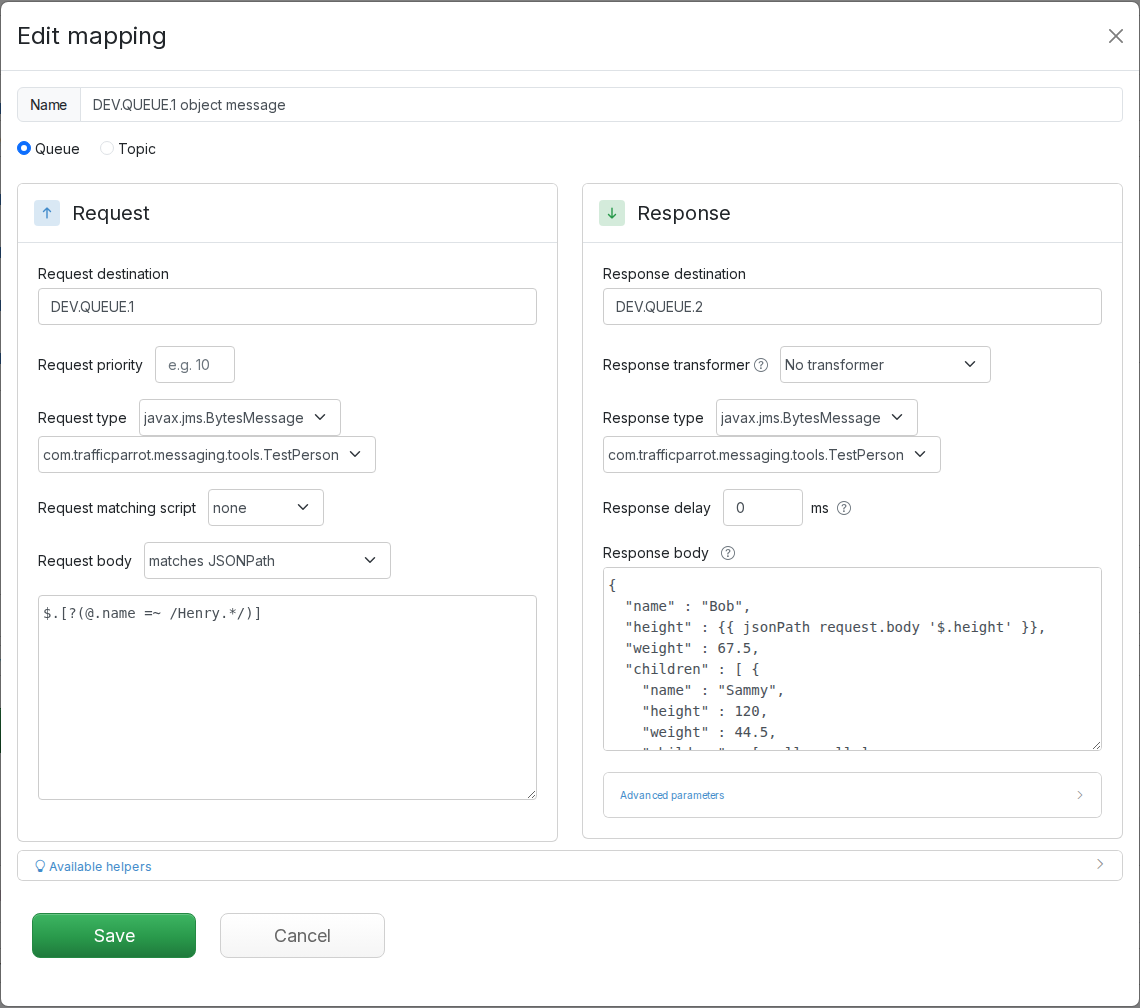
If the bytes of a `javax.jms.BytesMessage` are found to contain a single `java.io.Serializable` object that Traffic Parrot is able to deserialize, it will be displayed as a JSON object in the user interface.
The request and response body can be edited as if they were a JSON body. You are free to change the JSON as you wish, so long as the edits are compatible with the underlying Java class that the JSON represents.
##### Supported features
- Edit objects [without requiring additional JAR files or agents](#dynamic-object-serialization)
- Edit response object values
- Edit response object structure (e.g. delete fields, add items to list, add nested fields)
- Use [helpers](https://trafficparrot.com/documentation/5.65.x/dynamic.html#extension-functions) in the response body
- Use parts of the request object in the response object by [extracting with JsonPath](https://trafficparrot.com/documentation/5.65.x/dynamic.html#extract-jsonpath)
- Match request objects using the request body matchers (e.g. JsonPath, contains, regexp) on the JSON representation of the object
- Use priority to set up a preference order for matching mappings
##### Dynamic object serialization
By default, Traffic Parrot will use dynamic object serialization to support objects of any class that it is able to understand, including objects that are not on the classpath.
Unlike other tools, we do not require additional JAR files or agents to be installed in order to record, edit and replay object messages.
##### Standard object serialization
To improve compatibility ([and support special handling during the serialization](https://docs.oracle.com/javase/8/docs/api/java/io/ObjectInputStream.html)), you can choose to use [standard Java object serialization](https://docs.oracle.com/javase/8/docs/api/java/io/ObjectInputStream.html) by adding your classes to the Traffic Parrot classpath.
See the [notes for developers](#edit-jms-java-objects-dev-notes) for instructions on how to do this.
###### Notes for testers
If you are having trouble with this functionality, please ask the developers on your team to review the [notes for developers](#edit-jms-java-objects-dev-notes) below.
Please [contact us](mailto:support@trafficparrot.com) if you require any additional help for your particular configuration.
###### Notes for developers
In order to deserialize a [serialized Java object](https://docs.oracle.com/javase/8/docs/api/java/io/Serializable.html) using [standard Java object serialization](https://docs.oracle.com/javase/8/docs/api/java/io/ObjectInputStream.html), the Java class of that object and the classes of all of its fields must be on the Traffic Parrot classpath. Copy the JAR files containing those classes to `trafficparrot-x.y.z/lib/external` and restart Traffic Parrot.
In order to represent the object as JSON and allow editing, the class must have a public zero argument constructor.
Please [contact us](mailto:support@trafficparrot.com) if you require any additional help for your particular configuration.
### JMS mapping JSON
JMS mapping configuration is stored in the `jms-mappings` directory as text files in JSON format. You may directly edit these files on the filesystem and store them in a VCS such as Git or SVN.
Some JMS mapping features are not currently supported in the UI and can only be edited directly in the mapping JSON:
- declareArguments (used e.g. for RabbitMQ queue declaration arguments)
- skipDeclare (used e.g. to skip RabbitMQ queue declaration and assume a queue already exists)
Example JMS mapping JSON:
```
{
"mappingId" : "1bf95fd0-5647-4db0-bae6-729a8b29fd1f",
"request" : {
"destination" : {
"name" : "request-queue",
"type" : "QUEUE",
"declareArguments" : {
"x-queue-mode" : "lazy",
"x-dead-letter-exchange" : "dead-letter-exchange",
"x-dead-letter-routing-key" : "dead-letter-routing-key",
"x-max-length" : 100,
"x-message-ttl" : 60000
},
"skipDeclare" : false
},
"bodyMatcher" : {
"equalTo" : "any"
},
"bodyType" : "TEXT",
"jmsMessageType" : "javax.jms.TextMessage"
},
"response" : {
"destination" : {
"name" : "response-queue",
"type" : "QUEUE",
"declareArguments" : {
"x-dead-letter-exchange" : "dead-letter-exchange",
"x-dead-letter-routing-key" : "dead-letter-routing-key",
"x-max-length" : 100,
"x-message-ttl" : 60000
},
"skipDeclare" : false
},
"jmsResponseTransformerClassName" : "NO_TRANSFORMER",
"text" : "anything",
"bodyType" : "TEXT",
"jmsMessageType" : "javax.jms.TextMessage",
"properties" : [ ],
"fixedDelayMilliseconds" : 0
},
"mappingName" : "saved-mapping-1bf95fd0-5647-4db0-bae6-729a8b29fd1f.json"
}
```
### Sending JMS messages from other protocols
JMS text messages can be sent after an HTTP or gRPC response, configured in the mapping JSON:
```
"postServeActions" : [ {
"name" : "send-jms-message",
"parameters" : {
"jmsConnectionId" : "(connection id from jms-connections.json)",
"destination" : {
"name" : "queue-name",
"type" : "QUEUE"
},
"variables" : {
"id" : "{{randomValue length=24 type='ALPHANUMERIC'}}"
},
"properties" : {
"id" : "{{variables.id}}"
},
"bodyType" : "TEXT",
"jsonBody" : {
"id" : "{{variables.id}}",
"fieldFromRequest" : "{{originalRequest.jsonBody.requestField}}",
"fieldFromResponse" : "{{originalResponse.jsonBody.responseField}}"
},
"delayDistribution" : {
"type" : "fixed",
"milliseconds" : 500
}
}
} ]
```
Supported `bodyType` settings:
- `TEXT` - text message
- `proto/example.ProtoType` - proto message of given type (using [provided proto files](https://trafficparrot.com/documentation/5.65.x/grpc.html#configure-proto))
- `protoBase64Bytes/example.ProtoType` - proto message with Base64 encoded bytes
## JMS request message matchers
When Traffic Parrot receives a request message, it will try to simulate the system it is replacing by sending back a response message on the response queue or topic. To decide which response message to send, it will go through all the request to response mappings it has available to find the response to be sent. For more details how request matching works, see [Request matching](https://trafficparrot.com/documentation/5.65.x/request_matching.html).
There are several matchers available to match JMS request messages, depending on the attribute.
##### Request type matcher
The type of message can be considered for matching.
- `javax.jms.TextMessage` - matches only text messages
- `javax.jms.BytesMessage` - matches only bytes messages
##### Request body type matcher
The type of the message body can be considered for matching.
| Type name | Type Id | Description |
| --- | --- | --- |
| Text | TEXT | Matches message text directly |
| Printable Characters | PRINTABLE_CHARACTERS | Matches message bytes represented in mapping as text using UTF-8 printable character encoding |
| Base64 Bytes | BYTES | Matches raw bytes represented in mapping using Base64 encoding |
| Proto Bytes | proto/com.example.RequestType | Matches [Proto message bytes](https://protobuf.dev/reference/java/api-docs/com/google/protobuf/AbstractMessageLite.html#toByteArray%28%29) represented in mapping as JSON text |
| Java Serialized Proto Bytes | javaProto/com.example.RequestType | Matches [Java object Serializable Proto message bytes](https://protobuf.dev/reference/java/api-docs/com/google/protobuf/GeneratedMessageLite) represented in mapping as JSON text |
| Java Serialized Bytes | com.example.RequestType | Matches [Java object Serializable message bytes](#edit-jms-java-objects) represented in mapping as JSON text |
##### Request body matchers
The most common matchers are shown below. All other WireMock [request body patterns](https://wiremock.org/docs/request-matching/) are also supported.
- **Matcher name:** any
**Matcher Id:** any
**Description:** Any request body will match.
- **Matcher name:** equal to
**Matcher Id:** equalTo
**Description:** Check that the received request message body is equal to the request body specified in the mapping
- **Matcher name:** contains
**Matcher Id:** contains
**Description:** Check that the received request message body contains the sequence of characters specified in the mapping
- **Matcher name:** does not contain
**Matcher Id:** doesNotContain
**Description:** Check that the received request body does not contain the sequence of characters specified in the mapping
- **Matcher name:** matches regex
**Matcher Id:** matches
**Description:** Check that the received request message body matches the regexp specified in the mapping
- **Matcher name:** does not match regexp
**Matcher Id:** doesNotMatch
**Description:** Check that the received request message body does not match the regexp specified in the mapping
- **Matcher name:** equal to JSON
**Matcher Id:** equalToJson
**Description:** Check that the received request message body is JSON and that it is equal to the request body JSON specified in the mapping
- **Matcher name:** matches JSON
**Matcher Id:** matchesJson
**Description:** Check that the received request message body matches (allowing for special wildcard tokens) JSON specified in the mapping.
Tokens allowed:
- `{{ anyValue }}` - matches any value
- `{{ anyNumber }}` - matches any whole or decimal number
- `{{ anyElements }}` - matches any number of sub-elements (child-nodes)
For example a "matches JSON" request body matcher:
```
{
"name": "{{ anyValue }}",
"lastName": "{{ anyValue }}",
"age": "{{ anyNumber }}",
"children": "{{ anyElements }}"
}
```
will match a request body:
```
{
"name": "Bob",
"lastName": "Smith",
"age": 37,
"children": [{"name": "sam"}, {"name": "mary"}]
}
```
- **Matcher name:** matches JSONPath
**Matcher Id:** matchesJsonPath
**Description:** Check that the received request message body is JSON and that it matches [JSONPath](https://restfulapi.net/json-jsonpath/) specified in the mapping. For example, if we use the following expression as the request body matcher
```
$[?(@.xyz.size() == 2)]
```
it will match this request body:
```
{"xyz":[{"a":true}, {"b":false}]}
```
but will NOT match this one:
```
{"xyz":[{"a":true}, {"b":false}, {"c":true}]}
```
For more examples see the [request matching](https://trafficparrot.com/documentation/5.65.x/request_matching.html#request-matcher-examples) documentation.
- **Matcher name:** equal to XML
**Matcher Id:** equalToXml
**Description:** Check that the received request message body is XML and that it is equal to the request body XML specified in the mapping
- **Matcher name:** matches XML
**Matcher Id:** matchesXml
**Description:** Check that the received request message body matches (allowing for special wildcard tokens) XML specified in the mapping.
Tokens allowed:
- `{{ anyValue }}` - matches any value
- `{{ anyNumber }}` - matches any whole or decimal number
- `` - matches any number of sub-elements (child-nodes)
For example a matches XML request body matcher:
```
{{ anyValue }}
{{ anyNumber }}
```
will match a request body:
```
Sam
29
```
- **Matcher name:** matches XPath
**Matcher Id:** matchesXPath
**Description:** Check that the received request message body is XML and that it matches [XPath](https://www.w3schools.com/xml/xml_xpath.asp) specified in the mapping. For example, if we use the following expression as the request body matcher
```
/xyz[count(abc) = 2]
```
it will match this request body:
```
```
but will NOT match this one:
```
```
- **Matcher name:** matches SWIFT field
**Matcher Id:** matchesSwiftField
**Description:** Match on a specific field within a SWIFT MT message body. Instead of writing a complex regular expression to match the entire message, you can target an individual field by its tag number and apply a regex to just that field's value.
The matcher value is a JSON object with two properties:
- `field`: the SWIFT tag identifier without colon delimiters (e.g., `20`, `32A`, `59`)
- `matches`: a regular expression applied to the extracted field value
For example, to match an MT103 message where tag 20 (Transaction Reference) starts with `TXNREF`:
```
{"field": "20", "matches": "TXNREF.*"}
```
This will match a SWIFT message containing:
```
:20:TXNREF001
```
but will NOT match:
```
:20:OTHERREF
```
The matcher handles both full SWIFT envelopes (with block structure) and bare field content. Multi-line field values (e.g., `:59:` address fields) are supported. If the specified tag appears multiple times, the match succeeds if any occurrence matches. If the tag is not present or the input is not a SWIFT message, the matcher returns no-match (not an error).
The corresponding JSON mapping file format is:
```
{
"bodyMatcher": {
"matchesSwiftField": {
"field": "20",
"matches": "TXNREF.*"
}
}
}
```
- **Matcher name:** matches FIX field
**Matcher Id:** matchesFixField
**Description:** Match on a specific tag within a FIX protocol message body. Instead of writing a complex regular expression to match the entire message body, you can target an individual tag by its number and apply a regex to just that tag's value.
The matcher value is a JSON object with two properties:
- `field`: the FIX tag number (e.g., `35` for message type, `11` for client order ID, `44` for price)
- `matches`: a regular expression applied to the extracted tag value
For example, to match a NewOrderSingle message (message type `D`) where tag 35 is `D`:
```
{"field": "35", "matches": "D"}
```
This will match a JMS message body containing the FIX-standard SOH-delimited body:
```
8=FIX.4.4|9=176|35=D|49=SENDER|56=TARGET|11=ORDER123|55=AAPL|54=1|44=150.25|10=128|
```
(where `|` represents the SOH character, ASCII `0x01`)
but will NOT match an ExecutionReport message where tag 35 is `8`.
Tag numbers are treated as opaque string keys, so the matcher works across FIX 4.2, 4.4, 5.0, and FIXT without any FIX-dictionary validation. If the specified tag appears multiple times (for example inside a repeating group), the match succeeds if any occurrence matches. If the tag is not present or the input is not a FIX message, the matcher returns no-match (not an error).
The corresponding JSON mapping file format is:
```
{
"bodyMatcher": {
"matchesFixField": {
"field": "35",
"matches": "D"
}
}
}
```
- **Matcher name:** equal to base64
**Matcher Id:** binaryEqualTo
**Description:** Check that the received request message's bytes equal the Base64 value specified in the mapping, decoded: the bytes of a bytes message, or for a text message the UTF-8 encoding of its text. It is accepted as the top-level `bodyMatcher` only, with the Base64 inline: not inside `not`, `and` or `or`, and not read from a `bodyFileName` file. The corresponding JSON mapping file format is:
```
{
"bodyMatcher": {
"binaryEqualTo": "AAEC/w=="
}
}
```
- **Matcher name:** NOT (negate a matcher)
**Matcher Id:** not
**Description:** Check that the received request message body does **not** match the child matcher. Selecting `NOT (negate a matcher)` in the *Request body* dropdown replaces the request body field with a **NOT child matcher** sub-editor where you choose the matcher to negate and its value. It is saved as a nested matcher, for example
```
"bodyMatcher": {
"not": {
"contains": "CANCELLED"
}
}
```
See [Authoring `not` in the messaging editor](https://trafficparrot.com/documentation/5.65.x/request_matching.html#not-in-messaging-editor) for the matchers that can be negated.
- **Matcher name:** AND (all sub-matchers match)
**Matcher Id:** and
**Description:** Check that the received request message body matches **every** sub-matcher. Selecting `AND (all sub-matchers match)` in the *Request body* dropdown replaces the request body field with a **Sub-matchers** panel in which each row is a matcher and its value. It is saved as a list of sub-matchers, for example
```
"bodyMatcher": {
"and": [
{"contains": "ORDER-"},
{"doesNotContain": "DRAFT"}
]
}
```
At least two sub-matchers are required. See [Authoring `and` and `or` in the messaging editor](https://trafficparrot.com/documentation/5.65.x/request_matching.html#and-or-in-messaging-editor).
- **Matcher name:** OR (any sub-matcher matches)
**Matcher Id:** or
**Description:** Check that the received request message body matches **at least one** sub-matcher. It is authored through the same **Sub-matchers** panel as `AND (all sub-matchers match)` above, and saved the same way under an `or` key, for example
```
"bodyMatcher": {
"or": [
{"equalTo": "PING"},
{"equalTo": "HEALTHCHECK"}
]
}
```
At least two sub-matchers are required. See [Authoring `and` and `or` in the messaging editor](https://trafficparrot.com/documentation/5.65.x/request_matching.html#and-or-in-messaging-editor).
##### Request matcher script
Another way to match JMS requests is with a request matcher script. If the expression evaluates to true, then the request is matched, otherwise it is not matched.
For example, Handlebars templating can be used to match a request header using a regular expression: 
## Requests page
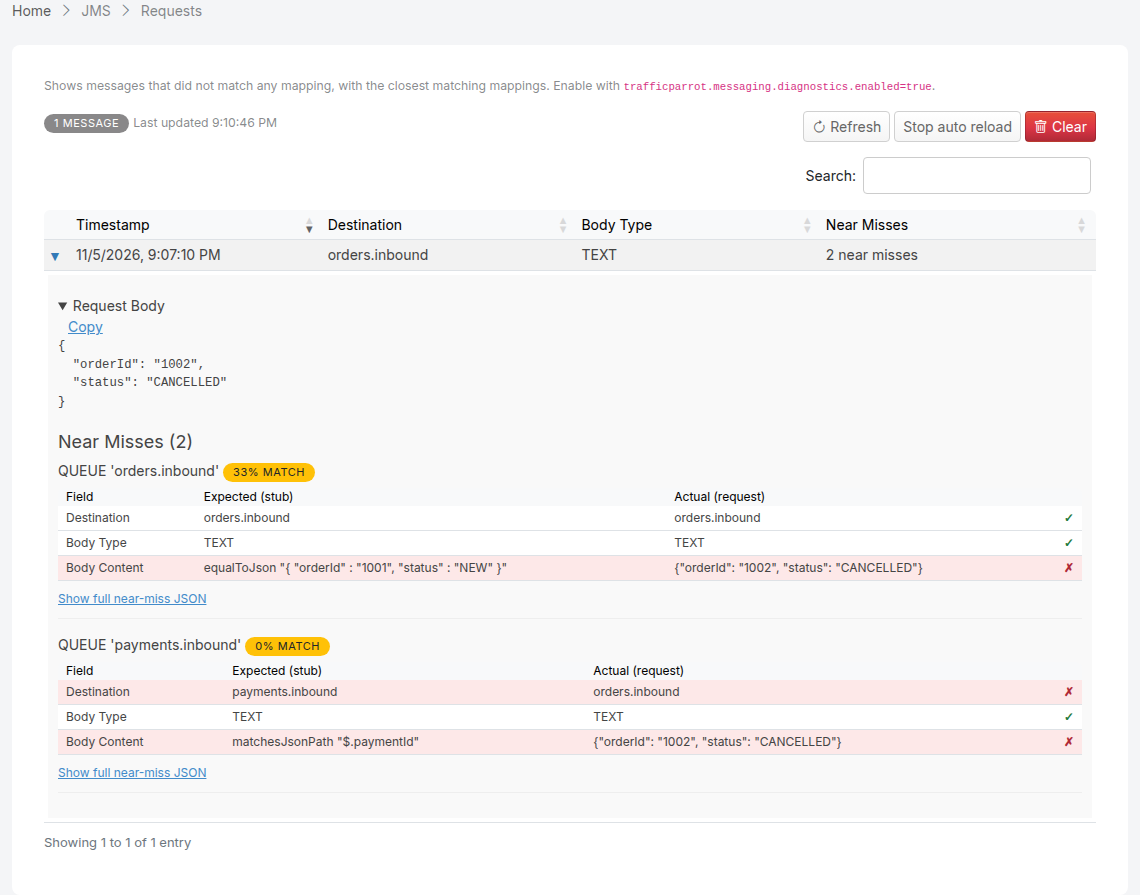
**JMS > Requests** in the top navigation bar lists the messages the JMS virtual service received that matched no mapping, each with the mappings that came closest and the field each one missed on. A message a mapping matched is answered and is not listed.
The page needs [`trafficparrot.messaging.diagnostics.enabled=true`](https://trafficparrot.com/documentation/5.65.x/properties.html#jms-properties) in `trafficparrot.properties`, read when Traffic Parrot starts. It is `false` by default, because finding the near misses compares each unmatched message with every mapping. With it off the page keeps its intro and stays at `0 MESSAGES`; an unmatched message is still written to the [log](https://trafficparrot.com/documentation/5.65.x/logging.html), under `No match for:`.
Each row shows when the message arrived, the queue or topic it arrived on, its body type and how many near misses were found. Expand a row to see the message body, laid out as JSON when it is JSON, and under **Near Misses** the three closest mappings, best first. Each one is headed with the mapping's destination and how close the message came, as a percentage, and compares what the mapping expects with what the message carried, for the destination, the body type and the body content, with a tick on each row that matched and a cross on each that did not. **Show full near-miss JSON** prints the comparison as `GET /jms/management/nearMisses` returns it. With no mapping to compare against, the row reads `No near misses found`.
The list reloads every three seconds and pauses while a row is expanded; **Refresh** reloads it at once and collapses the rows. **Clear** empties it, after a confirmation. Messages are listed under the [scenario](https://trafficparrot.com/documentation/5.65.x/user_guide.html#scenarios) selected when they arrived, at most [`trafficparrot.virtualservice.maxRequestJournalEntries`](https://trafficparrot.com/documentation/5.65.x/properties.html#virtualservice-properties) of them per scenario (`1000` by default; `0` switches the journal and this page off), and are forgotten when Traffic Parrot restarts.
The same journal answers the request count API, whether or not the diagnostics property is set: `POST /api/jms/requests/count` counts the messages received, matched or not, that match the pattern in its body (every message when the body is empty; a message is counted under the scenario whose virtual service received it), and `DELETE /api/jms/requests` resets the journal, which also empties this page. Both are in the [OpenAPI documentation](https://trafficparrot.com/documentation/5.65.x/openapi/index.html).
## Configuration
See [configuration](https://trafficparrot.com/documentation/5.65.x/user_guide.html#configuration) in the user guide.
## Typical environments
See [typical environments](https://trafficparrot.com/documentation/5.65.x/user_guide.html#how-to-videos) in the user guide.
## Proof of concept with on-premises installation at a large enterprise
See [proof of concept](https://trafficparrot.com/documentation/5.65.x/user_guide.html#poc) in the user guide.
## Dynamic responses and custom extensions
Have a look at [available custom extensions and how to generate responses dynamically](https://trafficparrot.com/documentation/5.65.x/dynamic.html)
## FAQ
Have a look at [FAQ](https://trafficparrot.com/documentation/5.65.x/faqs.html)