# User guide
## Quick start
Have a look at [quick start to Traffic Parrot](https://trafficparrot.com/documentation/5.65.x/start.html)
## Architecture
A tester uses a web browser to access the console. The console manages the virtual service. The system under test (application under test) connects directly to the virtual service on different ports.
For more details see the documentation for the protocol you are interested in:
- [HTTP architecture](https://trafficparrot.com/documentation/5.65.x/http.html#architecture)
- [gRPC architecture](https://trafficparrot.com/documentation/5.65.x/grpc.html#architecture)
- [WebSocket architecture](https://trafficparrot.com/documentation/5.65.x/websocket.html#architecture)
- [JMS architecture](https://trafficparrot.com/documentation/5.65.x/jms.html#architecture)
- [IBM® MQ architecture](https://trafficparrot.com/documentation/5.65.x/ibmmq.html#architecture)
- [File Message architecture](https://trafficparrot.com/documentation/5.65.x/filemessage.html#architecture)
## Supported protocols
### HTTP
For details on HTTP service virtualization have a look at the [HTTP documentation](https://trafficparrot.com/documentation/5.65.x/http.html)
### gRPC
For details on gRPC service virtualization have a look at the [gRPC documentation](https://trafficparrot.com/documentation/5.65.x/grpc.html)
### WebSocket
For details on WebSocket service virtualization have a look at the [WebSocket documentation](https://trafficparrot.com/documentation/5.65.x/websocket.html)
### JMS
For details on JMS service virtualization have a look at the [JMS documentation](https://trafficparrot.com/documentation/5.65.x/jms.html)
### Native IBM® MQ
For details on IBM® MQ service virtualization have a look at the [Native IBM® MQ documentation](https://trafficparrot.com/documentation/5.65.x/ibmmq.html)
### Files
For details on file based messaging service virtualization have a look at the [Files documentation](https://trafficparrot.com/documentation/5.65.x/filemessage.html)
## Starting and stopping
### Linux, Unix and Mac
###### Start
1. Open a terminal window
2. Go to the installation directory `cd trafficparrot-x.y.z`
3. Run start script `./start.sh`
4. (Optional) Inspect the startup log file and make sure there are no “ERROR”s `less +F tp.out`
5. Open the web console in any modern web browser (Chrome, Firefox or MS Edge) [http://localhost:8080](https://trafficparrot.com/documentation/5.65.x/start.html)
###### Stop
1. Open a terminal window
2. Go to the installation directory `cd trafficparrot-x.y.z`
3. Run stop script `./stop.sh`
### Windows
###### Start
1. Go to the installation directory `trafficparrot-x.y.z`
2. Double click `start.cmd` or `start.exe` to run it
3. (Optional) Inspect the console output and make sure there are no “ERROR”s
4. Open the web console in any modern web browser (Chrome, Firefox or MS Edge) [http://localhost:8080](https://trafficparrot.com/documentation/5.65.x/start.html)
###### Stop
There are several ways of stopping Traffic Parrot. You can use any of them.
By pressing Ctrl+C:
1. Press Ctrl+C in the Command Prompt running Traffic Parrot
By running the stop script:
1. Open a new Command Prompt.
2. Go to the installation directory `cd trafficparrot-x.y.z`
3. Run stop script `stop.cmd` or `stop.exe`
By clicking on the system tray:
1. Click on the system tray icon
2. Click quit
### Logs
###### Start and stop logs
Each time Traffic Parrot is started or stopped, it writes to the `tp.out` file detailing the startup or shutdown process. This file can be useful to help diagnose issues when starting and stopping.
###### Traffic Parrot logs
The main log file is written to `logs/trafficparrot.log` and contains information about what Traffic Parrot is doing while it is running.
### Viewing the application log in the GUI
As well as reading the `logs/trafficparrot.log` file on disk, you can view the same application log directly in your browser. In the GUI, open the **HTTP** menu, go to the **Logs** page, and click **Application logs**. The log opens in a new browser tab.
###### Raw view (the default)
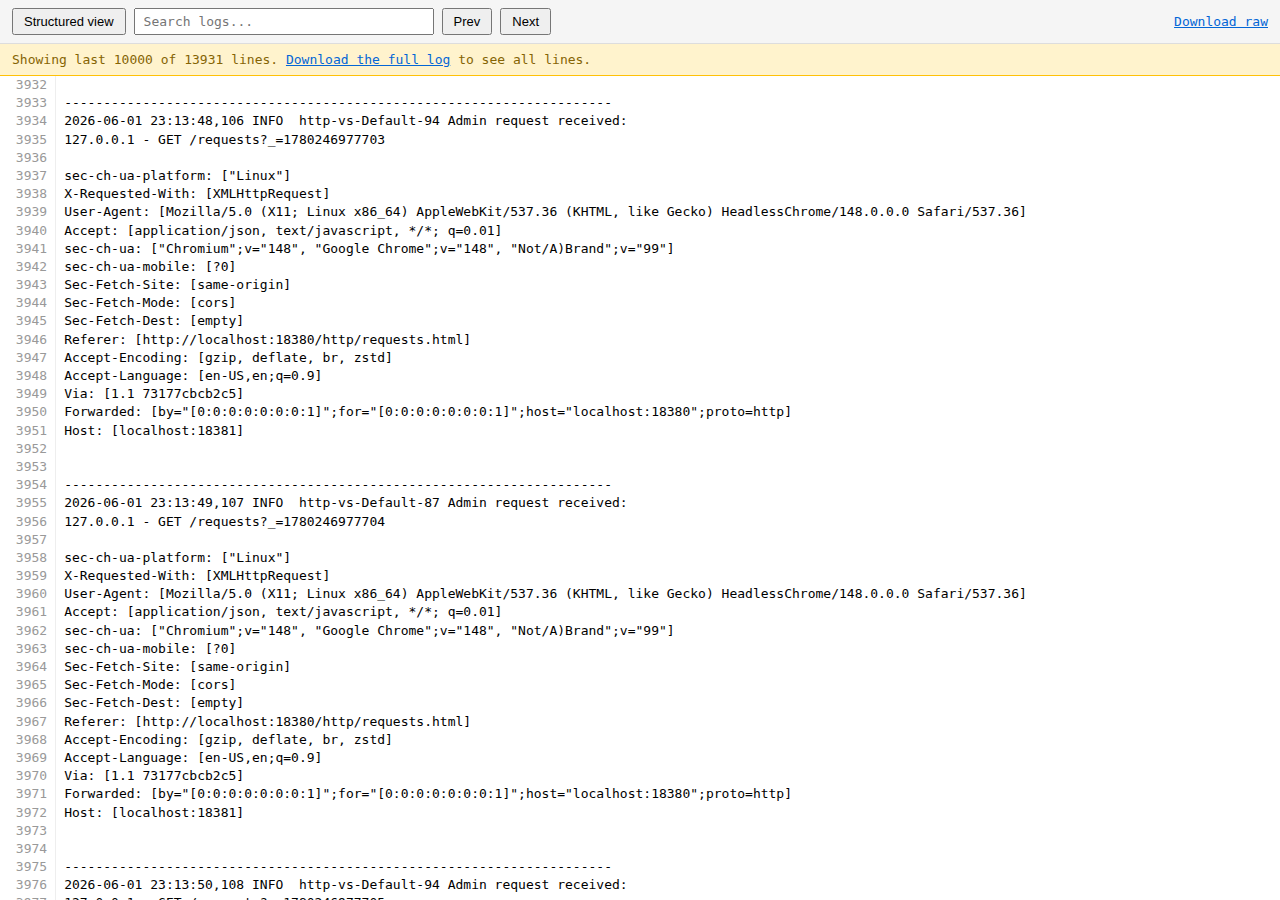
The page opens in the **raw view**: the log file is shown as plain text with line numbers, a **Search logs** box (use the **Prev** and **Next** buttons to step through matches), and a **Download raw** link. For a long log, only the last 10,000 lines are shown in the browser and a banner offers a download of the full file. The raw view loads instantly, so a large live log never blocks the page.
###### Structured view
Click **Structured view** in the toolbar to switch to a parsed, scannable view of the same log. Each entry is split into its **timestamp**, **level**, **thread** and **message**, and is shown with a coloured band and a level **badge**: ERROR in red, WARN in amber, and INFO / DEBUG / TRACE in muted colours. The level text is always shown on the badge, not just signalled by colour, so the view stays readable in greyscale and for colour-blind users.
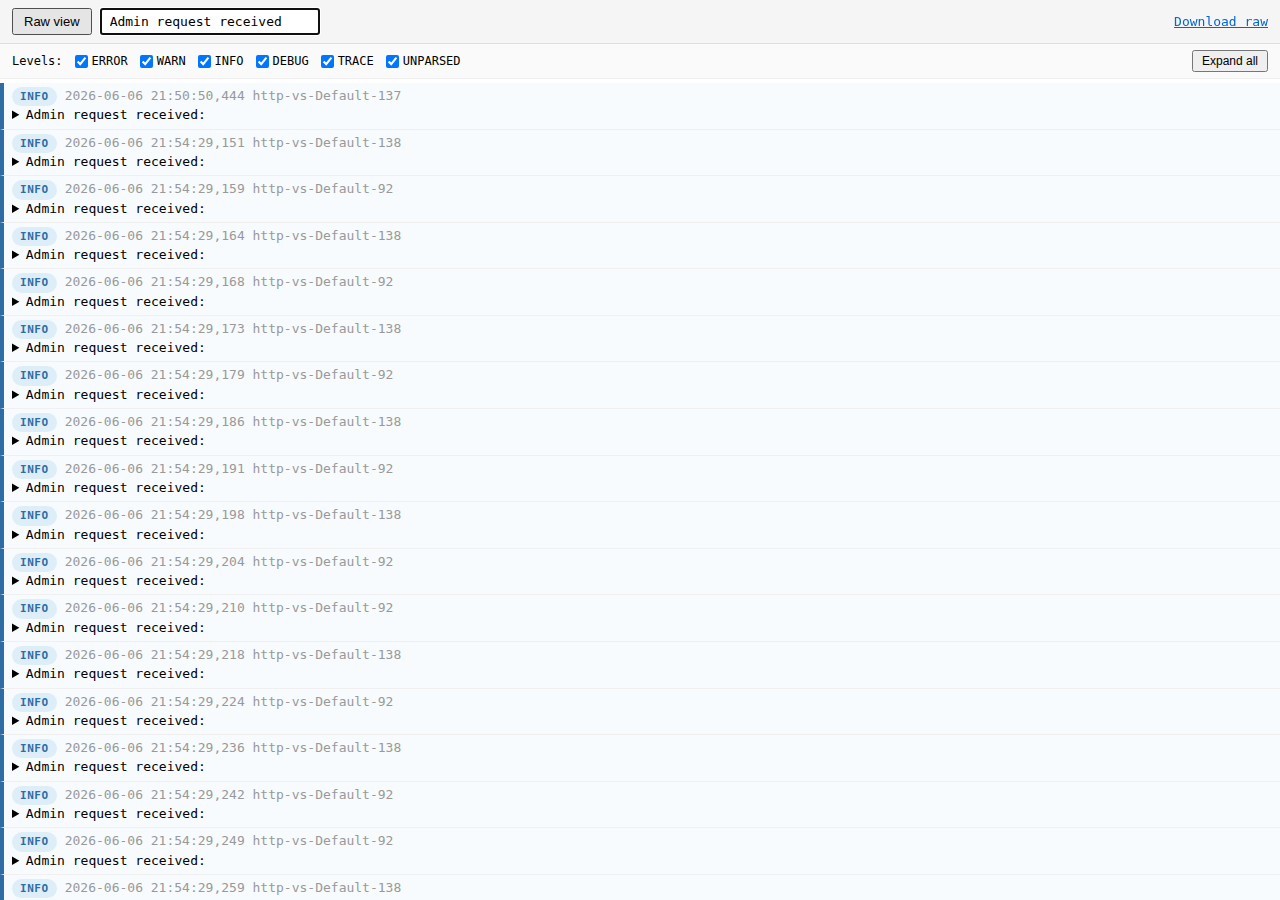
The structured view is built the first time you switch to it, so opening the page stays fast even for a large log. Click **Raw view** at any time to switch back to the plain-text view; **Download raw** always downloads the original, unmodified log file.
###### Levels, stack traces and filtering
A multi-line entry, such as a stack trace, is folded into a single collapsible entry whose summary is the log message; expand it to read the full detail, or use **Expand all** / **Collapse all** to open or close every entry at once. Use the **level filter** checkboxes to hide or show entries by level, and type in the **Filter entries** box to keep only the entries that contain a piece of text. Filtering only hides entries; it never removes anything from the log.
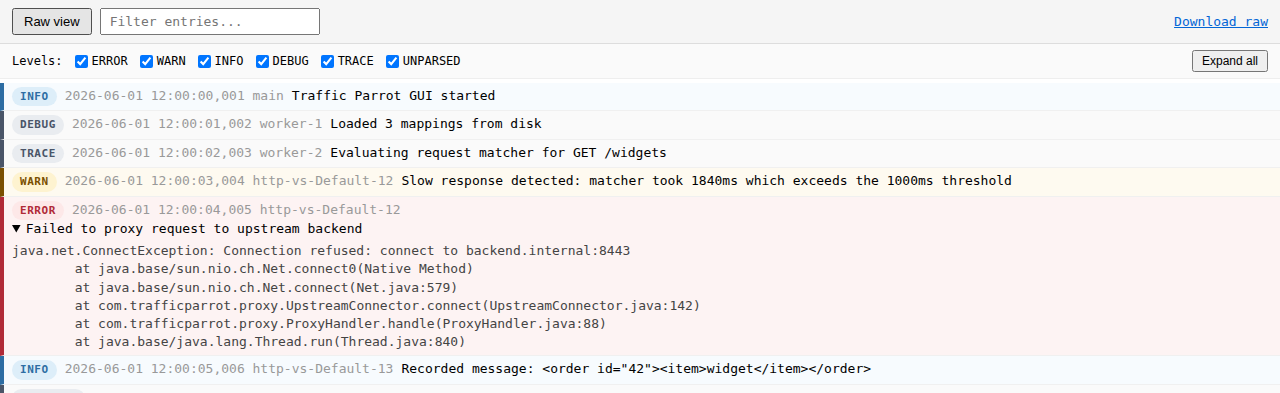
Any line that does not match the expected log pattern (for example a line written by a third-party library) is shown in full as an UNPARSED entry rather than being hidden, so no log content is ever lost in the structured view.
### Configuration changes requiring restart
Some changes to Traffic Parrot configuration require a restart. Please find further information in the lists below.
###### Changes requiring restart
- Dockerfile changes
- Kubernetes deployment configuration changes
- JAR file changes including plugins
- trafficparrot.properties file changes
- jvm.args file changes
- Changes to mappings when mappings cache is enabled
- MQ start queue replay on startup script
- HTTPS certificate changes
- HTTP/HTTPS port changes
- Add new virtual service folder
- Remove existing virtual service folder
###### Changes not requiring restart
- Changes to mappings for existing HTTP/HTTPS virtual service folder with mappings cache disabled
- Changes to MQ/JMS/Files for existing virtual service folder with no changes to request/response queues and mappings cache disabled
###### Changes not requiring restart but requiring MQ/JMS/Files stop and start replay mode
- Changes to MQ/JMS/Files with changes to request/response queues
- Changes to MQ/JMS/Files connections JSON file
## Configuration
### Properties
You configure Traffic Parrot web console and virtual service by editing property values in [[`trafficparrot.properties`](https://trafficparrot.com/documentation/5.65.x/properties.html)](https://trafficparrot.com/documentation/5.65.x/properties.html) file or by passing parameters to the start script.
###### Configuration reference
All configuration properties are documented in the [Configuration Reference](https://trafficparrot.com/documentation/5.65.x/properties.html) page.
###### Changing properties in the file
The [`trafficparrot.properties`](https://trafficparrot.com/documentation/5.65.x/properties.html) is located in the main Traffic Parrot directory. Open [`trafficparrot.properties`](https://trafficparrot.com/documentation/5.65.x/properties.html) file in your [favourite](https://trafficparrot.com/documentation/5.65.x/faqs.html#favourite-editor) text editor and update the property values. The names of properties should be self-explanatory. If you have any issues just [request help by emailing us](https://trafficparrot.com/documentation/5.65.x/faqs.html#favourite-editor).
###### Passing values to the start script
You can also configure Traffic Parrot by passing arguments to the start script. This will override properties defined in the [`trafficparrot.properties`](https://trafficparrot.com/documentation/5.65.x/properties.html) file.
For example, on Linux:
```
./start.sh trafficparrot.gui.http.port=20000 trafficparrot.virtualservice.http.port=20001
```
For example, on Windows:
```
start.cmd trafficparrot.gui.http.port=20000 trafficparrot.virtualservice.http.port=20001
```
The list of all available properties that can be configured is available in the [`trafficparrot.properties`](https://trafficparrot.com/documentation/5.65.x/properties.html) file which is located in the main Traffic Parrot directory.
Some properties may only be changed by passing values to the start script. For example, outbound HTTPS certificate configuration and outbound HTTP proxy configuration may only be specified as start script values.
###### Frequently changed properties
For the full list of available configuration options please see [`trafficparrot.properties`](https://trafficparrot.com/documentation/5.65.x/properties.html) file located in the Traffic Parrot directory.
- **Property name:** trafficparrot.gui.http.port
**Description:** Port number of the HTTP Web UI
**Example usage:** `trafficparrot.gui.http.port=18080`
- **Property name:** trafficparrot.gui.https.port
**Description:** Port number of the HTTPS Web UI
**Example usage:** `trafficparrot.gui.https.port=18079`
- **Property name:** trafficparrot.gui.security.mode
**Description:** Web UI security configuration:
- `ALLOW_ALL` will allow UI access to any user
- `LOGIN_PROPERTIES` will only allow UI access for specified users, and asks the same users for their login on the log pages every virtual service HTTP and HTTPS port serves under `/__logs`
**Example usage:** `trafficparrot.gui.security.mode=LOGIN_PROPERTIES`
Contents of `trafficparrot.gui.login.properties` in Jetty [HashLoginService](https://wiki.eclipse.org/Jetty/Tutorial/Realms#HashLoginService) format:
```
admin=password,traffic-parrot-gui-role
```
- **Property name:** trafficparrot.virtualservice.trafficFilesRootUrl
**Description:** Points to the location of traffic recording and replay files. While recording, new files will be written to that location. While replaying, mappings will be read from that location. Allows for checking-in traffic files to source control like Subversion or GIT (or any other). Currently only "file:" URLs are supported.
**Example usage:** Example on Linux (in one line, no spaces):
`trafficparrot.virtualservice.trafficFilesRootUrl =file:/home/dev/git/paymentsapi/trafficparrot_files`
Example on Windows (in one line, no spaces):
`trafficparrot.virtualservice.trafficFilesRootUrl =file://C:\Users\tom\workspace\sales\api_rec`
- **Property name:** trafficparrot.virtualservice.http.port
**Description:** HTTP virtual service port number
**Example usage:** `trafficparrot.virtualservice.http.port=18081`
- **Property name:** trafficparrot.virtualservice.https.port
**Description:** HTTPS virtual service port number
**Example usage:** `trafficparrot.virtualservice.https.port=18082`
### Outbound HTTP proxy settings
If your system requires the use of a HTTP proxy to make outbound connections (e.g. in a corporate environment) you can tell Traffic Parrot to use the proxy using the settings below. The values must be passed to the start script.
| Property name | Description | Example usage |
| --- | --- | --- |
| http.proxyHost | The hostname or IP address of the HTTP proxy server | `http.proxyHost=localhost` |
| http.proxyPort | The port number of the HTTP proxy server | `http.proxyPort=9043` |
| https.proxyHost | The hostname or IP address of the HTTPS proxy server | `https.proxyHost=192.168.2.6` |
| https.proxyPort | The port number of the HTTPS proxy server | `https.proxyPort=9044` |
| java.net.useSystemProxies | If you have a system level proxy configured you may instead be able to set this flag to true | `java.net.useSystemProxies=true` |
### Outbound HTTPS certificates
If you need to record a system with a certificate that is not trusted by default, you will need to specify the trust store properties. The values must be passed to the start script. This is used for one-way SSL scenarios.
| Property name | Description | Example usage |
| --- | --- | --- |
| javax.net.ssl.trustStore | The path to the trust store file containing the trusted certificates | `javax.net.ssl.trustStore=C:\path\to\trust.jks` |
| javax.net.ssl.trustStorePassword | The password of the trust store | `javax.net.ssl.trustStorePassword=password` |
| javax.net.ssl.trustStoreType | The type of trust store (e.g. jks or pkcs12) | `javax.net.ssl.trustStoreType=jks` |
If you need to record a system that requires a client certificate for authentication, you will need to specify the key store properties. The values must be passed to the start script. This is used for two-way SSL scenarios requiring mutual authentication.
| Property name | Description | Example usage |
| --- | --- | --- |
| javax.net.ssl.keyStore | The path to the key store file containing the client certificate to use | `javax.net.ssl.keyStore=C:\path\to\key.jks` |
| javax.net.ssl.keyStorePassword | The password of the key store | `javax.net.ssl.keyStorePassword=password` |
| javax.net.ssl.keyStoreType | The type of key store (e.g. jks or pkcs12) | `javax.net.ssl.keyStoreType=jks` |
### Running more than one instance simultaneously
To run two Traffic Parrot instances in parallel, you need to configure it to run on different port numbers.
For example:
```
cd trafficparrot-x-y-z-instance_1
./start.sh trafficparrot.gui.http.port=18080 trafficparrot.gui.https.port=18079 trafficparrot.gui.jmx.port=18085 trafficparrot.virtualservice.http.port=8081 trafficparrot.virtualservice.https.port=18082 trafficparrot.virtualservice.http.management.port=18083 trafficparrot.virtualservice.jms.management.port=19093 trafficparrot.virtualservice.jmx.port=18084 trafficparrot.virtualservice.grpc.tls.port=10051 trafficparrot.virtualservice.grpc.non.tls.port=10052
cd ../trafficparrot-x-y-z-instance_2
./start.sh trafficparrot.gui.http.port=28080 trafficparrot.gui.https.port=28079 trafficparrot.gui.jmx.port=28085 trafficparrot.virtualservice.http.port=28081 trafficparrot.virtualservice.https.port=28082 trafficparrot.virtualservice.http.management.port=28083 trafficparrot.virtualservice.jms.management.port=29093 trafficparrot.virtualservice.jmx.port=28084 trafficparrot.virtualservice.grpc.tls.port=20051 trafficparrot.virtualservice.grpc.non.tls.port=20052
```
Depending on your particular use case, you might have to change a number of additional properties values. For a list of all the available properties, please see [`trafficparrot.properties`](https://trafficparrot.com/documentation/5.65.x/properties.html) file located in the Traffic Parrot directory.
### HTTPS certificates for the virtual service
##### Change the HTTPS server certificate
If you connect to Traffic Parrot via HTTPS it will return a self-signed certificate.
If you would like Traffic Parrot to use a different certificate for its HTTPS virtual service you can override the `PrivateKeyEntry` called `trafficparrot` in `trafficparrot-x.y.z/certificates/trafficparrot-keystore.jks`. The password to the JKS keystore is `trafficparrot`.
For example:
```
cd trafficparrot-x.y.z/certificates
# (optional) generate a new certificate
openssl genrsa -out server.key 2048
openssl req -new -out server.csr -key server.key
openssl x509 -req -days 365 -in server.csr -signkey server.key -out server.crt
openssl pkcs12 -export -in server.crt -inkey server.key -out server.p12 -name trafficparrot -passout pass:trafficparrot
# import the certificate to traffic parrot
keytool -importkeystore -deststorepass trafficparrot -destkeypass trafficparrot -destkeystore trafficparrot-keystore.jks -srckeystore server.p12 -srcstoretype PKCS12 -srcstorepass trafficparrot -alias trafficparrot
# restart traffic parrot
cd ..
./stop.sh
./start.sh
# display the new certificate
openssl s_client -showcerts -connect localhost:8082
##### Restrict the TLS protocol versions and cipher suites
By default the virtual service HTTPS listener offers what Java offers: TLSv1.3 and TLSv1.2, with the SSL protocols and the RSA key exchange, SHA-1, MD5, NULL and anonymous cipher suites excluded. To offer less, set these properties in [`trafficparrot.properties`](https://trafficparrot.com/documentation/5.65.x/properties.html):
- `trafficparrot.virtualservice.https.tls.protocols`: the protocol versions to offer in place of the defaults, for example `TLSv1.3`.
- `trafficparrot.virtualservice.https.tls.protocols.exclude`: protocol versions to refuse, added to the default exclusions.
- `trafficparrot.virtualservice.https.tls.cipherSuites`: the cipher suites to offer in place of the defaults, for example `^TLS_AES_.*$`.
- `trafficparrot.virtualservice.https.tls.cipherSuites.exclude`: cipher suites to refuse, added to the default exclusions.
Each value is a comma-separated list, and a blank value keeps the default. An entry is a protocol version or cipher suite name, or a regular expression that must match the whole name; an entry that is not a valid regular expression stops Traffic Parrot from starting, with a message naming the property, and an entry that matches no version or suite the JVM supports, such as a mistyped name, is reported as a warning naming the property when the listener starts. The default exclusions stay in force whatever the include lists say, so an include entry naming an RSA key exchange or SHA-1 suite is dropped, and an excluded protocol version or cipher suite stays excluded even if the include list names it. The include lists are matched against what the JVM supports, so a version the JVM has disabled, such as TLSv1.1 under `jdk.tls.disabledAlgorithms` in its `java.security` file, is listed at startup when you include it but is still refused in the handshake. If no protocol version or no cipher suite remains, the listener still starts, the startup line is logged as an error showing the empty list, and every handshake fails. The settings apply to the HTTPS listener of every scenario and to the TLS connector the recording proxy uses when browser proxying is enabled. They do not cover the gRPC virtual service's TLS port, which has TLS settings of its own, or the web user interface's own HTTPS port, `trafficparrot.gui.https.port`; both keep the defaults.
The protocol versions and cipher suites in force are logged when a listener starts, one line per listener, so you can read them off `logs/trafficparrot.log`, for example:
```
Virtual service HTTPS listener on port 8082: TLS protocols [TLSv1.3], cipher suites [TLS_AES_256_GCM_SHA384, TLS_CHACHA20_POLY1305_SHA256, ...]
```
For example, to offer TLSv1.3 only and refuse `TLS_AES_128_GCM_SHA256`:
```
trafficparrot.virtualservice.https.tls.protocols=TLSv1.3
trafficparrot.virtualservice.https.tls.cipherSuites.exclude=TLS_AES_128_GCM_SHA256
```
Then check the listener with `openssl`: the first handshake fails and the second completes on `TLS_AES_256_GCM_SHA384`.
```
openssl s_client -connect localhost:8082 -tls1_3 -ciphersuites TLS_AES_128_GCM_SHA256
### JVM arguments
There is a special file `jvm.args` that you can use to specify custom JVM arguments. One parameter per line. For example you can change the heap size with the `-Xmx` parameter.
System properties are also supported e.g. `-Dproperty.name=value`. A system property overrides the value in [`trafficparrot.properties`](https://trafficparrot.com/documentation/5.65.x/properties.html), and applies whether or not that file holds the property, so a file carried over from an earlier installation, or one holding only the keys you set, needs nothing added to it. It does not override a `key=value` property passed as an argument to the start script.
##### Where the file lives
The `jvm.args` file ships at the root of the Traffic Parrot install directory (the unzipped enterprise distribution), alongside `start.sh`, `start.cmd`, `stop.sh` and [`trafficparrot.properties`](https://trafficparrot.com/documentation/5.65.x/properties.html). It is included only in the enterprise distributions and is a user-editable file, so your changes are preserved when you [upgrade Traffic Parrot](#upgrade); on upgrade your edited values are merged into the new version's `jvm.args`.
##### How it is read
When you start Traffic Parrot the launcher reads `jvm.args` and passes each non-empty line straight through, unchanged, as a separate parameter to the Traffic Parrot server JVM. There is no special argument-file syntax to learn: you write one JVM parameter per line, and blank lines are ignored.
##### Shipped defaults
The file ships with the following lines. The first line, `-Xmx128m`, is the one you would typically change; the remaining lines are Traffic Parrot operational defaults that should generally be left as they are.
| Line | What it does |
| --- | --- |
| `-Xmx128m` | Sets the maximum heap size for the server to 128 MB. This is the line to raise if you work with large recordings or datasets (see [Typical adjustments](#jvm-args-typical-adjustments) below). There is no separate minimum-heap line in the shipped file. |
| `-XX:+PrintCommandLineFlags` | Prints the JVM's effective flags to standard output at startup, which is useful for diagnostics. |
| `-XX:+HeapDumpOnOutOfMemoryError` | Writes a heap dump file if the server runs out of memory. The dump is created in the install (working) directory. |
| `-Djdk.security.allowNonCaAnchor` | Security system property that allows non-CA trust anchors. |
| `-Dtrafficparrot.properties.filename=trafficparrot.properties` | Names the main properties file that Traffic Parrot loads (see [`trafficparrot.properties`](https://trafficparrot.com/documentation/5.65.x/properties.html)). |
| `-Dtrafficparrotserver.logging.properties.filename=trafficparrotserver.log4j.properties` | Names the [logging](#logging) (log4j) configuration file. |
| `-Dorg.eclipse.jetty.server.Request.maxFormContentSize=-1` | Removes Jetty's form-content size limit (`-1` means unbounded), so large mappings and uploads are not rejected. |
##### Typical adjustments
Each adjustment is one new line in `jvm.args`:
- Raise `-Xmx` if you work with large recordings or datasets, for example change `-Xmx128m` to `-Xmx512m` or `-Xmx2g`.
- Add a diagnostic flag by adding a line: for example a remote debugging flag, or garbage-collection logging. Add the exact flag for your JVM as its own line.
After editing `jvm.args`, restart Traffic Parrot for the change to take effect (see [Configuration changes requiring restart](#start-restart)).
### Logging
In order to change the logging level, see configuration files `trafficparrotserver.log4j.properties`.
### Startup config
To configure how long the startup scripts will wait for TP to start up set an environment variable `TP_STARTUP_WAIT_MILLIS`, for example:
```
test@test-pcs:~/Downloads/trafficparrot-no-jre-5.x.y$ export TP_STARTUP_WAIT_MILLIS=180000
test@test-pcs:~/Downloads/trafficparrot-no-jre-5.x.y$ ./start.sh
/optf/programs/jdk1.8.0_181/bin/java
Picked up environment startup timeout in milliseconds 180000
```
## Recording HTTPS via the browser proxy
### Overview
Traffic Parrot records HTTPS traffic by acting as a **browser (forward) proxy**. Instead of pointing your client at a single backend URL, you point your browser or application's proxy setting at Traffic Parrot, and Traffic Parrot decrypts, records, and forwards each HTTPS request on to the real host.
Because Traffic Parrot terminates the TLS connection, it mints a certificate for each host on the fly using the TLS **Server Name Indication (SNI)** from the connection. This means it can decrypt and record traffic to **any** host, not just `localhost`, so recording against real external HTTPS services works out of the box.
### Trusting the Traffic Parrot CA certificate
Because Traffic Parrot generates a per-host certificate for each connection, your client must trust the certificate authority (CA) that signs them. Import the Traffic Parrot CA certificate into the trust store of the browser or application you are recording from.
The CA keystore ships with Traffic Parrot:
| Property | Value |
| --- | --- |
| Keystore | `certificates/virtualservice-CA-keystore.p12` |
| Password | `trafficparrot` |
| Type | PKCS12 |
Export the CA certificate from this keystore and import it into your client's trust store so that the per-host certificates Traffic Parrot mints are trusted during recording.
### How the recorded host is determined
The host of each recorded request is taken from the HTTP `Host` header sent inside the proxied connection.
Once your traffic is recorded, the rest of the recording workflow is the same as for plain HTTP; see [Recording HTTP](https://trafficparrot.com/documentation/5.65.x/http.html#recording-http) for managing, editing, and replaying the recorded mappings. If the backend you are recording uses a certificate that is not trusted by default, or requires a client certificate, see [Outbound HTTPS certificates](#outbound-https-certificates).
## Management APIs
As an alternative to using the Traffic Parrot user interface, you can instead use the HTTP management APIs.
We have a [Postman](https://www.getpostman.com) workspace [file](https://documenter.getpostman.com/view/8460952/2sBYB1M8Eg?version=latest) that you can [import](https://learning.getpostman.com/docs/postman/collections/data_formats/#data-dumps) to demonstrate some of the common Traffic Parrot management APIs.
There is also some [OpenAPI](https://trafficparrot.com/documentation/5.65.x/openapi/index.html) documentation of those APIs. Or you may download the raw [OpenAPI specification](https://trafficparrot.com/documentation/5.65.x/downloads/openapi.yaml).
Please note that these APIs are not fully documented yet - if you see something missing that you would like then please [let us know](mailto:support@trafficparrot.com) and we will add it for you.
## Testing with scenarios
### Overview
Traffic Parrot supports a method for grouping together virtual service mappings to form a scenario. For example you may wish to group together mappings used for different types of testing e.g. integration, manual and performance tests.
The default scenario stores mappings on the filesystem under the directory specified in [`trafficparrot.properties`](https://trafficparrot.com/documentation/5.65.x/properties.html) by the `trafficparrot.virtualservice.trafficFilesRootUrl` property. For example the `mappings` and `__files` directories which are used for HTTP mappings in the default scenario.
All other scenarios are placed in the `scenarios` directory, which is also found under the configured root folder. For example the `scenarios/Example/mappings` and `scenarios/Example/__files` which are used for HTTP mappings in the scenario named `Example`.
Once you have placed some files under a scenario directory you will see the scenario in the navigation bar dropdown:
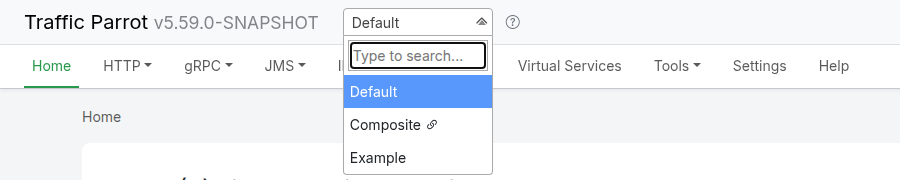
Clicking on a scenario name will activate that scenario. The scenario directory on the file system will be used as the source of mappings until Traffic Parrot is shut down. The default scenario is activated when Traffic Parrot starts up.
You can also use the `/api/scenarios` [REST API](#management-apis) to switch between scenarios.
### Workflow
Here is the required workflow for using scenarios as part of your testing.
###### Protocol used is HTTP/gRPC
1. Switch to scenario in the Traffic Parrot web user interface by selecting it from the dropdown
2. Run tests that rely on scenario
###### Protocol used is JMS/MQ/Files
1. Stop replay for protocol
2. Switch to scenario in the Traffic Parrot web user interface by selecting it from the dropdown
3. Start replay for protocol
4. Run tests that rely on scenario
### How to create a new scenario
To create a new scenario create a new folder on disk in `trafficparrot-5.0.0/scenarios` directory, for example, `trafficparrot-5.0.0/scenarios/hello-world-scenario`.
You can then select that new scenario in the Traffic Parrot user interface dropdown and add mappings to it by recording or manually creating from request-response pairs.
## Role based access
### Overview
Traffic Parrot supports role based access control (RBAC) with the following roles available:
| Role | Description |
| --- | --- |
| traffic-parrot-gui-role | Allows a user to sign in to the web user interface and read what it shows: the pages, the mappings, the request logs, and the file names under **Settings**, **Current configuration files**. |
| traffic-parrot-gui-edit-role | Allows a user to change Traffic Parrot: add, edit and delete mappings; record, replay and switch scenarios; clear the request logs; upload static files; import specifications and mapping files; load and save files under **Settings**, **Current configuration files**; and call an [MCP tool](https://trafficparrot.com/documentation/5.65.x/mcp.html#tools) that changes something. A user without this role is refused with `403`, naming the role, for every request that could change Traffic Parrot, from the pages and through the APIs the web user interface port serves alike: any method other than `GET`, `HEAD` and `OPTIONS`, and any request carrying a body. The request log queries that take their criteria in a `POST` body stay open to a reader. The roles apply to the web user interface port only: the virtual service port, its `/__admin` API and the management ports are not behind the login. |
### Configuration
To configure users and roles:
- Enable in [`trafficparrot.properties`](https://trafficparrot.com/documentation/5.65.x/properties.html) by setting:
```
trafficparrot.gui.security.mode=LOGIN_PROPERTIES
```
- Define users in `trafficparrot.gui.login.properties` by setting:
```
admin=password,traffic-parrot-gui-role,traffic-parrot-gui-edit-role
readonly=password,traffic-parrot-gui-role
```
- HTTP basic authentication popup prompts users to specify a username and password when they access the UI for the first time in their web browser
- The log pages that every virtual service HTTP and HTTPS port serves under `/__logs` (`/__logs/virtualservice/` and `/__logs/access/`, a scenario's own ports included) ask for the same login. Read them through the [Logs page](#start-logs) or the HTTPS port, since a plain-HTTP port sends the password unencrypted. Stubs and the admin API on those ports are not affected.
## Traffic Parrot in JUnit and Spring Boot tests
This section shows how to run Traffic Parrot from a JUnit or Spring Boot test suite without Docker: the build starts it before the integration tests and stops it after them, the tests point the code under test at its port, and every test starts from a clean journal and clean state. If Docker is available where your tests run, the [Testcontainers module](https://trafficparrot.com/documentation/5.65.x/testcontainers.html) does the same from inside the test class and is the shorter route.
It is the Traffic Parrot answer to the WireMock habit of starting the mock server inside the test JVM with `@WireMockTest` or a JUnit rule. Traffic Parrot is a standalone server, so it runs next to your tests rather than inside them, and one instance serves every test class in the run. There are three ways to have one running when your tests need it:
- **Started by the build, around the integration-test phase.** The [Maven plugin](#maven-plugin) or the [Gradle plugin](#gradle-plugin) downloads a release, starts it with your mappings before the tests and stops it afterwards. Nothing is installed on the machine and no Docker is needed. This is the set-up described here.
- **Started by the test, in a container.** The [Testcontainers module](https://trafficparrot.com/documentation/5.65.x/testcontainers.html) starts Traffic Parrot from a JUnit 5 extension or a JUnit 4 rule on ports Docker picks, and its client stubs, verifies and resets over the admin API.
- **Started once and shared.** A Traffic Parrot that is already running, on a developer machine or a shared test environment, started from the [downloaded distribution](https://trafficparrot.com/documentation/5.65.x/start.html) or [in Docker](#running-docker). The tests only need its address. Choose it when the mocks are maintained in the web user interface by more than one team.
### Start and stop Traffic Parrot from the build
Put your HTTP mappings under `src/test/resources/trafficparrot/mappings`, bind the plugin's `start` goal to `pre-integration-test` and its `stop` goal to `post-integration-test`, and run the tests in between with the [Maven Failsafe Plugin](https://maven.apache.org/surefire/maven-failsafe-plugin/). The `check-environment` goal at `pre-clean` stops an instance left running by an earlier run, so a build interrupted mid-test does not block the next one. The Surefire exclude and the Failsafe include route the `*IntegrationTest` classes to the `integration-test` phase: with the two plugins' defaults, a class name ending in `Test` runs under Surefire in the `test` phase, before Traffic Parrot has started, and Failsafe runs only `IT*`, `*IT` and `*ITCase`.
```
com.trafficparrot
trafficparrot-maven-plugin
${trafficparrot.version}
check-environment
pre-clean
check-environment
start-traffic-parrot
pre-integration-test
start
stop-traffic-parrot
post-integration-test
stop
true
https://your-host/trafficparrot-no-jre-${trafficparrot.version}.zip
file:///${project.basedir}/trafficparrot.license
8081
org.apache.maven.plugins
maven-surefire-plugin
**/*IntegrationTest*
org.apache.maven.plugins
maven-failsafe-plugin
integration-tests
integration-test
verify
**/*IntegrationTest*
```
`mvn clean verify` now downloads the release named by `downloadFrom`, starts it with your mappings, runs every class matching `*IntegrationTest`, and stops it. The complete list of plugin properties (HTTPS port, OpenAPI import, JMS and IBM® MQ replay, extra JAR files) is under [Running from Maven](#maven-plugin); the Gradle equivalents, in the `startTrafficParrot` block of `build.gradle.kts`, are under [Running from Gradle](#gradle-plugin).
### The port: fixed, or reserved by the build
Traffic Parrot listens on the port you configure, `httpVirtualServicePort` above, rather than on a random one your test reads back afterwards, so your tests and your application configuration can name it once. A fixed port is the simplest choice, and it is enough on a developer machine and on a CI agent that runs one build at a time.
When several builds share one CI host, every port the release opens has to differ per build, not only the one your tests call. With Docker available, the [Testcontainers module](https://trafficparrot.com/documentation/5.65.x/testcontainers.html#ports-and-urls) is the simpler answer, because Docker picks the host ports. Without it, reserve free ports at build time: the [`reserve-network-port`](https://www.mojohaus.org/build-helper-maven-plugin/reserve-network-port-mojo.html) goal of the Build Helper Maven Plugin stores free ports in Maven properties, and a filtered copy of `src/test/resources/trafficparrot.properties` hands them to Traffic Parrot. The Traffic Parrot plugin merges that file into the release's own `trafficparrot.properties` before it starts, and reads the ports it talks to from the merged file when they are not set in its `configuration`, so leave `httpVirtualServicePort` and the other port properties out of the plugin configuration in this set-up.
```
src/test/resources
true
trafficparrot.properties
src/test/resources
trafficparrot.properties
org.codehaus.mojo
build-helper-maven-plugin
3.6.1
reserve-traffic-parrot-ports
initialize
reserve-network-port
trafficparrot.gui.port
trafficparrot.gui.https.port
trafficparrot.gui.jmx.port
trafficparrot.http.port
trafficparrot.https.port
trafficparrot.management.port
trafficparrot.jms.management.port
trafficparrot.jmx.port
trafficparrot.grpc.port
trafficparrot.grpc.tls.port
org.apache.maven.plugins
maven-failsafe-plugin
integration-tests
integration-test
verify
**/*IntegrationTest*
${trafficparrot.http.port}
${trafficparrot.gui.port}
...
```
And in `src/test/resources/trafficparrot.properties`, one line per port:
```
trafficparrot.gui.http.port=${trafficparrot.gui.port}
trafficparrot.gui.https.port=${trafficparrot.gui.https.port}
trafficparrot.gui.jmx.port=${trafficparrot.gui.jmx.port}
trafficparrot.virtualservice.http.port=${trafficparrot.http.port}
trafficparrot.virtualservice.https.port=${trafficparrot.https.port}
trafficparrot.virtualservice.http.management.port=${trafficparrot.management.port}
trafficparrot.virtualservice.jms.management.port=${trafficparrot.jms.management.port}
trafficparrot.virtualservice.jmx.port=${trafficparrot.jmx.port}
trafficparrot.virtualservice.grpc.non.tls.port=${trafficparrot.grpc.port}
trafficparrot.virtualservice.grpc.tls.port=${trafficparrot.grpc.tls.port}
```
Each build now gets its own set of ports, and a test reads the two it needs, the virtual service port and the web user interface port, from the `trafficparrot.http.port` and `trafficparrot.gui.port` system properties. The Gradle plugin takes the same port properties as numbers in its `startTrafficParrot` block and reserves no ports of its own, so a build script that needs distinct ports computes them before configuring the block.
### The JUnit test
The test needs no Traffic Parrot library: it reads the port and uses any HTTP client. With this mapping file under `src/test/resources/trafficparrot/mappings`:
```
{
"request": { "method": "GET", "urlPath": "/customers/123" },
"response": { "status": 200, "headers": { "Content-Type": "application/json" }, "body": "{\"id\": \"123\"}" }
}
```
the test is:
```
import java.net.URI;
import java.net.http.HttpClient;
import java.net.http.HttpRequest;
import java.net.http.HttpResponse;
import org.junit.jupiter.api.Test;
import static org.assertj.core.api.Assertions.assertThat;
class CustomerLookupIntegrationTest {
static final String TRAFFIC_PARROT = "http://localhost:" + System.getProperty("trafficparrot.http.port", "8081");
@Test
void returnsTheStubbedCustomer() throws Exception {
HttpClient client = HttpClient.newHttpClient();
HttpRequest request = HttpRequest.newBuilder(URI.create(TRAFFIC_PARROT + "/customers/123")).GET().build();
HttpResponse response = client.send(request, HttpResponse.BodyHandlers.ofString());
assertThat(response.statusCode()).isEqualTo(200);
assertThat(response.body()).contains("\"id\": \"123\"");
}
}
```
The class name ends in `IntegrationTest`, the pattern the `pom.xml` above hands to Failsafe and keeps out of Surefire, so it runs after Traffic Parrot has started. The default in the `getProperty` call keeps the test runnable from an IDE against a Traffic Parrot you started yourself on the fixed port.
### Spring Boot tests
A Spring Boot application calls its downstream services at URLs it reads from configuration, so the test's job is to point that configuration at Traffic Parrot. The port system property is in Spring's environment, so a placeholder in a test property does it, with the fixed port as the default:
```
@SpringBootTest(webEnvironment = SpringBootTest.WebEnvironment.RANDOM_PORT)
@TestPropertySource(properties = "customers.base-url=http://localhost:${trafficparrot.http.port:8081}")
class OrderServiceIntegrationTest {
@Autowired
TestRestTemplate restTemplate;
@Test
void placesAnOrderForAStubbedCustomer() {
ResponseEntity response = restTemplate.postForEntity("/orders", new Order("123", "book"), String.class);
assertThat(response.getStatusCode()).isEqualTo(HttpStatus.CREATED);
}
}
```
The application under test calls the mock without any change to its code, and the random port in `webEnvironment` is the application's own port, not Traffic Parrot's. With a fixed Traffic Parrot port the same line can live in `src/test/resources/application-test.properties` instead, which Spring reads for a test class annotated `@ActiveProfiles("test")`.
### A clean start for every test
One Traffic Parrot serves the whole run, so what a test leaves behind is visible to the next one. Four things accumulate, and each has a management API call that clears it. All four are served on the web user interface port, `trafficparrot.gui.http.port`, `8080` by default:
- The **request journal**, which [request verification](https://trafficparrot.com/documentation/5.65.x/http.html#verifying-requests) reads: `DELETE /api/http/requests`.
- **Scenario state** of stateful mappings, the `scenarioName` and `requiredScenarioState` of a mapping file: `POST /api/http/__admin/scenarios/reset` returns every one to its `Started` state. (These are WireMock scenarios inside a mapping, not the [Traffic Parrot scenarios](#scenarios) that group mapping files.)
- **Key-value state** written by the [`manageState`](https://trafficparrot.com/documentation/5.65.x/dynamic.html#manage-state) helper: `DELETE /api/state`.
- **Mappings added over the API** with `POST /api/http/__admin/mappings`, which are held in memory unless the mapping sets `"persistent": true`: `POST /api/http/__admin/mappings/reset` forgets them and reloads the mapping files.
```
static final String TRAFFIC_PARROT_UI = "http://localhost:" + System.getProperty("trafficparrot.gui.port", "8080");
@BeforeEach
void startClean() throws Exception {
HttpClient client = HttpClient.newHttpClient();
client.send(HttpRequest.newBuilder(URI.create(TRAFFIC_PARROT_UI + "/api/http/requests")).DELETE().build(), HttpResponse.BodyHandlers.discarding());
client.send(HttpRequest.newBuilder(URI.create(TRAFFIC_PARROT_UI + "/api/http/__admin/scenarios/reset")).POST(HttpRequest.BodyPublishers.noBody()).build(), HttpResponse.BodyHandlers.discarding());
client.send(HttpRequest.newBuilder(URI.create(TRAFFIC_PARROT_UI + "/api/state")).DELETE().build(), HttpResponse.BodyHandlers.discarding());
client.send(HttpRequest.newBuilder(URI.create(TRAFFIC_PARROT_UI + "/api/http/__admin/mappings/reset")).POST(HttpRequest.BodyPublishers.noBody()).build(), HttpResponse.BodyHandlers.discarding());
}
```
The mapping files in the mappings folder, the ones the build copied from `src/test/resources` included, are kept by every call above. `POST /api/http/__admin/mappings/reset` reloads them and forgets the mappings added in memory (`POST /api/http/__admin/reset` does the same and clears the request journal and the scenario state with it), so the files serve as they did at startup; keep the mappings in those files and treat them as read-only during the run. A mapping held in memory answers ahead of a mapping file that matches the same request at the same priority, so a test can override a shipped mapping until the reset. A mapping added with `"persistent": true` at the top level of its JSON, or any mapping added over the API when [`trafficparrot.http.mappings.persistentByDefault`](https://trafficparrot.com/documentation/5.65.x/properties.html#http-mappings-persistent-by-default) is `true`, is written to that folder and outlives the test, so delete it by id when the test ends: `DELETE /api/http/__admin/mappings/{id}` removes the mapping and its file. Do not call `DELETE /api/http/__admin/mappings` between tests: it deletes every mapping and every mapping file in the folder, the ones you shipped with the build included.
### Next steps
- [Testcontainers](https://trafficparrot.com/documentation/5.65.x/testcontainers.html): the same lifecycle from inside the test class, with a client that stubs, verifies and resets.
- [Verifying requests](https://trafficparrot.com/documentation/5.65.x/http.html#verifying-requests): assert what your application sent, from the request journal.
- [Request matching](https://trafficparrot.com/documentation/5.65.x/request_matching.html) and [dynamic responses](https://trafficparrot.com/documentation/5.65.x/dynamic.html): the mapping files your tests rely on.
- [For WireMock users](https://trafficparrot.com/documentation/5.65.x/wiremock_users.html): how the rest of the WireMock embedded API maps onto Traffic Parrot.
### Running from Maven
First, download the [examples project](https://trafficparrot.com/documentation/5.65.x/downloads/trafficparrot-examples-5.65.x.zip) which will help you get started. Please follow the instructions below for more information.
#### The build lifecycle
We recommend using the following [lifecycle phases](https://maven.apache.org/guides/introduction/introduction-to-the-lifecycle.html#Lifecycle_Reference):
1. `pre-clean` to check that there is not an existing Traffic Parrot instance running using the `trafficparrot:check-environment` goal
2. `pre-integration-test` to start Traffic Parrot using `trafficparrot:start` goal
3. `integration-test` to run tests that rely on Traffic Parrot using the `failsafe:integration-test` goal
4. `post-integration-test` to stop Traffic Parrot using the `trafficparrot:stop` goal
We recommend using the following [Maven Failsafe Plugin](https://maven.apache.org/surefire/maven-failsafe-plugin/) goals to execute your tests:
```
org.apache.maven.plugins
maven-failsafe-plugin
3.5.5
integration-tests
integration-test
verify
**/*IntegrationTest*
false
```
You should ensure that your [Maven Surefire Plugin](https://maven.apache.org/surefire/maven-surefire-plugin/) tests do not overlap:
```
org.apache.maven.plugins
maven-surefire-plugin
3.5.5
**/*IntegrationTest*
```
#### Changes to your pom.xml
To use the plugin, you will need to make changes similar to the following in your `pom.xml` file:
```
org.apache.maven.plugins
maven-surefire-plugin
3.5.5
**/*IntegrationTest*
false
org.apache.maven.plugins
maven-failsafe-plugin
3.5.5
integration-tests
integration-test
verify
**/*IntegrationTest*
false
com.trafficparrot
trafficparrot-maven-plugin
4.7.7
check-environment
pre-clean
check-environment
start-traffic-parrot
pre-integration-test
start
stop-traffic-parrot
post-integration-test
stop
true
file:///${trafficparrot.zip.file}
file:///${trafficparrot.license.file}
true
true
true
true
18081
18082
file:///${project.build.testOutputDirectory}/trafficparrot/jms-connections.json
INTERNAL
19091
ACTIVE_MQ
true
USE-TRAFFIC-PARROT-INTERNAL-BROKER
example-connection-id
true
example-connection-id
file:///${project.build.testOutputDirectory}/trafficparrot/ibm-mq-connections.json
true
ibm-mq-connection
ibm-mq-connection
true
ibm-mq-connection
file:///${examples.jar.file}
file:///${ibm.mq.client.jar.file}
trafficparrot.com
https://trafficparrot.com/repository
trafficparrot.com
https://trafficparrot.com/repository
```
You will need to:
1. Update the version of the `trafficparrot-maven-plugin` to match the version you wish to use. Usually this should match the Traffic Parrot release version number.
2. Set the value of the `acceptLicense` property in the `pom.xml` to `true` to indicate that you accept the Traffic Parrot license terms. You can find a copy in the [examples project](https://trafficparrot.com/documentation/5.65.x/downloads/trafficparrot-examples-5.65.x.zip).
3. Set the value of the `downloadFrom` property in the `pom.xml` to the URL of the Traffic Parrot release you would like to use. We are able to host a stable `https://` link for our clients if you do not want to host the artifact internally.
4. Set the value of the `licenseFile` property in the `pom.xml` to the `file:///` that points to your license file.
5. Add entries in the `additionalJarFiles` field in the `pom.xml` for any additional JAR files that you would usually place in the `lib/external` directory of Traffic Parrot.
6. Ensure you have connectivity to `https://trafficparrot.com/repository`
#### HTTP replay
To replay HTTP traffic:
1. Place the HTTP mappings in the `src/test/resources/trafficparrot/mappings` directory of your project
2. Set the value of the `httpVirtualServicePort` property in the `pom.xml` to the port number your tests will use to connect to the virtual service over HTTP
3. Set the value of the `httpsVirtualServicePort` property in the `pom.xml` to the port number your tests will use to connect to the virtual service over HTTPS
4. The mappings will be replayed by Traffic Parrot during the `integration-test` phase
#### HTTP import
You can also provide your existing Swagger/OpenAPI/RAML definitions and Traffic Parrot will generate mocks based on the APIs and examples in the specification.
To import HTTP definitions:
1. Place the Swagger/OpenAPI/RAML files in the `src/test/resources/trafficparrot/http-import` directory of your project
2. Set the value of the `httpVirtualServicePort` property in the `pom.xml` to the port number your tests will use to connect to the virtual service over HTTP
3. Set the value of the `httpsVirtualServicePort` property in the `pom.xml` to the port number your tests will use to connect to the virtual service over HTTPS
4. Set the value of the `httpImportMappings` property in the `pom.xml` to `true`
5. Mappings will generated based on the specification and replayed by Traffic Parrot during the `integration-test` phase
#### JMS queue replay
To replay JMS queue traffic using an internal broker:
1. Place the JMS queue mappings in the `src/test/resources/trafficparrot/jms-mappings` directory
2. Set the value of the `jmsReplayQueue` property in the `pom.xml` to be `true`
3. Set the value of the `jmsBrokerType` property in the `pom.xml` to be `INTERNAL`
4. Set the value of the `jmsInternalBrokerPort` property in the `pom.xml` to the port number your tests will use to connect to the internal broker
5. Set the value of the `jmsQueueConsumeRequestsFromConnectionId` property in the `pom.xml` to `USE-TRAFFIC-PARROT-INTERNAL-BROKER`
6. Set the value of the `jmsQueueReplayResponsesToConnectionId` property in the `pom.xml` to `USE-TRAFFIC-PARROT-INTERNAL-BROKER`
7. The mappings will be replayed by Traffic Parrot during the `integration-test` phase
To replay JMS queue traffic using an external broker:
1. [Define JMS connections](https://trafficparrot.com/documentation/5.65.x/jms.html#define-jms-connections) that will be used for replay in the `src/test/resources/trafficparrot/jms-connections.json` file
2. Place the JMS queue mappings in the `src/test/resources/trafficparrot/jms-mappings` directory
3. Set the value of the `jmsConnectionsFile` property in the `pom.xml` to be `file:///${project.build.testOutputDirectory}/trafficparrot/jms-connections.json`
4. Set the value of the `jmsReplayQueue` property in the `pom.xml` to be `true`
5. Set the value of the `jmsBrokerType` property in the `pom.xml` to be `EXTERNAL`
6. Set the value of the `jmsQueueConsumeRequestsFromConnectionId` property in the `pom.xml` to the connection id of the broker to consume request messages from.
7. Set the value of the `jmsQueueReplayResponsesToConnectionId` property in the `pom.xml` to the connection id of the broker to replay response messages to.
8. The mappings will be replayed by Traffic Parrot during the `integration-test` phase
#### JMS topic replay
To replay JMS topic traffic using an internal broker:
1. Place the JMS topic mappings in the `src/test/resources/trafficparrot/jms-mappings` directory
2. Set the value of the `jmsReplayTopic` property in the `pom.xml` to be `true`
3. Set the value of the `jmsBrokerType` property in the `pom.xml` to be `INTERNAL`
4. Set the value of the `jmsInternalBrokerPort` property in the `pom.xml` to the port number your tests will use to connect to the internal broker
5. Set the value of the `jmsTopicReplayToConnectionId` property in the `pom.xml` to `USE-TRAFFIC-PARROT-INTERNAL-BROKER`
6. The mappings will be replayed by Traffic Parrot during the `integration-test` phase
To replay JMS topic traffic using an external broker:
1. [Define JMS connections](https://trafficparrot.com/documentation/5.65.x/jms.html#define-jms-connections) that will be used for replay in the `src/test/resources/trafficparrot/jms-connections.json` file
2. Place the JMS topic mappings in the `src/test/resources/trafficparrot/jms-mappings` directory
3. Set the value of the `jmsConnectionsFile` property in the `pom.xml` to be `file:///${project.build.testOutputDirectory}/trafficparrot/jms-connections.json`
4. Set the value of the `jmsReplayTopic` property in the `pom.xml` to be `true`
5. Set the value of the `jmsBrokerType` property in the `pom.xml` to be `EXTERNAL`
6. Set the value of the `jmsTopicReplayToConnectionId` property in the `pom.xml` to the connection id of the broker that will be used for replay.
7. The mappings will be replayed by Traffic Parrot during the `integration-test` phase
To replay IBM® MQ queue traffic using an external broker:
1. [Define IBM® MQ connections](https://trafficparrot.com/documentation/5.65.x/ibmmq.html#define-connections) that will be used for replay in the `src/test/resources/trafficparrot/ibm-mq-connections.json` file
2. Place the IBM® MQ queue mappings in the `src/test/resources/trafficparrot/ibm-mq-mappings` directory
3. Define `additionalJarFiles` in the `pom.xml` that point to the [required JAR files](https://trafficparrot.com/documentation/5.65.x/ibmmq.html#ibm-mq-libs).
4. Set the value of the `ibmMqConnectionsFile` property in the `pom.xml` to be `file:///${project.build.testOutputDirectory}/trafficparrot/ibm-mq-connections.json`
5. Set the value of the `ibmMqReplayQueue` property in the `pom.xml` to be `true`
6. Set the value of the `ibmMqBrokerType` property in the `pom.xml` to be `EXTERNAL`
7. Set the value of the `ibmMqQueueConsumeRequestsFromConnectionId` property in the `pom.xml` to the connection id of the broker to consume request messages from.
8. Set the value of the `ibmMqQueueReplayResponsesToConnectionId` property in the `pom.xml` to the connection id of the broker to replay response messages to.
9. The mappings will be replayed by Traffic Parrot during the `integration-test` phase
Replaying IBM® MQ queue traffic using an internal broker is not yet supported, please contact us at [support@trafficparrot.com](mailto:support@trafficparrot.com) to be notified of when this functionality will be ready.
#### IBM® MQ topic replay
To replay IBM® MQ topic traffic using an external broker:
1. [Define IBM® MQ connections](https://trafficparrot.com/documentation/5.65.x/ibmmq.html#define-connections) that will be used for replay in the `src/test/resources/trafficparrot/ibm-mq-connections.json` file
2. Define `additionalJarFiles` in the `pom.xml` that point to the [required JAR files](https://trafficparrot.com/documentation/5.65.x/ibmmq.html#ibm-mq-libs).
3. Place the IBM® MQ topic mappings in the `src/test/resources/trafficparrot/ibm-mq-mappings` directory
4. Set the value of the `ibmMqConnectionsFile` property in the `pom.xml` to be `file:///${project.build.testOutputDirectory}/trafficparrot/ibm-mq-connections.json`
5. Set the value of the `ibmMqReplayTopic` property in the `pom.xml` to be `true`
6. Set the value of the `ibmMqBrokerType` property in the `pom.xml` to be `EXTERNAL`
7. Set the value of the `ibmMqTopicReplayToConnectionId` property in the `pom.xml` to the connection id of the broker that will be used for replay.
8. The mappings will be replayed by Traffic Parrot during the `integration-test` phase
Replaying IBM® MQ topic traffic using an internal broker is not yet supported, please contact us at [support@trafficparrot.com](mailto:support@trafficparrot.com) to be notified of when this functionality will be ready.
### Running from Gradle
First, download the [examples project](https://trafficparrot.com/documentation/5.65.x/downloads/trafficparrot-examples-5.65.x.zip) which will help you get started. Please follow the instructions below for more information.
#### The build lifecycle
The Traffic Parrot Gradle plugin has two tasks `startTrafficParrot` and `stopTrafficParrot` that you can use. We recommend using the following tasks as part of your build:
1. `clean` to delete the files in the build directory
2. `startTrafficParrot` to start Traffic Parrot
3. `test` to run tests that rely on Traffic Parrot
4. `stopTrafficParrot` to stop Traffic Parrot
#### Changes to your project configuration
You will need the following changes to your `settings.gradle` file:
```
pluginManagement {
repositories {
maven {
url 'https://trafficparrot.com/repository'
// Serves Traffic Parrot artifacts only, and answers 403 rather than 404 for anything else,
// so without this filter a transitive dependency of the plugin fails here instead of
// falling through to Maven Central.
content {
includeGroup 'com.trafficparrot'
}
}
mavenCentral()
gradlePluginPortal()
}
}
```
You will also need to make changes similar to the following in your `build.gradle.kts` file:
```
plugins {
id("com.trafficparrot").version("4.5.4")
}
repositories {
maven("https://trafficparrot.com/repository")
}
startTrafficParrot {
// This can either be a file:/// or a http:// location of the Traffic Parrot release ZIP file
downloadFrom = uri("http://location/to/artifact/repository/trafficparrot-4.5.4-bin.zip").toURL()
// Set this to true to indicate that you accept the Traffic Parrot LICENSE terms
acceptLicense = false
// Set this to true if you would like to cache the download in the java.io.tmpdir
cacheDownload = true
// Set this to the location of your Traffic Parrot enterprise license file
licenseFile = file(project.projectDir.absolutePath + "/trafficparrot.license").toURL()
trafficFilesRoot = file(project.projectDir.absolutePath + "/src/test/resources/trafficparrot")
// This will import Swagger/OpenAPI/RAML specifications
httpImportMappings = true
httpVirtualServicePort = 18081
httpsVirtualServicePort = 18082
jmsConnectionsFile = file(project.projectDir.absolutePath + "/src/test/resources/trafficparrot/jms-connections.json").toURL()
jmsBrokerType = "INTERNAL"
jmsInternalBrokerPort = 19091
jmsInternalBrokerProvider = "ACTIVE_MQ"
jmsReplayQueue = true
jmsQueueConsumeRequestsFromConnectionId = "USE-TRAFFIC-PARROT-INTERNAL-BROKER"
jmsQueueReplayResponsesToConnectionId = "example-connection-id"
jmsReplayTopic = true
jmsTopicReplayToConnectionId = "example-connection-id"
}
stopTrafficParrot {
deleteAfterStop = true
}
```
You will need to:
1. Update the version of the `com.trafficparrot` plugin to match the version you wish to use. Usually this should match the Traffic Parrot release version number.
2. Set the value of the `acceptLicense` property in the `build.gradle.kts` to `true` to indicate that you accept the Traffic Parrot license terms. You can find a copy in the [examples project](https://trafficparrot.com/documentation/5.65.x/downloads/trafficparrot-examples-5.65.x.zip).
3. Set the value of the `downloadFrom` property in the `build.gradle.kts` to the URL of the Traffic Parrot release you would like to use.
4. Set the value of the `licenseFile` property in the `build.gradle.kts` to the `file(project.projectDir.absolutePath + "/trafficparrot.license").toURL()` that points to your license file.
5. Ensure you have connectivity to `https://trafficparrot.com/repository`
#### HTTP replay
To replay HTTP traffic:
1. Place the HTTP mappings in the `src/test/resources/trafficparrot/mappings` directory of your project
2. Set the value of the `httpVirtualServicePort` property in the `build.gradle.kts` to the port number your tests will use to connect to the virtual service over HTTP
3. Set the value of the `httpsVirtualServicePort` property in the `build.gradle.kts` to the port number your tests will use to connect to the virtual service over HTTPS
4. The mappings will be replayed by Traffic Parrot once it has been started with the `startTrafficParrot` task
#### HTTP import
You can also provide your existing Swagger/OpenAPI/RAML definitions and Traffic Parrot will generate mocks based on the APIs and examples in the specification.
To import HTTP definitions:
1. Place the Swagger/OpenAPI/RAML files in the `src/test/resources/trafficparrot/http-import` directory of your project
2. Set the value of the `httpVirtualServicePort` property in the `build.gradle.kts` to the port number your tests will use to connect to the virtual service over HTTP
3. Set the value of the `httpsVirtualServicePort` property in the `build.gradle.kts` to the port number your tests will use to connect to the virtual service over HTTPS
4. Set the value of the `httpImportMappings` property in the `build.gradle.kts` to `true`
5. Mappings will generated based on the specification and replayed by Traffic Parrot once it has been started with the `startTrafficParrot` task
#### JMS queue replay
To replay JMS queue traffic using an internal broker:
1. Place the JMS queue mappings in the `src/test/resources/trafficparrot/jms-mappings` directory
2. Set the value of the `jmsReplayQueue` property in the `build.gradle.kts` to be `true`
3. Set the value of the `jmsBrokerType` property in the `build.gradle.kts` to be `INTERNAL`
4. Set the value of the `jmsInternalBrokerPort` property in the `build.gradle.kts` to the port number your tests will use to connect to the internal broker
5. Set the value of the `jmsQueueConsumeRequestsFromConnectionId` property in the `build.gradle.kts` to `USE-TRAFFIC-PARROT-INTERNAL-BROKER`
6. Set the value of the `jmsQueueReplayResponsesToConnectionId` property in the `build.gradle.kts` to `USE-TRAFFIC-PARROT-INTERNAL-BROKER`
7. The mappings will be replayed by Traffic Parrot once it has been started with the `startTrafficParrot` task
To replay JMS queue traffic using an external broker:
1. [Define JMS connections](https://trafficparrot.com/documentation/5.65.x/jms.html#define-jms-connections) that will be used for replay in the `src/test/resources/trafficparrot/jms-connections.json` file
2. Place the JMS queue mappings in the `src/test/resources/trafficparrot/jms-mappings` directory
3. Set the value of the `jmsConnectionsFile` property in the `build.gradle.kts` to be `file(project.projectDir.absolutePath + "/src/test/resources/trafficparrot/jms-connections.json").toURL()`
4. Set the value of the `jmsReplayQueue` property in the `build.gradle.kts` to be `true`
5. Set the value of the `jmsBrokerType` property in the `build.gradle.kts` to be `EXTERNAL`
6. Set the value of the `jmsQueueConsumeRequestsFromConnectionId` property in the `build.gradle.kts` to the connection id of the broker to consume request messages from.
7. Set the value of the `jmsQueueReplayResponsesToConnectionId` property in the `build.gradle.kts` to the connection id of the broker to replay response messages to.
8. The mappings will be replayed by Traffic Parrot once it has been started with the `startTrafficParrot` task
#### JMS topic replay
To replay JMS topic traffic using an internal broker:
1. Place the JMS topic mappings in the `src/test/resources/trafficparrot/jms-mappings` directory
2. Set the value of the `jmsReplayTopic` property in the `build.gradle.kts` to be `true`
3. Set the value of the `jmsBrokerType` property in the `build.gradle.kts` to be `INTERNAL`
4. Set the value of the `jmsInternalBrokerPort` property in the `build.gradle.kts` to the port number your tests will use to connect to the internal broker
5. Set the value of the `jmsTopicReplayToConnectionId` property in the `build.gradle.kts` to `USE-TRAFFIC-PARROT-INTERNAL-BROKER`
6. The mappings will be replayed by Traffic Parrot once it has been started with the `startTrafficParrot` task
To replay JMS topic traffic using an external broker:
1. [Define JMS connections](https://trafficparrot.com/documentation/5.65.x/jms.html#define-jms-connections) that will be used for replay in the `src/test/resources/trafficparrot/jms-connections.json` file
2. Place the JMS topic mappings in the `src/test/resources/trafficparrot/jms-mappings` directory
3. Set the value of the `jmsConnectionsFile` property in the `build.gradle.kts` to be `file(project.projectDir.absolutePath + "/src/test/resources/trafficparrot/jms-connections.json").toURL()`
4. Set the value of the `jmsReplayTopic` property in the `build.gradle.kts` to be `true`
5. Set the value of the `jmsBrokerType` property in the `build.gradle.kts` to be `EXTERNAL`
6. Set the value of the `jmsTopicReplayToConnectionId` property in the `build.gradle.kts` to the connection id of the broker that will be used for replay.
7. The mappings will be replayed by Traffic Parrot once it has been started with the `startTrafficParrot` task
## Supplying the license
By default Traffic Parrot reads its license from a `trafficparrot.license` file on the classpath (typically placed in the installation directory). This works well for a local installation, but baking the license file into a Docker image means you have to rebuild the image whenever the license changes, and the license is then embedded in an image layer.
You can instead supply the license through the `TRAFFICPARROT_LICENSE` environment variable, so it can be injected at runtime from a Kubernetes Secret, a Docker secret, or a secrets manager such as [HashiCorp Vault](https://www.vaultproject.io/); this follows the [12-factor](https://12factor.net/config) approach of keeping configuration out of the image. If the environment variable is not set, Traffic Parrot reads the `trafficparrot.license` file from the classpath exactly as before, so existing installations are unaffected.
##### Encoding the license
The license content is multi-line and encrypted, so it must be base64-encoded before it can be carried safely in an environment variable. Encode your `trafficparrot.license` file once and use the resulting single line as the value of the variable:
```
base64 -w0 trafficparrot.license
```
The `-w0` flag disables line wrapping so the whole value is produced on a single line. (On macOS, GNU `coreutils` provides `gbase64 -w0`; the BSD `base64` does not wrap by default.) A stray trailing newline in the value is tolerated; Traffic Parrot trims the value before decoding it.
##### Precedence
Traffic Parrot resolves the license from the first source that is set, in this order:
| Priority | Source | Value |
| --- | --- | --- |
| 1 (highest) | System property `-Dtrafficparrot.license.content` | base64-encoded license content |
| 2 | Environment variable `TRAFFICPARROT_LICENSE` | base64-encoded license content |
| 3 (lowest) | Classpath file `trafficparrot.license` | the raw license file (default behaviour) |
If the environment variable or system property is **set but not valid** (the value is not valid base64, or the decoded content is not a parseable license), Traffic Parrot fails to start with a clear error that names the variable; it does **not** silently fall back to the classpath file. This is intentional: a set-but-broken value is a misconfiguration you need to see rather than have masked. An unset (or empty) variable falls back to the classpath file as normal.
##### Docker
Pass the encoded license to `docker run` with `--env`:
```
docker run --name trafficparrot -d \
--env TRAFFICPARROT_LICENSE=BASE64_LICENSE_CONTENT \
-p 127.0.0.1:8080:8080 -p 127.0.0.1:8081:8081 trafficparrot
```
To avoid the value appearing in your shell history or process list, keep it in an [env file](https://docs.docker.com/reference/cli/docker/container/run/#env) that is not committed to source control and reference it with `--env-file`:
```
# trafficparrot.env (do not commit this file)
TRAFFICPARROT_LICENSE=BASE64_LICENSE_CONTENT
```
```
docker run --name trafficparrot -d \
--env-file trafficparrot.env \
-p 127.0.0.1:8080:8080 -p 127.0.0.1:8081:8081 trafficparrot
```
##### Docker Compose
With Docker Compose, inject the value at runtime rather than hard-coding it in a committed `docker-compose.yml`. The example below reads the variable from the environment of the host that runs `docker compose up` (for example exported from your secrets manager):
```
services:
trafficparrot:
image: trafficparrot
environment:
# value supplied from the host environment, not stored in this file
TRAFFICPARROT_LICENSE: ${TRAFFICPARROT_LICENSE}
ports:
- "127.0.0.1:8080:8080"
- "127.0.0.1:8081:8081"
```
##### Kubernetes
In Kubernetes, store the encoded license in a [Secret](https://kubernetes.io/docs/concepts/configuration/secret/) and reference it from the pod with `valueFrom.secretKeyRef`.
Create the Secret:
```
kubectl create secret generic trafficparrot-license \
--from-literal=license=BASE64_LICENSE_CONTENT
```
Reference it from the container:
```
env:
- name: TRAFFICPARROT_LICENSE
valueFrom:
secretKeyRef:
name: trafficparrot-license
key: license
```
The sample [Kubernetes Helm chart](#running-kubernetes) does this for you: name the Secret in its `license.existingSecret` value. The sample [OpenShift chart](#running-openshift) copies the license file into the image instead; to keep it out of the image, add the environment variable above to its Deployment.
> #### Keep the license secret
>
> The license is sensitive. Inject it at runtime via a Kubernetes Secret, a Docker secret, or a secrets manager such as [Vault](https://www.vaultproject.io/). Do **not** commit the license (encoded or raw) to a source repository, and do not bake it into a Docker image layer. Traffic Parrot never logs the license content or the value of the environment variable.
## Running in Docker
To run Traffic Parrot in [Docker](https://www.docker.com/) you will need to use `start-foreground.sh` instead of `start.sh`.
Here is an example that should get you started:
1. Copy `trafficparrot-x.y.z-bin.zip` to the current directory
- We recommend to use the bundled JRE distribution we provide per OS, which means you do not need a base image with Java installed. Linux is typically used for Docker.
- The examples below show how to use a Java base image, in case you are using the no-JRE bundle
2. Save the following file as `Dockerfile`. These are only example files, to help get you started, but you can modify them to suit your needs. Additional examples can be found in our [Docker examples GitHub repository](https://github.com/trafficparrot/trafficparrot-examples-docker).
##### Eclipse Temurin OpenJDK 21 LTS base image example
```
FROM eclipse-temurin:21-jre
RUN apt-get update && apt-get install unzip -y
WORKDIR /opt
COPY trafficparrot-*.zip trafficparrot.zip
RUN unzip trafficparrot.zip && rm trafficparrot.zip && mv trafficparrot-* trafficparrot
RUN chgrp -R 0 /opt/trafficparrot && chmod -R g=u /opt/trafficparrot
WORKDIR /opt/trafficparrot
CMD ["./start-foreground.sh"]
```
##### Alpine base image example with Java 21 LTS
```
FROM alpine:3
RUN apk add --no-cache openjdk21-jre bash libc6-compat gcompat libgcc
WORKDIR /opt
COPY trafficparrot-*.zip trafficparrot.zip
RUN unzip trafficparrot.zip && rm trafficparrot.zip && mv trafficparrot-* trafficparrot
RUN chgrp -R 0 /opt/trafficparrot && chmod -R g=u /opt/trafficparrot
ENV LD_LIBRARY_PATH=/usr/lib:/opt/trafficparrot/jre/lib/amd64/server:/opt/trafficparrot/jre/lib/amd64
WORKDIR /opt/trafficparrot
CMD ["./start-foreground.sh"]
```
3. Build the image, for example:
```
docker build -t trafficparrot .
```
4. Run the container, for example:
```
docker run --name trafficparrot -d -p 127.0.0.1:8080:8080 -p 127.0.0.1:8081:8081 -p 127.0.0.1:8083:8083 -p 127.0.0.1:9093:9093 trafficparrot
```
5. Wait for the container to start, for example:
```
until docker logs trafficparrot | grep "Started Traffic Parrot"; do sleep 1; done
```
6. Open [http://127.0.0.1:8080](http://127.0.0.1:8080) in a web browser to view the Traffic Parrot UI
7. Stop the container, for example:
```
docker stop trafficparrot
```
8. View the container logs, for example:
```
docker logs trafficparrot
```
9. Remove the container, for example:
```
docker rm -v trafficparrot
```
Please be aware of these important points when running Traffic Parrot in Docker:
- **DO** prefer to use the bundled JRE distribution we provide per OS instead of the no-JRE bundle. This ensures Traffic Parrot runs with a Java version that has passed our compatibility tests.
- **DO** expose ports for the protocols you require; you can check the [`trafficparrot.properties`](https://trafficparrot.com/documentation/5.65.x/properties.html) file for port numbers.
- **DO** make sure you are using `start-foreground.sh` to ensure that Traffic Parrot is started as a foreground process that will correctly receive process termination signals such as `SIGTERM` when a `docker stop` command is issued.
- **DO** stop the container using a `docker stop` command that will issue a `SIGTERM` signal, allowing graceful shutdown of Traffic Parrot. This will ensure the license seat that was in use is immediately available for use by new instances.
- **DO NOT** use `docker kill` or `docker rm -fv` commands that will issue a `SIGKILL` signal, circumventing graceful shutdown of Traffic Parrot. This will result in the license seat that was in use remaining checked out until the timeout period has expired, which is typically set at 5 minutes for most customers.
- **DO** see references
- [termination signals reference](https://www.gnu.org/software/libc/manual/html_node/Termination-Signals.html)
- [docker stop reference](https://docs.docker.com/engine/reference/commandline/stop)
- [docker kill reference](https://docs.docker.com/engine/reference/commandline/kill/)
- [docker rm reference](https://docs.docker.com/engine/reference/commandline/rm/)
We highly recommend using the [OpenJDK base JRE images](https://hub.docker.com/_/eclipse-temurin) which are well tested with Java. If you choose to use a custom base image, keep in mind these requirements:
- `bash` is required for the start and stop scripts
- `java` is required when using the no-JRE bundle, otherwise the bundled Java version will be used
- `glibc` is a key library required by Java that is sometimes not included in small images e.g. Alpine Linux
##### How to copy mapping files from Docker to Git
When running in Docker, to commit mapping files edited via the UI to Git, there are a number of approaches possible:
- You can use [Docker volume](https://docs.docker.com/storage/volumes/) mounts so the mappings are saved on your localhost file system or use [Docker cp](https://docs.docker.com/engine/reference/commandline/cp/) to extract files from the container
- Or you can run [outside of Docker](https://trafficparrot.com/documentation/5.65.x/start.html) locally when editing mappings so the filesystem is directly accessible
- Or you can use [Traffic Parrot APIs](https://trafficparrot.com/tutorials/traffic-parrot-programmatic-setup-using-apis.html) to view the JSON for the current mappings
##### How to pass environment variables to Docker
The Dockerfile CMD command can be modified to accept environment variables as follows:
```
ENV GUI_HTTP_PORT=8080
ENV VS_HTTP_PORT=8081
CMD exec ./start-foreground.sh \
trafficparrot.gui.http.port=$GUI_HTTP_PORT \
trafficparrot.virtualservice.http.port=$VS_HTTP_PORT
```
##### How to set the logging level dynamically with Docker environment variables
First the Dockerfile can be configured with an environment variable:
```
ENV LOG_LEVEL=ERROR
```
This can be then be configured for use:
- `trafficparrotserver.log4j.properties` can be configured with:
```
log4j.rootLogger=${LOG_LEVEL},file,stdout
```
And the Dockerfile with:
```
CMD exec ./start-foreground.sh -DLOG_LEVEL=$LOG_LEVEL
```
- `trafficparrotserver.log4j2.xml` can be configured with:
```
```
- `trafficparrotserver.logback.xml` can be configured with:
```
```
## Running in Kubernetes
Traffic Parrot can be run in a [Kubernetes](https://kubernetes.io/) cluster that has an [Ingress controller](https://kubernetes.io/docs/concepts/services-networking/ingress-controllers/). We have sample [Helm charts](https://helm.sh/) for Traffic Parrot and for the [License Server](#license-server), each with a Dockerfile for its image and installation instructions, in our [Traffic Parrot Kubernetes Examples GitHub repository](https://github.com/trafficparrot/trafficparrot-examples-k8s).
The Traffic Parrot chart creates a Deployment, a Service and three `networking.k8s.io/v1` Ingresses: one for the web user interface, one for the HTTP virtual service and one for the gRPC virtual service. The license is read from the [Kubernetes Secret](#supplying-the-license-kubernetes) named in the `license.existingSecret` value, and TLS is configured with an `ingress.tls` value shaped like an Ingress `spec.tls`.
The charts are tested with [ingress-nginx](https://kubernetes.github.io/ingress-nginx/). Proxying gRPC and passing TLS through to a pod are configured per Ingress controller: the gRPC virtual service Ingress carries the `nginx.ingress.kubernetes.io/backend-protocol: GRPC` annotation and the License Server usage Ingress the `nginx.ingress.kubernetes.io/ssl-passthrough` annotation, both set from the `ingress.*.annotations` values. Another Ingress controller needs its own equivalent annotations there. We have not tested the charts with other controllers.
For OpenShift, use the [OpenShift chart](#running-openshift), which uses OpenShift Routes instead of Ingresses.
## Running in OpenShift
Traffic Parrot can be run in [OpenShift](https://docs.openshift.com/container-platform/4.12/welcome/index.html), and in any other [Kubernetes](https://kubernetes.io/) based environment with the Ingress based charts in [Running in Kubernetes](#running-kubernetes). The sample Helm chart below uses OpenShift Routes, so it installs on OpenShift only.
We have a sample [Helm chart](https://helm.sh/) that can be used to help you get started, you can [download it here](https://trafficparrot.com/documentation/5.65.x/downloads/TP-sample-openshift4-v1.0.3.zip) and follow the included instructions.
For the latest examples, check out our [Traffic Parrot Helm Examples GitHub repository](https://github.com/trafficparrot/trafficparrot-examples-helm).
## Upgrading Traffic Parrot
You can use the upgrade script (upgrade.sh on Linux/Mac or upgrade.exe on Windows) to help you upgrade from a previous version to a new version:
- First, unzip the new release, and you will find the upgrade script there
- For example on Linux/Mac in a terminal:
```
./upgrade.sh /path/to/previous-trafficparrot
```
- For example on Windows at the command prompt:
```
upgrade.exe "C:\path\to\previous-trafficparrot"
```
- Your traffic files and settings are carried from the previous installation into the new one: the mapping directories (`mappings`, `__files`, `grpc-mappings`, `jms-mappings`, `ibm-mq-mappings`, `file-mappings` and `websocket-mappings`), `scenarios`, `data`, `templates`, `responses` and any `.hbs` Handlebars partial at the installation root, `certificates`, `plugins`, `proto`, `proto-bin`, `openapi`, `performance-profile-settings`, `lib/external`, `jvm.args`, `trafficparrot.properties`, `trafficparrot.gui.login.properties`, the connection files (`database-connections.json`, `ibm-mq-connections.json`, `jms-connections.json` and `root-directories.json`), the coverage check allowlists (`openapi-coverage.properties`, `grpc-coverage.properties` and `messaging-coverage.properties`), the mapping schema check allowlists (`http-schema.properties` and `messaging-schema.properties`), the embedded SFTP server's `sftp-server-users.json`, `sftp-server-host.key` and `sftp-server-root`, and the logging configuration files
- `trafficparrot.properties`, `trafficparrot.performance.properties` and `jvm.args` are merged into the new release's copies setting by setting, so a setting you changed keeps your value and a setting the new release adds keeps its default. Every other file, the web user interface user store included, is copied whole, so a shipped user you removed stays removed. The upgrade prints the name of each setting it carries and never its value; its output is also written to `tp.out` in the new installation
- The licence file, `trafficparrot.license`, is not carried: copy it into the new installation yourself (see [Supplying the license](#supplying-the-license))
- (optional) Additional arguments can be used with the upgrade script:
- `--replace-existing` will automatically replace the previous installation with the new installation, and backup the previous installation into a new folder
- `--interactive` will prompt for user input to decide whether to stop the old instance and start the new instance
- `--automatic-stop` will automatically stop a previously running instance before upgrading
- `--automatic-start` will automatically start the new instance after upgrading
## License Server
For details on how to use Traffic Parrot with an on premise license server have a look at the [Traffic Parrot License Server](https://trafficparrot.com/documentation/license/latest/start.html) documentation.
## Monitoring via JMX
### Enabling JMX connectors
You can use JMX to monitor Traffic Parrot, for example by using [JConsole](http://docs.oracle.com/javase/8/docs/technotes/guides/management/jconsole.html).
The JMX connectors are disabled by default. In order to enable them you need to set the following [properties](#properties):
- `trafficparrot.gui.jmx.enabled=true`
- `trafficparrot.virtualservice.jmx.enabled=true`
## Typical environments
### Manual exploratory testing QA and development working in isolation
###### If you cannot see a video frame below [please download it here](https://trafficparrot.com/documentation/videos/ManualExploratoryTestingQAAndDevelopmentWorkingInIsolation.zip)
### Starting with automated testing
###### If you cannot see a video frame below [please download it here](https://trafficparrot.com/documentation/videos/StartingWithQAAutomatedTesting.zip)
### Continuous Delivery team sharing stubs or virtual services
###### If you cannot see a video frame below [please download it here](https://trafficparrot.com/documentation/videos/ContinuousDeliveryTeamSharingStubsOrCirtualServices.zip)
## Proof of concept with on-premises installation at a large enterprise
Large enterprises with **complex test environments** often start with a proof of concept project. If you feel like you do not have very complex test environments in your organisation, or would like to just try the software go ahead and jump straight into the [Quick start](https://trafficparrot.com/documentation/5.65.x/start.html). Otherwise, here is an example of a plan divided into stages on how you can implement a proof of concept project today.
### Stage 0: a 1-hour installation plan
After completing this first step, you will have a Traffic Parrot installation ready to virtualize assets. This step is usually combined with [Stage 1](#poc-stage1).
Prerequisites:
1. Access to the Traffic Parrot installation files
2. Access to the server where Traffic Parrot will be installed
3. [Correct Java version](https://trafficparrot.com/documentation/5.65.x/data_sheet.html#software-requirements) installed on the server
4. Access to a user account able to bind ports on the server
5. Access to a [modern web browser](https://trafficparrot.com/documentation/5.65.x/data_sheet.html#software-requirements)
6. An SSH client
Steps to perform:
1. Copy the provided `trafficparrot-x.y.z-bin.zip` to the destination directory
2. Unzip `trafficparrot-x.y.z-bin.zip`
3. [Start Traffic Parrot](#start-and-stop)
4. Access `http://server-address:8080`
5. [Stop Traffic Parrot](#start-and-stop)
If you you are a large enterprise with complex environments you will be required to run prerequisite confirmation tests (bash commands, SSH connections, ...) to confirm environment set up readiness before proceeding to installation. This will help avoiding common pitfalls to speed up the proof of concept project.
### Stage 1: a one to five day proof of concept
After completing this step you will have a solid proof of the value of service virtualization and Traffic Parrot to your organization. Traffic Parrot will be up and running and deliver value; the whole team will not yet know how to use it.
After completing this step, proceed to [Stage 2](#poc-stage2) to enable the whole team.
Prerequisites:
1. Completed [the 1 hour installation](#poc-stage0) plan
2. Identified a test plan to virtualize
1. Only stateless transactions
2. Causing much pain because of system unavailability, third party transaction costs, etc. Virtualizing these services will help prove value faster and will less effort.
3. Access from SUT server to the Traffic Parrot server (unblocked firewalls, etc.)
4. Access from Traffic Parrot server to the virtualized system
5. Access to the SUT application configuration files
6. Team
1. A small 2-5 people team for pilot deployment of Traffic Parrot
2. A team member able to configure SUT to point to Traffic Parrot available for the day
###### Potential blockages to successful implementation of Stage 1:
1. Not able to Download Traffic Parrot binaries inside the organization. Downloads are often blocked.
2. Test plan/suite issues
1. No stateless HTTP(S) transactions.
2. No simple transactions that would demonstrate high ROI after virtualizing.
3. No small team to lead the pilot project
4. No team member available to help with SUT configuration.
3. No access to a modern web browser.
###### Potential blockages to successful implementation of Stage 1 on the System Under Test server:
1. No SSH access to the application server. This type of access often requires prior setup.
2. No user with HDD write and port binding access on the SUT server. This type of access often requires prior setup.
3. No RAM and HDD space available on the application server. Often servers come with limited resources.
4. No Java installation on SUT server. Downloads are often blocked.
###### Potential blockages to successful implementation of Stage 1 on a dedicated server or cloud:
1. No SSH access to the Traffic Parrot server. This type of access often requires prior setup.
2. No user with HDD write and port binding access on the Traffic Parrot server. This type of access often requires prior setup.
3. No RAM and HDD space available on the Traffic Parrot. Often servers come with limited resources.
4. No Java installation on Traffic Parrot server. Downloads are often blocked.
5. No firewall routes from SUT server to Traffic Parrot server.
### Stage 2: enable the team in 4 weeks
Introducing other team members to Traffic Parrot. After this step, the team should have been able to virtualize one more service on their own for the given system or across a given team.
### Next steps
Introducing Traffic Parrot to other teams. Showcasing the successful implementation in the first team. Repeat steps 0-2 for other teams.
## Dynamic responses and custom extensions
Have a look at [available custom extensions and how to generate responses dynamically](https://trafficparrot.com/documentation/5.65.x/dynamic.html)
## FAQ
Have a look at [FAQ](https://trafficparrot.com/documentation/5.65.x/faqs.html)