Introduction

What is the Traffic Parrot License Server?

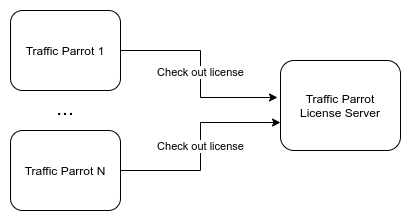
The license server allows Traffic Parrot instances to start up and make use of the licenses that were purchased.

Each Traffic Parrot instance will consume one of the purchased licenses until it is shut down.

There are 3 key states of a Traffic Parrot instance when connecting to the usage server:

  1. Check out a license on startup
  2. (optional) Keep alive a license if it is used for an extended period
  3. Check in a license on shutdown (waits for check in before shutting down)

Architecture

Each Traffic Parrot instance connects to the Traffic Parrot License Server to check out a license on startup.
Traffic Parrot License Server Architecture

First Steps

Prerequisites

Traffic Parrot License Server has the following minimum requirements. Customers with a large number of Traffic Parrot instances or with intensive usage may exceed these minimum requirements.

  • 256MB RAM
  • 1GB persistent volume (SSD recommended)
  • Host with 24/7 availability
  • Host accessible from all Traffic Parrot instances
  • Each purchased license pool must be used with a separate single license server instance

Installation

  1. You will have received links containing the license server installation files. Please download the .zip file for your corresponding operating system.
  2. Transfer the .zip file to the host machine and extract the contents. You will have a folder with a name starting with trafficparrot-license-usage-*.
  3. Configure licenseusage.properties with:
    • The persistent volume data directory location e.g. license.data.directory=data
    • The UI HTTP port e.g.
      user.interface.port=8050
      user.interface.port.enabled=true
    • (optional) The UI HTTPS port and certificates e.g.
      user.interface.https.port=8051
      user.interface.https.port.enabled=true
      user.interface.https.jks.path=certs/user-interface-https.jks
      user.interface.https.jks.password=trafficparrot
    • The usage port that Traffic Parrot will connect to e.g.
      license.usage.port=8040
      license.usage.port.ssl.enabled=true
    • The number of minutes before a license is released if Traffic Parrot loses connectivity to the license server e.g. license.time.out.in.minutes=5
  4. Place a copy of your trafficparrot.usage.license file in the usage server working directory
  5. Deploy the license usage server as a 24/7 application somewhere in your network that is visible to all Traffic Parrot instances
  6. The start script will launch the license server in a foreground process. To detach the process you can use commands:
    • nohup ./start.sh >nohup.out 2>&1 </dev/null & on Linux
    • Task Scheduler or NSSM service helper on Windows

Running in Docker

You may optionally use Docker to run the license server using the following steps:

  1. Copy the trafficparrot-license-usage-*.zip release to the current directory.
    • We recommend to use the bundled JRE distribution we provide per OS, which means you do not need a base image with Java installed. Linux is typically used for Docker.
    • The examples below show how to use a Java base image, in case you are using the no-JRE bundle
  2. Copy the trafficparrot.usage.license file to the current directory.
  3. Save the following Dockerfile content. These are only example files, to help get you started, but you can modify them to suit your needs.
    Eclipse Temurin OpenJDK base image example
    FROM eclipse-temurin:8u352-b08-jre
    
    RUN apt-get update && apt-get install unzip -y
    
    WORKDIR /opt
    COPY trafficparrot-license-usage-*.zip trafficparrot-license-usage.zip
    RUN unzip trafficparrot-license-usage.zip && rm trafficparrot-license-usage.zip && mv trafficparrot-license-usage-* trafficparrot-license-usage
    COPY trafficparrot.usage.license /opt/trafficparrot-license-usage
    
    RUN chgrp -R 0 /opt/trafficparrot-license-usage && chmod -R g=u /opt/trafficparrot-license-usage
    
    WORKDIR /opt/trafficparrot-license-usage
    VOLUME ["/opt/trafficparrot-license-usage/data"]
    CMD ["./start.sh"]
    Alpine base image example
    FROM alpine:3.17.2
    
    RUN apk add --no-cache openjdk8-jre bash libc6-compat gcompat
    
    WORKDIR /opt
    COPY trafficparrot-license-usage-*.zip trafficparrot-license-usage.zip
    RUN unzip trafficparrot-license-usage.zip && rm trafficparrot-license-usage.zip && mv trafficparrot-license-usage-* trafficparrot-license-usage
    COPY trafficparrot.usage.license /opt/trafficparrot-license-usage
    
    RUN chgrp -R 0 /opt/trafficparrot-license-usage && chmod -R g=u /opt/trafficparrot-license-usage
    ENV LD_LIBRARY_PATH=/usr/lib:/opt/trafficparrot-license-usage/jre/lib/amd64/server:/opt/trafficparrot-license-usage/jre/lib/amd64
    
    WORKDIR /opt/trafficparrot-license-usage
    VOLUME ["/opt/trafficparrot-license-usage/data"]
    CMD ["./start.sh"]
  4. Build an image, for example:
    docker build -t trafficparrot-license-usage:latest -t trafficparrot-license-usage:$(date '+%d-%b-%YT%H-%M-%S') .
  5. Run a container, for example:
    docker run -p 8050:8050 -p 8040:8040 -v /opt/data:/opt/trafficparrot-license-usage/data trafficparrot-license-usage:latest
  6. In this example:
    • The host persistent volume is /opt/data
    • The container mount point is /opt/trafficparrot-license-usage/data
  7. You must always provide a persistent volume mount when starting the container so that the license server data is not lost if the container is stopped.

Running in OpenShift

You may optionally use OpenShift to run the license server using the following steps:

  1. Follow the steps to build a Docker container and push to your OpenShift Docker registry
  2. Configure a persistent volume
  3. Configure a single pod deployment configuration with the persistent volume mounted
  4. Configure a service with TCP ports 8040, 8050, 8051
  5. Configure a route for the UI
    • Use Edge termination if routing to the HTTP UI port 8050
    • Use Passthrough or Re-encrypt termination if routing to the HTTPS UI port 8051
  6. Configure a route for the license usage port 8040. Your trafficparrot.license will be configured to support either a direct SSL/TLS binary connection to the license server or an HTTPS connection via an on premise proxy server with path based routing (e.g. an F5 or NGINX proxy).
    • Use Passthrough termination when using a direct SSL/TLS binary connection to the license server
    • Use Re-encrypt termination when using an HTTPS proxy server and license.usage.port.ssl.enabled=true
    • Use Edge termination when using an HTTPS proxy server and license.usage.port.ssl.enabled=false
  7. In this example:
    • The license usage port is 8040
    • The HTTP UI port is 8050
    • The HTTPS UI port is 8051
  8. You must configure a persistent volume mount in the deployment configuration so that the license server data is not lost if the pod is stopped.
  9. If you receive an HTTP 502 response from an OpenShift route this can sometimes mean you are incorrectly using insecure Edge termination for a secure target.

We also have a sample Helm chart that can be used to help you get started, you can download it here and follow the included instructions.

Activation

Before Traffic Parrot instances can successfully connect to the license server, it must be activated.

Please note that this is a one time only operation that should only be performed on a production ready license server that has been assigned a permanent persistent data volume and the installation directory or Docker image will no longer be changing.

Please follow the steps below to perform activation:

  1. Visit the Traffic Parrot License Activation web page by clicking the link on the license server UI:
    Traffic Parrot License Activation Link
  2. Follow the link, including the full URL that looks like https://license.trafficparrot.com?id=example
    Traffic Parrot License Activation
  3. (optional) If you do not have access to the activation web page, contact support@trafficparrot.com and we will issue a token via email if you provide us with the link
  4. Upload your trafficparrot.usage.license file
  5. You will receive a response with an activation token that is valid for 72 hours to activate the running license server:
    Traffic Parrot License Activation success
  6. This is the only time you will be shown this token, please take note of it
  7. If the license server is restarted before activation then the token will no longer be valid
  8. Visit your local license server activation page:
    GUI Activation page
  9. Enter your token and click submit
  10. You will see a success message:
    GUI Activation page success
  11. The server will remain activated unless any of the following occur:
    • The license server data directory changes
    • The license server installation directory changes
    • The license server Docker image is rebuilt
    which will require you to contact us to request activation of the new installation.
  12. If you encounter any issues or lose your activation token please contact support@trafficparrot.com

Connecting Traffic Parrot

Now the license server is deployed, we can connect Traffic Parrot instances to it:

  1. Place a copy of your trafficparrot.license file in the Traffic Parrot working directory (this has already been done for you in the download links we provide)
  2. Configure trafficparrot.properties with the host and port of the usage server. Your trafficparrot.license will be configured to support either a direct SSL/TLS binary connection to the license server or an HTTPS connection via an on premise proxy server with path based routing (e.g. an F5 or NGINX proxy).
    • When using a direct SSL/TLS binary connection to the license server e.g.
      trafficparrot.license.usage.server=licensehost:8040
    • When using an HTTPS proxy server with SSL e.g.
      trafficparrot.license.usage.server=https://proxyhost/some/path
      with the proxy server routing to https://licensehost:8040 and license server licenseusage.properties
      license.usage.port.ssl.enabled=true
    • When using an HTTPS proxy server without SSL e.g.
      trafficparrot.license.usage.server=https://proxyhost/some/path
      with the proxy server routing to http://licensehost:8040 and license server licenseusage.properties
      license.usage.port.ssl.enabled=false
  3. (optional) Configure trafficparrot.properties to allow sending custom headers to the proxy server, which may be necessary if your proxy server requires header based authentication:
    trafficparrot.license.usage.custom.headers=ExampleA:ValueA,ExampleB:ValueB
  4. Check logs/trafficparrot.log and you should see messages like this:
    Checking out initial license usage token
    Checked out initial license usage token PWEZWDW8S7E6EWOG with expiry 2020-11-15T13:37:54.465Z
    License usage token PWEZWDW8S7E6EWOG renewed with expiry 2020-11-15T13:42:54.523Z
    Checking in license usage token PWEZWDW8S7E6EWOG before shutdown
    Checked in license usage token PWEZWDW8S7E6EWOG
  5. Now when Traffic Parrot instances start up and shut down you should start to see data in the usage server
  6. Please ensure Traffic Parrot is shut down gracefully (in particular when using Docker) so that licenses can be released as soon as they are not in use, otherwise you will not be able to use the license until it has timed out

Upgrades

Upgrading only Traffic Parrot

  1. Stop Traffic Parrot
  2. Take a backup of the previous installation directory
  3. Copy the configuration that you would like to preserve from the previous installation to the new installation, for example this typically includes:
    • Compare trafficparrot.properties with the previous version and keep any custom property settings
    • Compare jvm.args with the previous version and keep any custom JVM settings
    • Copy ibm-mq-connections.json
    • Copy mappings directory
    • Copy ibm-mq-mappings directory
    • Copy data directory
    • Copy __files directory
    • Copy certificates certificate directory if you have custom certificates
    • Copy lib/external JAR directory if you have custom JARs
    • Compare the installation directory with the previous version to check for any other configuration differences
  4. Follow the instructions for connecting to the license server
  5. (optional) You can use the upgrade script (upgrade.sh on Linux/Mac or upgrade.exe on Windows) to help you perform the backup and configuration migration in the previous steps:
    • First, unzip the new release, and you will find the upgrade script there
    • For example on Linux/Mac in a terminal:
      ./upgrade.sh /path/to/previous-trafficparrot
    • For example on Windows at the command prompt:
      upgrade.exe "C:\path\to\previous-trafficparrot"
    • Your configuration changes from the previous installation will be merged into the new installation
    • (optional) Additional arguments can be used with the upgrade script:
      • --replace-existing will automatically replace the previous installation with the new installation, and backup the previous installation into a new folder
      • --interactive will prompt for user input to decide whether to stop the old instance and start the new instance
      • --automatic-stop will automatically stop a previously running instance before upgrading
      • --automatic-start will automatically start the new instance after upgrading
  6. Start Traffic Parrot

Upgrading only Traffic Parrot License Server

  1. Stop Traffic Parrot License Server
  2. Take a backup of the installation directory
  3. To preserve the usage history, copy the data directory from the previous installation to the new installation before starting
  4. Follow the instructions for installation
  5. Follow the instructions for activation
  6. Start Traffic Parrot License Server

Upgrading both Traffic Parrot and Traffic Parrot License Server

  1. Follow the instructions for upgrading Traffic Parrot License Server
  2. Follow the instructions for upgrading Traffic Parrot

Renewing the license files

  1. Keep the old Traffic Parrot License Server instance running while the old license is still valid
  2. Use the new trafficparrot.usage.license file with a new Traffic Parrot License Server instance, following the installation instructions
  3. Start up the new Traffic Parrot License Server instance
  4. Use the new trafficparrot.license file with new Traffic Parrot instances
  5. Check that new Traffic Parrot instances can connect to the new Traffic Parrot License Server instance
  6. Shut down the old Traffic Parrot License Server instance

Usage Reports

Hourly Peak Usage CSV Export

Customers with an on premise license server are requested to provide usage reports to Traffic Parrot via email. To export a CSV report:

  1. Visit the license server GUI Reports page:
    GUI Reports page
  2. Select the date range
  3. Click the "Load selected date range" button
  4. Click the "Peak license usage by hour" button
  5. A report with a file name similar to peak-usage-by-hour-16-Oct-2020-to-15-Nov-2020-Kq20bQre6MhgswfyG2RYFFIWr3FXTszZkDPnDq5FctL3wkxbb3KpGQ_.csv will be downloaded with content
    Date,Peak license usage in hour
    2020-10-16-00,3
    2020-10-16-01,2
    2020-10-16-02,2
    2020-10-16-03,0
    2020-10-16-05,1
    2020-10-16-06,4
    ...
  6. Please send a copy of the report to support@trafficparrot.com, keeping the same file name that was generated