User guide
« Back to documentation homeQuick start
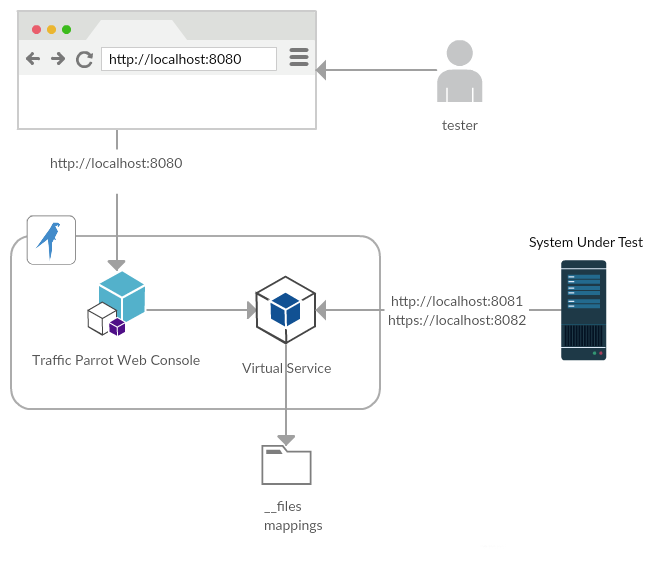
Architecture
Typical environments
Manual exploratory testing QA and development working in isolation
If you cannot see a video frame below please download it here
Starting with automated testing
If you cannot see a video frame below please download it here
Continuous Delivery team sharing stubs or virtual services
If you cannot see a video frame below please download it here
Proof of concept with on-premises installation at a large enterprise
Large enterprises with complex test environments often start with a proof of concept project. If you feel like you do not have very complex test environments in your organisation, or would like to just try the software go ahead and jump straight into the Quick start. Otherwise, here is an example of a plan divided into stages on how you can implement a proof of concept project today.
Stage 0: a 1-hour installation plan
After completing this first step, you will have a Traffic Parrot installation ready to virtualize assets. This step is usually combined with Stage 1.
- Access to the Traffic Parrot installation files
- Access to the server where Traffic Parrot will be installed
- Correct Java version installed on the server
- Access to a user account able to bind ports on the server
- Access to a modern web browser
- An SSH client
- Copy the provided trafficparrot-release-x.y.z-bin.zip to the destination directory
- Unzip trafficparrot-release-x.y.z-bin.zip
- Start Traffic Parrot
- Access http://server-address:8080
- Stop Traffic Parrot
If you you are a large enterprise with complex environments you will be required to run prerequisite confirmation tests (bash commands, SSH connections, ...) to confirm environment set up readiness before proceeding to installation. This will help avoiding common pitfalls to speed up the proof of concept project.
Stage 1: a one to five day proof of concept
After completing this step you will have a solid proof of the value of service virtualization and Traffic Parrot to your organization. Traffic Parrot will be up and running and deliver value; the whole team will not yet know how to use it.
After completing this step, proceed to Stage 2 to enable the whole team.
- Completed the 1 hour installation plan
- Identified a test plan to virtualize
- Only stateless transactions
- Causing much pain because of system unavailability, third party transaction costs, etc. Virtualizing these services will help prove value faster and will less effort.
- Access from SUT server to the Traffic Parrot server (unblocked firewalls, etc.)
- Access from Traffic Parrot server to the virtualized system
- Access to the SUT application configuration files
- Team
- A small 2-5 people team for pilot deployment of Traffic Parrot
- A team member able to configure SUT to point to Traffic Parrot available for the day
Potential blockages to successful implementation of Stage 1:
- Not able to Download Traffic Parrot binaries inside the organization. Downloads are often blocked.
- Test plan/suite issues
- No stateless HTTP(S) transactions.
- No simple transactions that would demonstrate high ROI after virtualizing.
- No small team to lead the pilot project
- No team member available to help with SUT configuration.
- No access to a modern web browser.
Potential blockages to successful implementation of Stage 1 on the System Under Test server:
- No SSH access to the application server. This type of access often requires prior setup.
- No user with HDD write and port binding access on the SUT server. This type of access often requires prior setup.
- No RAM and HDD space available on the application server. Often servers come with limited resources.
- No Java installation on SUT server. Downloads are often blocked.
Potential blockages to successful implementation of Stage 1 on a dedicated server or cloud:
- No SSH access to the Traffic Parrot server. This type of access often requires prior setup.
- No user with HDD write and port binding access on the Traffic Parrot server. This type of access often requires prior setup.
- No RAM and HDD space available on the Traffic Parrot. Often servers come with limited resources.
- No Java installation on Traffic Parrot server. Downloads are often blocked.
- No firewall routes from SUT server to Traffic Parrot server.
Stage 2: enable the team in 4 weeks
Introducing other team members to Traffic Parrot. After this step, the team should have been able to virtualize one more service on their own for the given system or across a given team.
Next steps
Introducing Traffic Parrot to other teams. Showcasing the successful implementation in the first team. Repeat steps 0-2 for other teams.
Starting and stopping
Linux, Unix and Mac
Start
- Open a terminal window
- Go to the installation directory cd trafficparrot-release-x.y.z
- Run start script ./start.sh
- Inspect the main log file and make sure there are no “ERROR”s less +F tp.out
- Open the web console in any modern web browser (Chrome, Firefox or MS Edge) http://localhost:8080
Stop
- Open a terminal window
- Go to the installation directory cd trafficparrot-release-x.y.z
- Run stop script ./stop.sh
Windows
Start
- Open a Command Prompt. Click Start, type cmd in the "Search programs and files" box or type cmd in Cortana prompt.
- Go to the installation directory cd trafficparrot-release-x.y.z
- Run start script start.cmd
- Inspect the console output and make sure there are no “ERROR”s
- Open the web console in any modern web browser (Chrome, Firefox or MS Edge) http://localhost:8080
Stop
- Press Ctrl+C in the Command Prompt
- Close the Command Prompt
Recording
Usage
In order to record traffic to a URL, simply enter the Recording URL and click Start recording.
All traffic received by the Traffic Parrot virtual service will be proxied to the host in the Recording URL and recorded as Mappings.
Filter by URL path
If the Recording URL includes a path, only traffic to this path will be recorded, however all traffic will still be proxied.
For example, if the Recording URL is set to http://example.com/aSampleResource then only traffic to paths staring with /aSampleResource will be recorded and all other traffic will be proxied to http://example.com.
Filter by Content-Type
trafficparrot.virtualservice.recordOnlyContentTypesContaining=TP_RECORD_ALL_CONTENT_TYPES
to include content types you would like to record, for example:
trafficparrot.virtualservice.recordOnlyContentTypesContaining=application/javascript,application/xml
Scenarios
In order to edit the list of elements on the scenarios dropdown on the Add/Edit page please open and edit file trafficparrot-x.y.z/scenarios.js and using the samples provided in the file add your new entries and remove the existing ones.
- urlEqualTo
- urlMatching
- urlPathEqualTo
- urlPathMatching
- ANY
- GET
- POST
- PUT
- HEAD
- OPTIONS
- DELETE
- CONNECT
- TRACE
- any
- equalTo
- contains
- matches
- doesNotMatch
- equalToJson
- matchesJsonPath
- equalToXml
- matchesXPath
- CLOSE_CONNECTION_AFTER_HALF_RESPONSE
- DRIP_BYTE_EVERY_100ms
- DRIP_BYTE_EVERY_1s
- DRIP_BYTE_EVERY_10s
If you cannot see a video frame below please download it here
Configuration
Properties
Frequently changed properties
- Web console port number trafficparrot.gui.http.port=8080
- Virtual service HTTP and HTTPS ports trafficparrot.virtualservice.http.port=8081 and trafficparrot.virtualservice.https.port=8082
HTTPS certificates
- trafficparrot.virtualservice.keystoreAndTruststore.jks.resource=certificates/trafficparrot-keystore-and-truststore.jks
- trafficparrot.virtualservice.keystoreAndTruststore.jks.password=trafficparrot