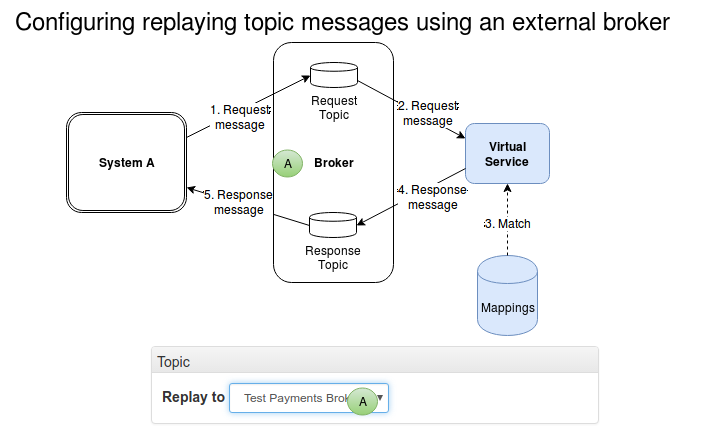
A tester or developer uses a web browser to access the console. The console manages the virtual service. The system under test (application under test) connects directly to the virtual service on different ports.
Here is an example of how that could look like for a scenario where the virtual service is replaying messages to an external queue.
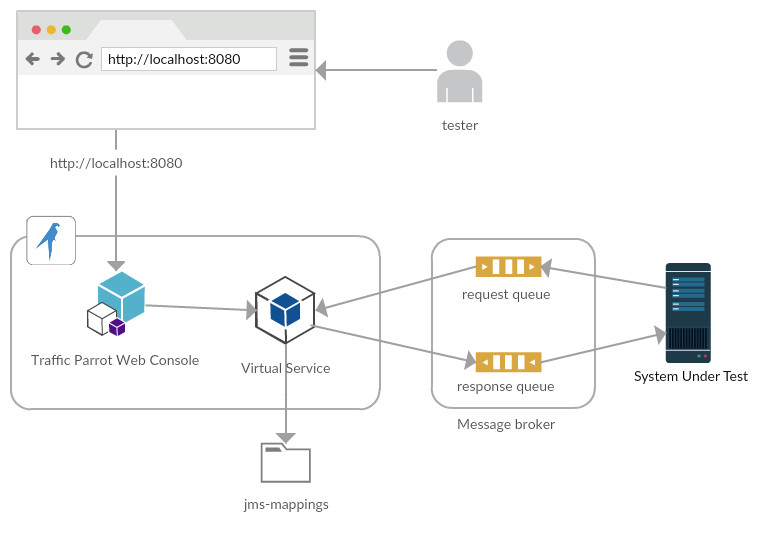 Virtual service replaying IBM® MQ messages to and from a queue
To record from or replay to brokers you will need to tell Traffic Parrot how to connect to them.
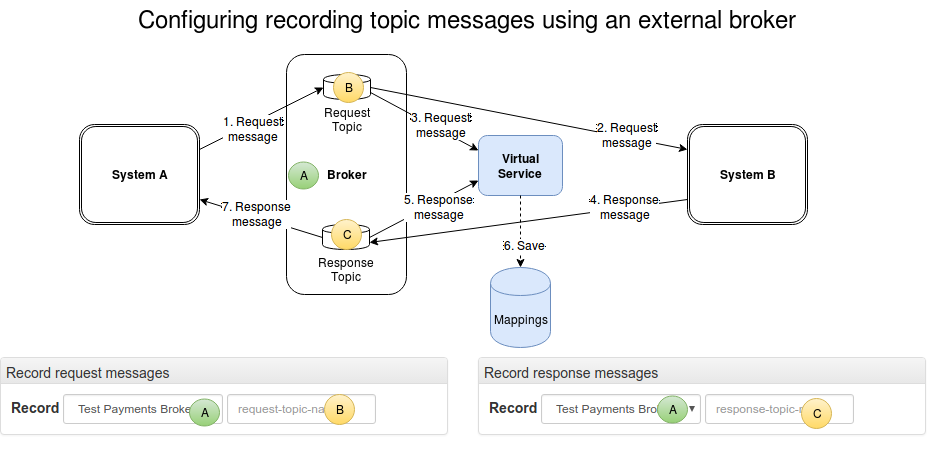
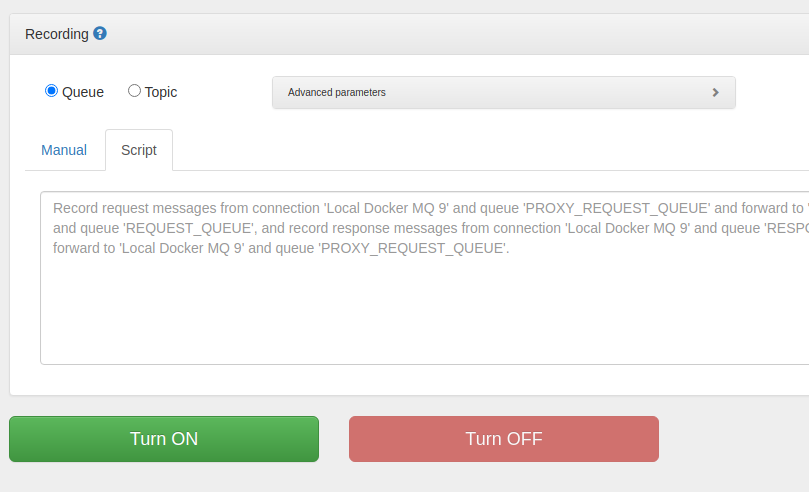
Those connections are displayed in the dropdown menus on the record and replay panels, for example:
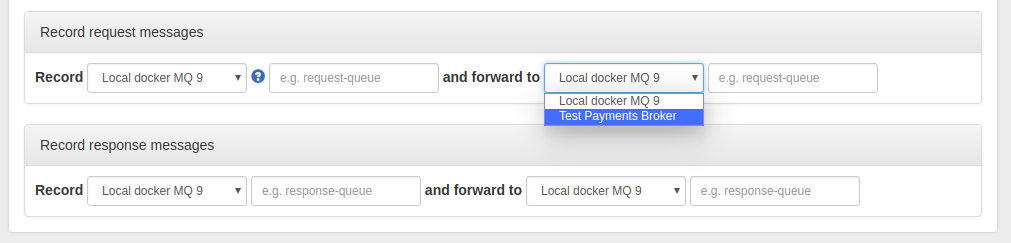
The "Internal broker" connection is available in the dropdown by default when you choose to use an internal broker in the Broker panel.
To define a new connection that will be available in the dropdown in the record and replay panels:[
{
"connectionId": "1",
"connectionName": "Test Payments Broker",
"connectionData": {
"ibmMqVersion": "IBM_MQ_7_5",
"hostname": "mqserver.example.com",
"port": 1415,
"queueManager": "PAYMENT.QM",
"channel": "PAYMENT.SVRCONN",
"username": "payuser",
"password": "paypassword222",
"useMQCSPAuthenticationMode": false,
"readConnectionsToOpen": 1,
"writeConnectionsToOpen": 1,
"sslCipherSuite": null,
"sslPeerName": null
}
},
{
"connectionId": "2",
"connectionName": "Local docker MQ 9",
"connectionData": {
"ibmMqVersion": "IBM_MQ_9",
"hostname": "localhost",
"port": 1414,
"queueManager": "QM1",
"channel": "DEV.APP.SVRCONN",
"username": "app",
"password": "",
"useMQCSPAuthenticationMode": false,
"readConnectionsToOpen": 1,
"writeConnectionsToOpen": 1,
"sslCipherSuite": null,
"sslPeerName": null
}
}
]
In the current Traffic Parrot version you edit connections directly in the ibm-mq-connections.json file. In near future you will be able to do it via the Web UI as well.
trafficparrot.virtualservice.ibmMqConnectionsUrl=classpath:ibm-mq-connections.jsonto for example
trafficparrot.virtualservice.ibmMqConnectionsUrl=file:/home/john/git/project/trafficparrot-ibm-mq-connections.jsonThis can be useful if you would like to version control it with your application source code.
To connect to IBM® MQ you need jar files provided by IBM that will allow Traffic Parrot to establish connections with MQ.
Before you proceed please read these instructions to double check your actions are inline with the supported way to install WebSphere MQ Java jar files.
If you have any issues with obtaining the jar files please contact us.
Copy those files to trafficparrot-x.y.z/lib/external and restart Traffic Parrot.
trafficparrot.ibmmq.start.queue.replay.on.startup.script=classpath:start-ibmmq-queue-replay-on-startup.txt
To connect Traffic Parrot Native IBM MQ to an SSL/TLS channel, you need to configure the cipher suite and provide the certificates.
[
  {
    "connectionId": "1",
    "connectionName": "Local Docker MQ 9",
    "connectionData": {
      "ibmMqVersion": "IBM_MQ_8",
      "hostname": "localhost",
      "port": 2414,
      "queueManager": "QM1_V8",
      "channel": "DEV.APP.SVRCONN.SSL",
      "username": "app",
      "password": "",
      "useMQCSPAuthenticationMode": false,
      "readConnectionsToOpen": 1,
      "writeConnectionsToOpen": 1,
      "sslCipherSuite": "TLS_RSA_WITH_AES_128_CBC_SHA",
      "sslPeerName": "OU=TP IBM MQ"
    }
  }
]
In the example above we are also configuring the sslPeerName which allows us to validate the server certificate DN.
To provide the server and client certificates, we will use a trust store and key store. The trust store should contain all certificates, be it CA or direct public keys to validate the IBM MQ queue manager certificate. The key store should include a client certificate that when requested by the IBM MQ queue manager SSL channel is signed by the approved issuer. The key store should also contain a private key associated with the client certificate.
-Djavax.net.ssl.trustStore=certificates/ca-chain.jks
-Djavax.net.ssl.trustStorePassword=trafficparrot
-Djavax.net.ssl.keyStore=certificates/mq-client.jks
-Djavax.net.ssl.keyStorePassword=trafficparrot
-Dcom.ibm.mq.cfg.useIBMCipherMappings=false
For the example above to work, you will need to create the certificates/ca-chain.jks and certificates/mq-client.jks JKS files with the required certificates in them.
Below you can find sample content of the trust store and the key store. In our example, the trust store contains a certificate authority chain of 2 certificates. The intermediate ca was used to sign both client and the IBM MQ queue manager certificates. The key store contains the client private key and a certificate signed by the intermediate ca.
trafficparrot@trafficparrot-pcs:~/Downloads/tp/trafficparrot-linux-x64-jre$ keytool -list -keystore certificates/ca-chain.jks
Enter keystore password:
Keystore type: jks
Keystore provider: SUN

Your keystore contains 2 entries

intermediateca, 13-Jul-2020, trustedCertEntry,
Certificate fingerprint (SHA1): 2E:FB:4F:8A:44:89:CD:FB:EE:25:5B:78:D0:D8:9B:89:A8:1E:1C:9E
rootca, 13-Jul-2020, trustedCertEntry,
Certificate fingerprint (SHA1): 13:D1:98:09:59:66:C7:64:F0:78:C3:8C:C1:C2:68:9D:76:F0:CF:34


trafficparrot@trafficparrot-pcs:~/Downloads/tp/trafficparrot-linux-x64-jre$ keytool -list -keystore certificates/mq-client.jks
Enter keystore password:
Keystore type: jks
Keystore provider: SUN

Your keystore contains 1 entry

1, 13-Jul-2020, PrivateKeyEntry,
Certificate fingerprint (SHA1): 21:9B:F6:A4:12:B0:31:1E:D6:29:B5:D3:C4:19:6F:ED:E4:C3:50:C2
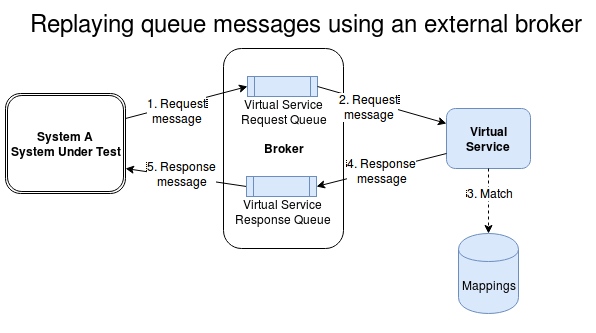
As with HTTP recording Traffic Parrot, during recording incoming and outgoing messages are matched up to provide mappings. Then upon playback receipt of a matching incoming message will trigger generation of an outgoing message.
Before you proceed to recording or replaying messages make sure you have installed the required libraries (required JARs) so that Traffic Parrot can connect to the broker.
Traffic Parrot can form mappings in a number of ways.
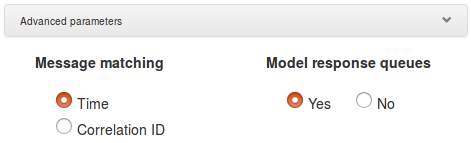
The default is to use time based matching. This can be changed in the advanced parameter section of the record page.
Traffic Parrot does not support running IBM® MQ internally. You will need to use an external broker.
You can use one of the following: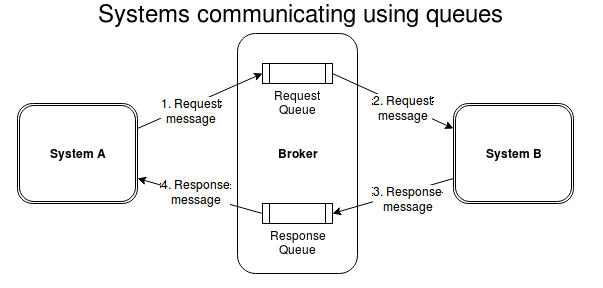
One system generates messages onto a queue; another system consumes these messages and puts responses onto a second queue, which the first system consumes. If our goal is to test the system-under-test in isolation, we must record these interactions in order to replay them.
We will create extra queues on the existing broker that will be used by the virtual service. Then we will reconfigure the system-under-test to connect to these queues instead of the original ones. Traffic Parrot will move messages between these queues and the original queues, recording and creating mappings as it does so.
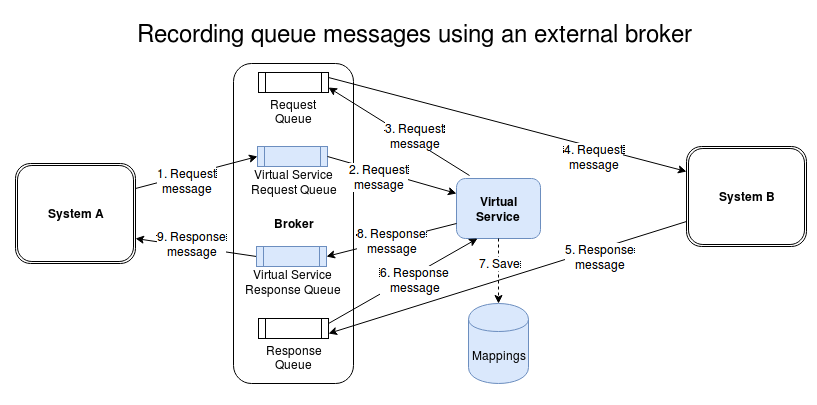
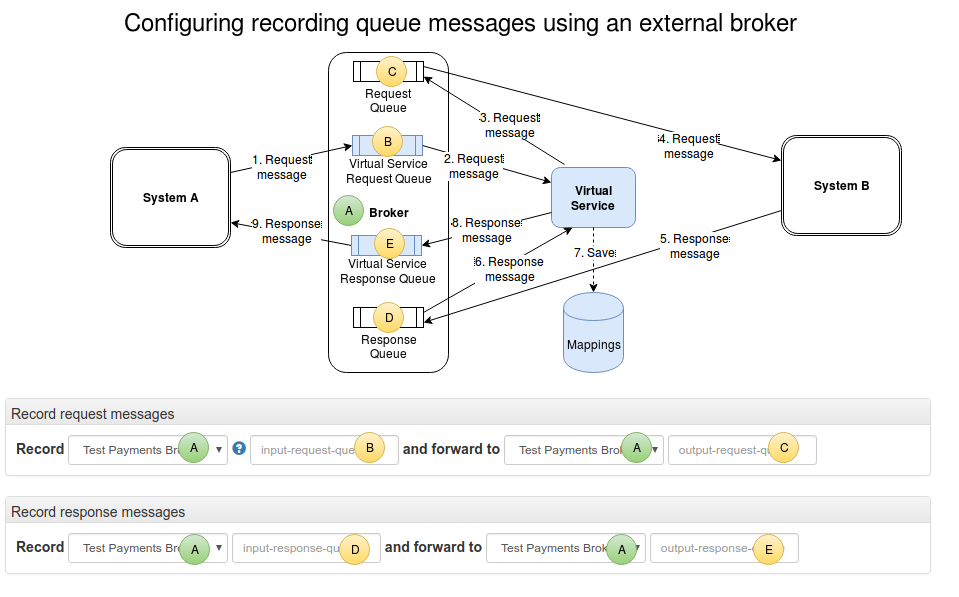
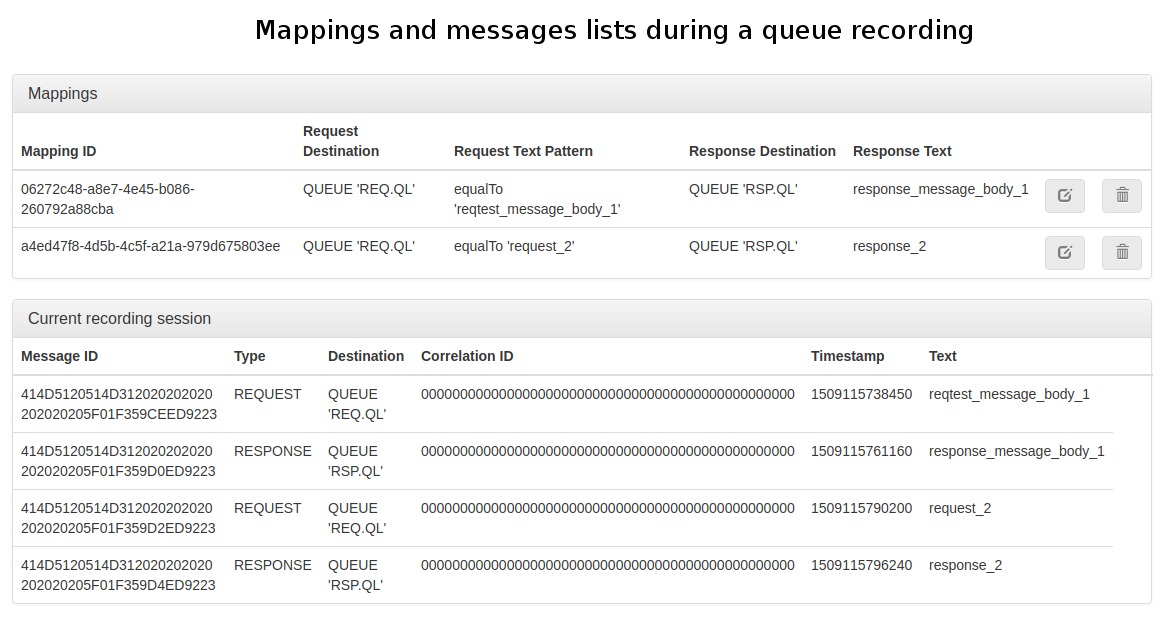
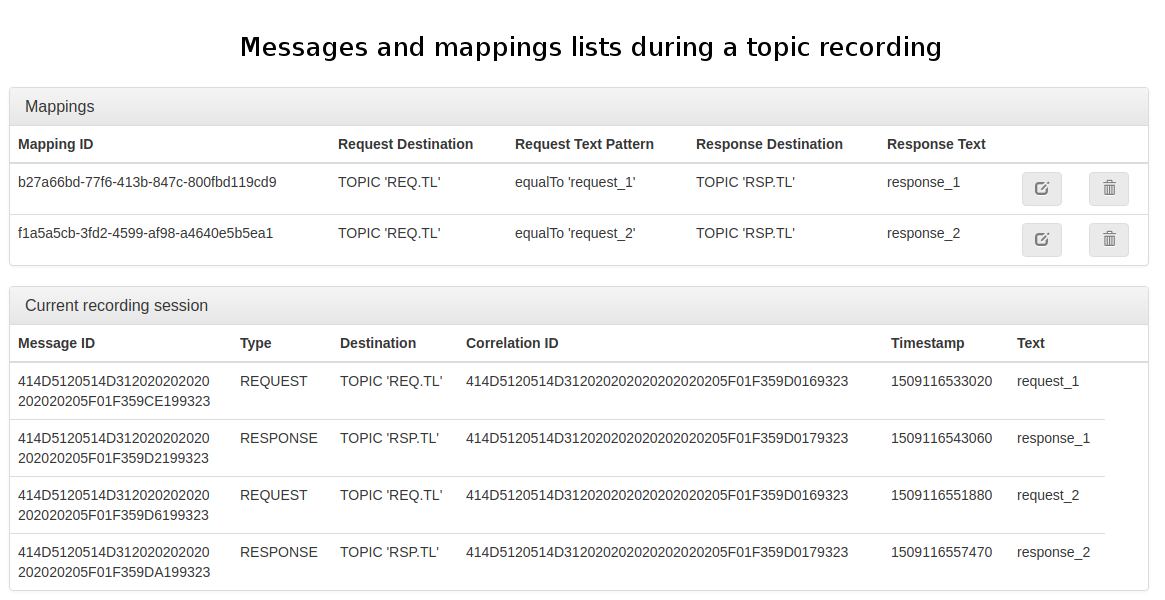
As the system-under-test generates messages they are listed in the bottom table 'Current recording session'. As the second system generates responses to these messages, they are also listed at the bottom, but in addition mappings are generated in the 'Mappings' table showing incoming and outgoing messages that Traffic Parrot has paired up.
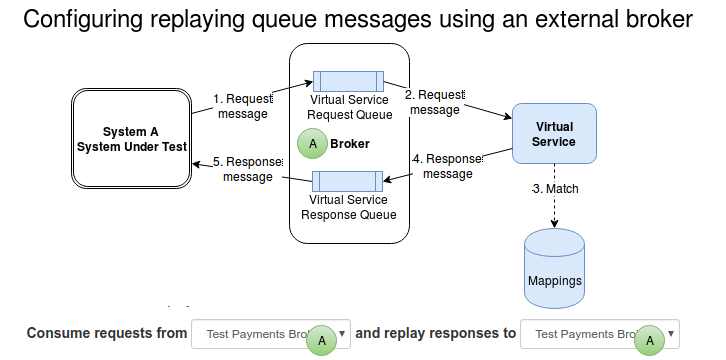
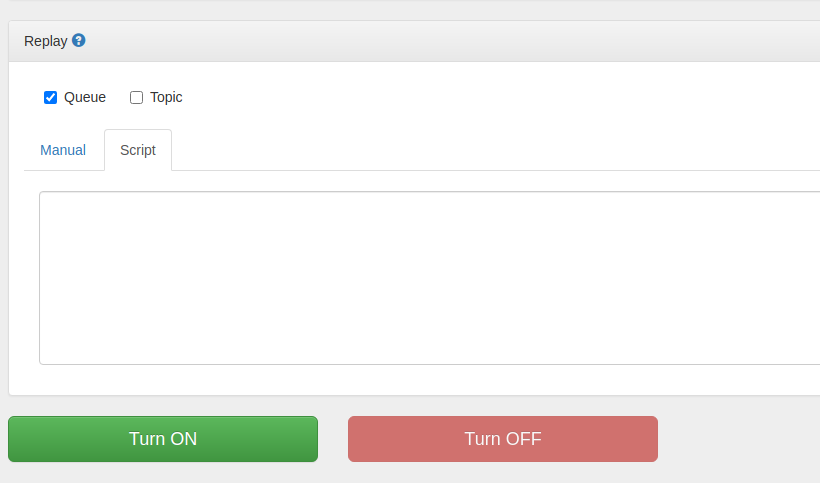
To replay the recorded mappings we will need the same virtual service queues in place as shown on the image below.
Traffic Parrot does not support running IBM® MQ internally. You will need to use an external broker.
You can use one of the following: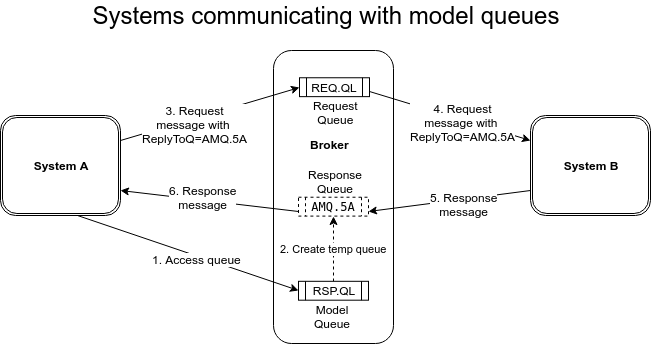
One system obtains a temporary queue based on a model queue. It puts messages onto a request queue with the ReplyToQ set to the temporary queue. Another system consumes these messages and puts responses onto the temporary queue that was in the ReplyToQ field, which the first system consumes. If our goal is to test the system-under-test in isolation, we must record these interactions in order to replay them.
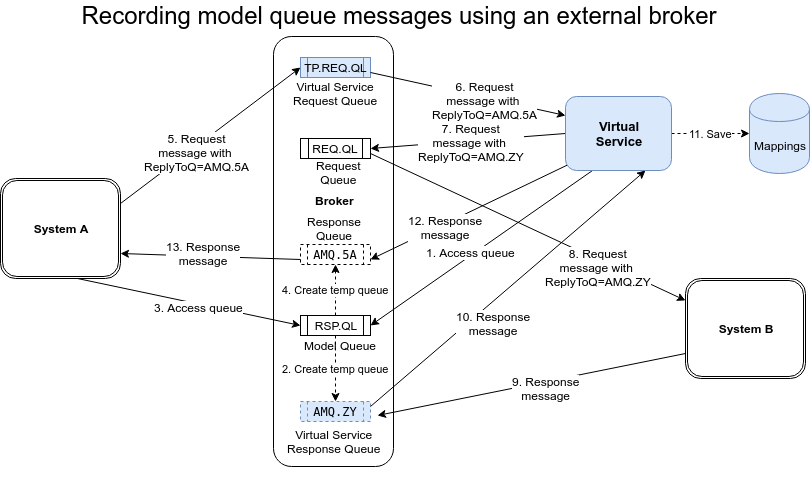
We will create an extra request queue on the existing broker that will be used by the virtual service. Then we will reconfigure the system-under-test to connect to this request queue instead of the original one. Traffic Parrot will move messages between the virtual and original request queue, recording and creating mappings as it does so.
Both the system-under-test and the virtual service will use a model queue that exists on the existing broker. This model queue will be used to create a dynamic response queue. Traffic Parrot will move messages between the virtual and original dynamic queue, recording and creating mappings as it does so.
Steps to record are similar to the usual recording steps but the response queues selected should be the same model queue name that exists in the external broker. In addition, the advanced parameter "Model response queues" should be set to "Yes":
To replay the recorded mappings we will need the same virtual service queues in place as shown on the image below.
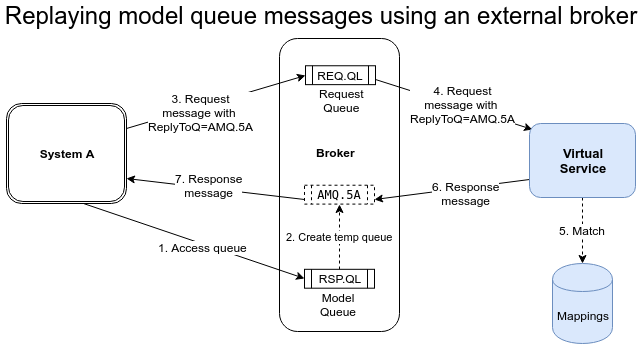
Steps to replay are the same as the usual replay steps. Response messages will be sent to the queue mentioned in th ReplyToQ field of the request message.
Recording and playback of topics using an external broker is less intrusive than queues because Traffic Parrot can subscribe to a topic just like any other application and receive messages, without affecting the delivery of those messages to other applications.
This diagram shows how the production systems connect:
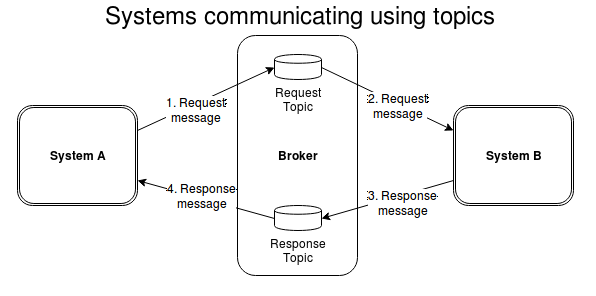
The system-under-test generates messages onto a topic which are received by a number of other systems. One of these systems generates responses onto a different topic (which are received by a number of systems, one of which is the system-under-test).
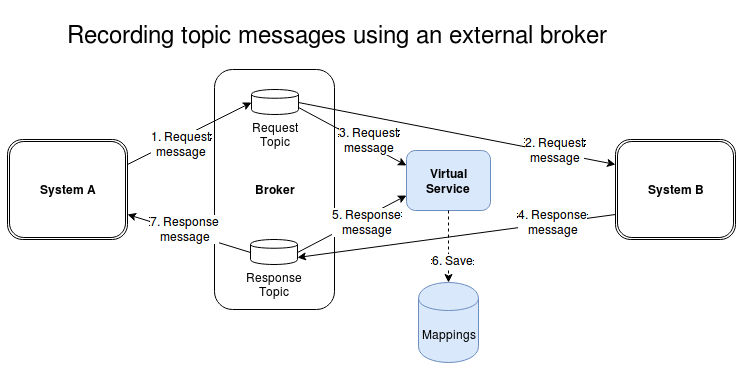
We will configure Traffic Parrot to connect to the request and response topics and record the messages appearing on both, generating mappings as it goes, as shown on diagram Recording topics using an external broker

#
# This is a sample comment
#
QueueManager:'Local Docker MQ 9'
ProxyRequestQueue:'PROXY_PROCESS_PAYMENT'
LiveRequestQueue:'PROCESS_PAYMENT'
LiveResponseQueue:'PAYMENT_PROCESSESED'
ProxyResponseQueue:'PROXY_PAYMENT_PROCESSESED'


#
# This is a sample comment
#
QueueManager:'Local Docker MQ 9'
ProxyRequestQueue:'PROXY_CREATE_ORDER'
LiveRequestQueue:'CREATE_ORDER'
LiveResponseQueue:'ORDER_CREATED'
ProxyResponseQueue:'PROXY_ORDER_CREATED
You can also use the another script format with syntax:
#
# Order and payment processing
#
Record request messages from connection 'Local Docker MQ 9' and queue 'PROXY_PROCESS_PAYMENT' and proxy to 'AWS Docker MQ 8' and queue 'PROCESS_PAYMENT', and record response messages from connection 'AWS Docker MQ 8' and queue 'PAYMENT_PROCESSESED' and proxy to 'Local Docker MQ 9' and queue 'PROXY_PAYMENT_PROCESSESED'.
Record request messages from connection 'Local Docker MQ 9' and queue 'PROXY_CREATE_ORDER' and proxy to 'AWS Docker MQ 8' and queue 'CREATE_ORDER', and record response messages from connection 'AWS Docker MQ 8' and queue 'ORDER_CREATED' and proxy to 'Local Docker MQ 9' and queue 'PROXY_ORDER_CREATED'.
Record request messages from connection 'Local Docker MQ 9' and queue 'PROXY_MAKE_SHIPMENT' and proxy to 'AWS Docker MQ 8' and queue 'MAKE_SHIPMENT', and record response messages from connection 'AWS Docker MQ 8' and queue 'ORDER_SHIPPED' and proxy to 'Local Docker MQ 9' and queue 'PROXY_ORDER_SHIPPED'.

#
# Compute statistics
#
Record request messages from connection 'Local Docker MQ 9' and queue 'PROXY_COMPUTE_USER_STATS' and proxy to 'AWS Docker MQ 8' and queue 'COMPUTE_USER_STATS', and record response messages from connection 'AWS Docker MQ 8' and queue 'USER_STATS' and proxy to 'Local Docker MQ 9' and queue 'PROXY_USER_STATS'.
#
# QM1 queue replay
#
RequestQueueManager:'Request QM1'
ResponseQueueManager:'Response QM1'
RequestQueueNames:'REQ_1_A','REQ_1_B'

#
# QM2 queue replay
#
RequestQueueManager:'Request QM2'
ResponseQueueManager:'Response QM2'
RequestQueueNames:'REQ_2_A','REQ_2_B'
When Traffic Parrot receives a request message, it will try to simulate the system it is replacing by sending back a response message on the response queue or topic. To decide which response message to send, it will go through all the request to response mappings it has available to find the response to be sent. For more details how request matching works, see Request matching.
| Matcher name | Matcher Id | Description |
|---|---|---|
| any | any | Any request body will match. |
| equal to | equalTo | Check that the received request message body is equal to the request body specified in the mapping |
| contains | contains | Check that the received request message body contains the sequence of characters specified in the mapping |
| matches regex | matches | Check that the received request message body matches the regexp specified in the mapping |
| does not match regexp | doesNotMatch | Check that the received request message body does not match the regexp specified in the mapping |
| equal to JSON | equalToJson | Check that the received request message body is JSON and that it is equal to the request body JSON specified in the mapping |
| matches JSON | matchesJson |
Check that the received request message body matches (allowing for special wildcard tokens) JSON specified in the mapping.
Tokens allowed:
For example a "matches JSON" request body matcher:
{
  "name": "{{ anyValue }}",
  "lastName": "{{ anyValue }}",
  "age": "{{ anyNumber }}",
  "children": "{{ anyElements }}"
}
will match a request body:
{
  "name": "Bob",
  "lastName": "Smith",
  "age": 37,
  "children": [{"name": "sam"}, {"name": "mary"}]
}
|
| matches JSONPath | matchesJsonPath | Check that the received request message body is JSON and that it matches JSONPath
specified in the mapping. For example, if we use the following expression as the request body matcher
$[?(@.xyz.size() == 2)]it will match this request body: {"xyz":[{"a":true}, {"b":false}]}
but will NOT match this one:
{"xyz":["a":true, "b":false, "c":true]}
|
| equal to XML | equalToXml | Check that the received request message body is XML and that it is equal to the request body XML specified in the mapping |
| matches XML | matchesXml |
Check that the received request message body matches (allowing for special wildcard tokens) XML specified in the mapping.
Tokens allowed:
For example a matches XML request body matcher:
<example>
  <name>{{ anyValue }}</name>
  <age>{{ anyNumber }}</age>
  <children><tp:AnyElements/></children>
</example>
will match a request body:
<example> <name>Sam</name> <age>29</age> <children><child name="bob"/></children> </example> |
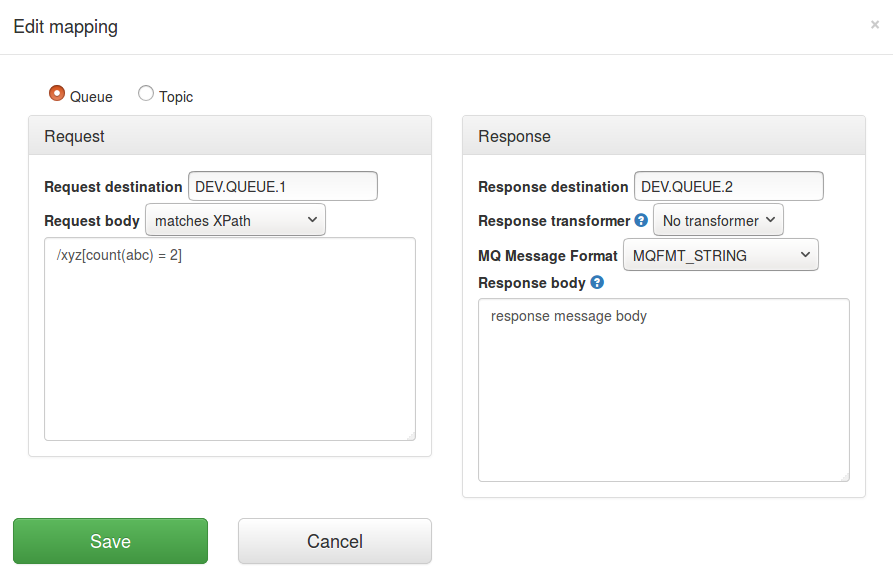
| matches XPath | matchesXPath | Check that the received request message body is XML and that it matches XPath
specified in the mapping. For example, if we use the following expression as the request body matcher
/xyz[count(abc) = 2]it will match this request body: <xyz><abc/><abc/></xyz>but will NOT match this one: <xyz><abc/></xyz> |
 will allow you to edit an existing mapping:
Traffic Parrot supports postponing the delivery of a MQ message. This can be useful to better simulate a more realistic scenario where the responding system does not send a response message immediately after receiving the request message.
Use the  field on the edit mapping panel to specify the delay in milliseconds.
The request priority can be set in order to set up a preference order for matching mappings.
The highest priority value is 1. If two or more mappings both match a request, the mapping with the higher priority will be used to provide the response. The default priority is 5.
This can be useful, if you want a "catch-all" mapping that returns a general response for most requests and specific mappings on top that return more specific responses.
Traffic Parrot is able to record and replay messages that could contain text in a variety of formats e.g. JSON, XML or plain text.
This documentation is for an old version of Traffic Parrot. There is a more recent Traffic Parrot version available for download at trafficparrot.com