Chapter 5: Mocking, simulating and service virtualization of systems communicating with RabbitMQ

« Back to tutorials home

Mocking, simulating APIs and service virtualization

If you are new to the subject have a look at Chapter 1: Getting started with stubbing, mocking and service virtualization. If you know why and how to use mocking, simulating APIs and service virtualization, continue reading to learn how to do it for systems communicating with RabbitMQ.

Video Tutorial

A quick refresh of RabbitMQ knowledge

Before we go into the details of service virtualization, mocking and simulating systems communicating via RabbitMQ, let us see what RabbitMQ actually is.

RabbitMQ is an open-source message-broker software for asynchronous communication. You can send a message to a queue on a RabbitMQ broker. For example, System A can send a JSON message to RabbitMQ queue called QUEUE1. Then, System B can consume that message from QUEUE1 whenever it wishes to. System A and System B can communicate that way without a time dependency, System A can send messages as often and as many as it wishes, and System B can consume then whenever it is ready to do so.

For more details on RabbitMQ such as Exchanges, AMQP protocol details and others, please have a look at the RabbitMQ documentation.

Two systems communicating with RabbitMQ

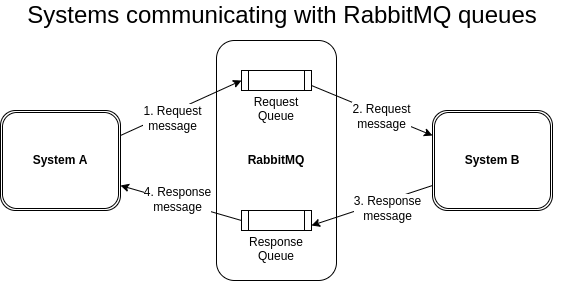
Let us focus on a typical communication pattern where two systems communicate with request and response messages with a RabbitMQ broker. Although there are a few ways of implementing the request to response pattern (a reply queue per request, a single reply queue for multiple requests, etc.) for simplicity, we will use a single reply queue for multiple responses for this example.

  1. System A will send a request message to the request queue
  2. The request message will then be consumed by System B
  3. System B after doing some internal processing, will respond by sending a response message to response queue
  4. Then, System A will consume the response message
Two systems communicating with request and response message via RabbitMQ

Now let us explore how we can mock/simulate/virtualize System B.

Mocking and simulating RabbitMQ response messages

Now that we have two systems communicating with RabbitMQ messages, we can explore how we could test those systems. What happens if we wanted to test System A, but System B is temporarily unavailable? Or, what happens if System B does not exist yet at all?


Testing issues when RabbitMQ response messages are not available

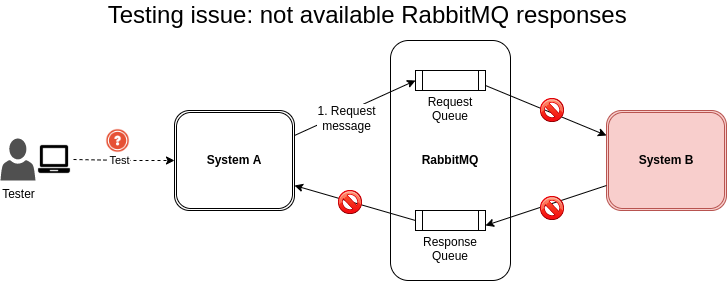
In these scenarios, we can simulate System B using Traffic Parrot so that System A can still be tested. It will consume the request messages and produce response messages, pretending to be System B.


Simulating System B, sending response messages to RabbitMQ using Traffic Parrot

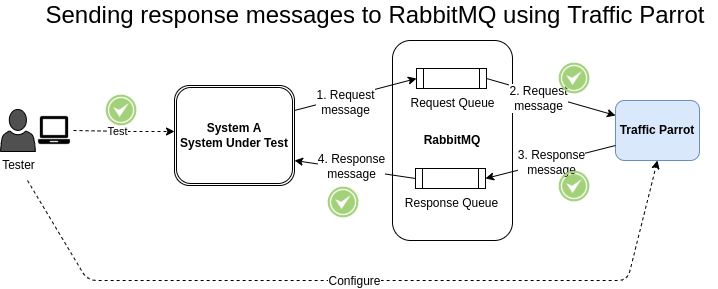
This will allow us to test System A in isolation in both typical and hypothetical situations. You will be able to simulate messages that are expected to be seen in production environments, but also non-typical error messages or failure scenarios that would usually be hard to produce. You can do that by configuring Traffic Parrot to respond with RabbitMQ response messages of your choice.

Using Traffic Parrot to send RabbitMQ response messages

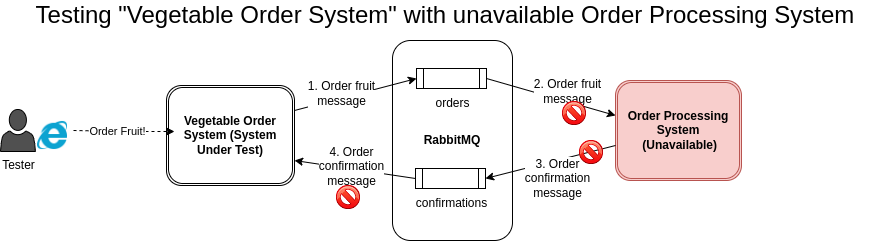
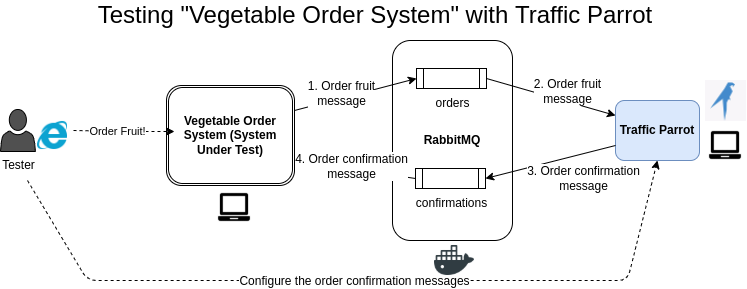
Let's go through an example of how to use Traffic Parrot to simulate a system that sends and receives RabbitMQ messages. Our system under test is a Vegetable Ordering System that is used to send "order vegetable" messages, and an Order Processing System that receives an "order vegetable" message, processes the order and sends an "order confirmation" message.

Now, in our example, we will assume that the Order Processing System is not available (for example, it is not yet developed or the environment is not yet configured). All we have is the documentation for it. How can we test the Vegetable Ordering System in that situation, and where will the "order confirmation" messages come from if Order Processing System is not there?


Testing RabbitMQ system under test in isolation with unavailable Order Processing System

We can simulate the Order Processing System using Traffic Parrot! Traffic Parrot will consume the order vegetable messages and send order confirmation messages, pretending to be the Order Processing System. We will read the Order Processing System documentation to understand how to define the format of the order confirmation messages.


Testing RabbitMQ system under test in isolation with Traffic Parrot

In order to do that we will need:
  1. The Vegetable Ordering System. You can download it here (sources on GitHub).
  2. An Rabbit MQ broker instance. We will use the official Docker Rabbit MQ image, but you can use any other version of Rabbit MQ if you already have one.
  3. We will also need Traffic Parrot

NOTE: Traffic Parrot connects to RabbitMQ via a RabbitMQ JMS API, but your application can use any API to connect to RabbitMQ, it does not have to be JMS.

To simulate the Order Processing System using Traffic Parrot and test the Vegetable Order System in isolation follow these steps:
  1. Download and extract Traffic Parrot.
  2. Start Traffic Parrot
  3. Download Vegetable Order System and extract it. (This application requires Java to run, if you do not have Java installed you can download it here)
  4. Start Docker Rabbit MQ.
    docker run -it --rm --name rabbitmq -p 5672:5672 -p 15672:15672 rabbitmq:3.9-management
  5. Open the file application.properties in the vegetable order system main folder and specify your Rabbit MQ broker details there.
  6. Start Vegetable Order System by running start.cmd script (or start.sh on Linux)
    Start Vegetable Order System

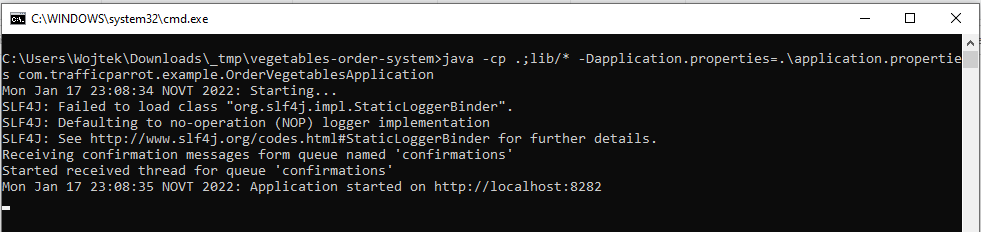
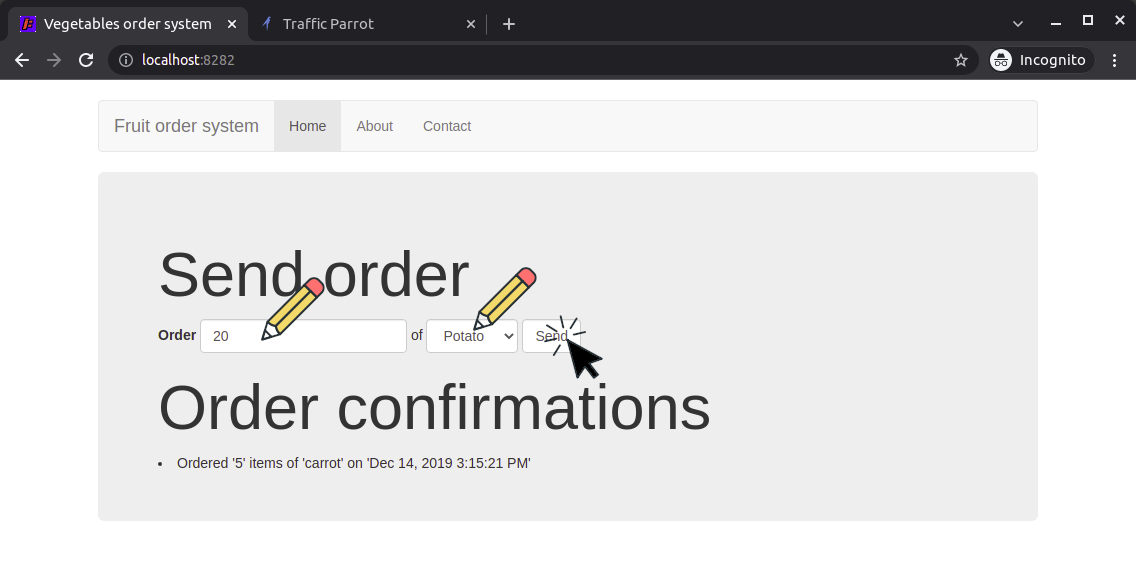
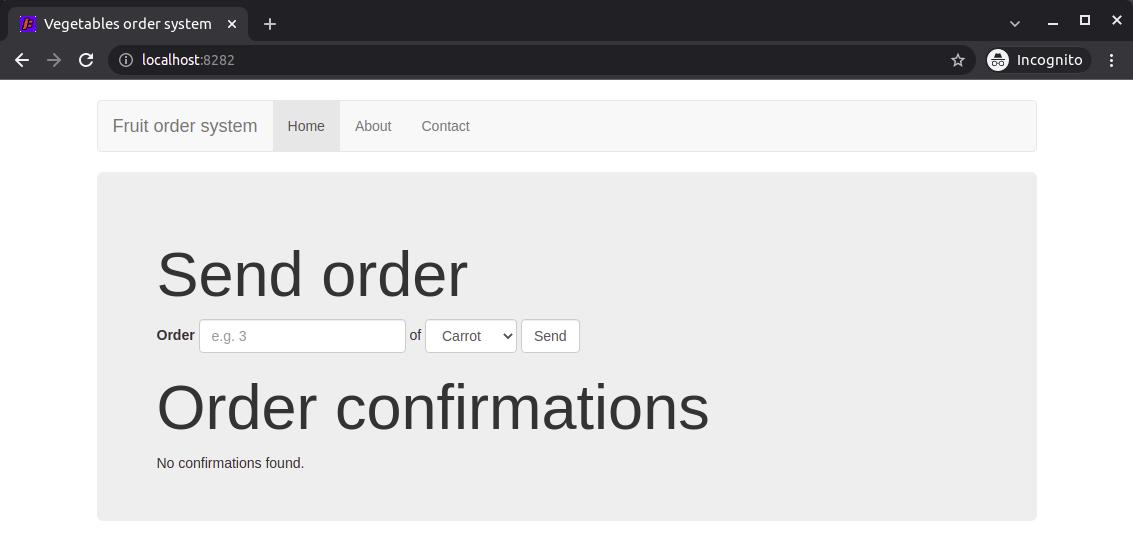
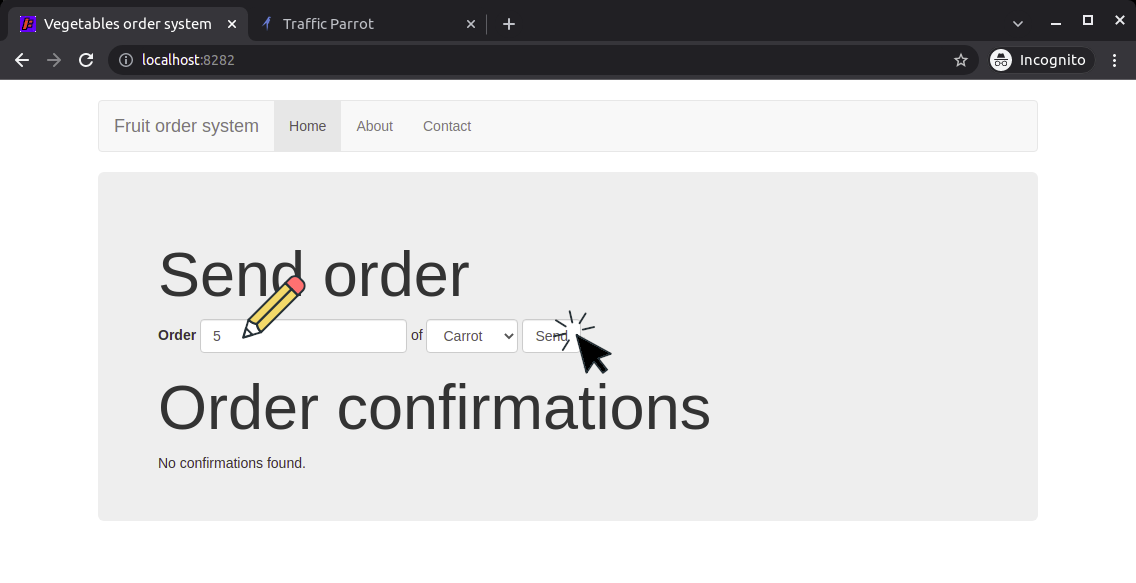
    You can view the web user interface in the browser at http://localhost:8282.

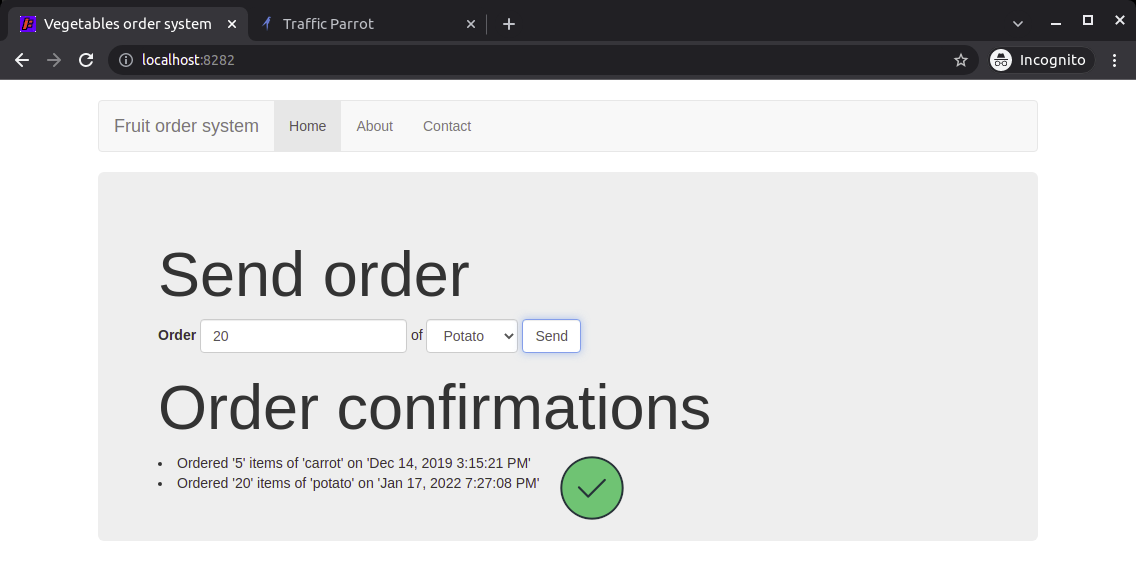
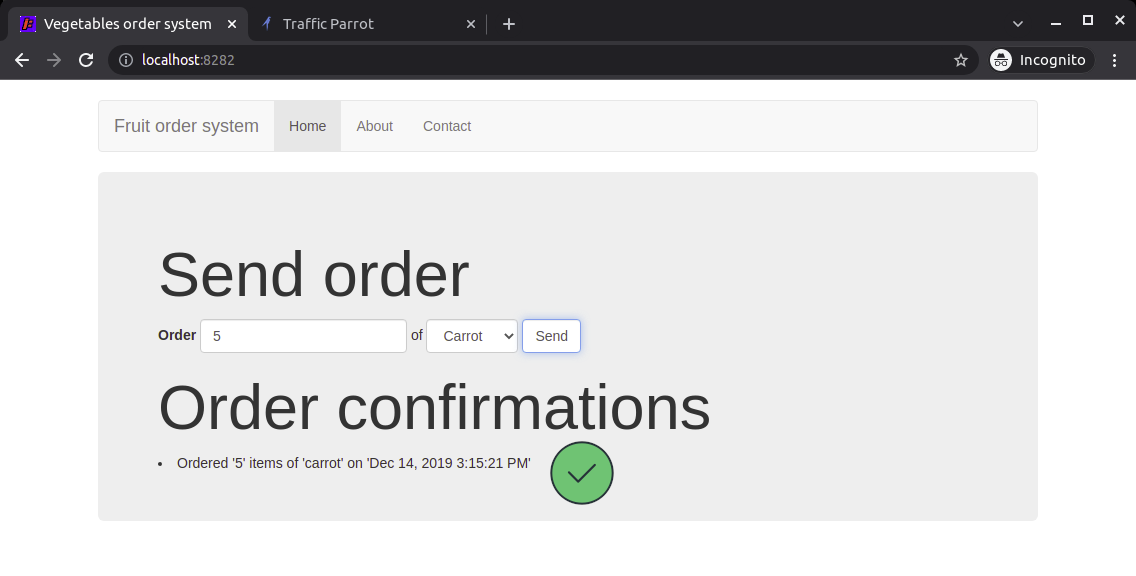
    The way the Vegetable Order System works is that you submit an order for a certain number of vegetable using the web user interface. It will then send a RabbitMQ request message to the Order Processing System. In the meantime it also awaits any RabbitMQ response messages and when it gets one it renders it on the web user interface. So when the Order Processing System is not available like in our scenario, there will never be anything displayed in the Order Confirmations section, but we still need to test that section!
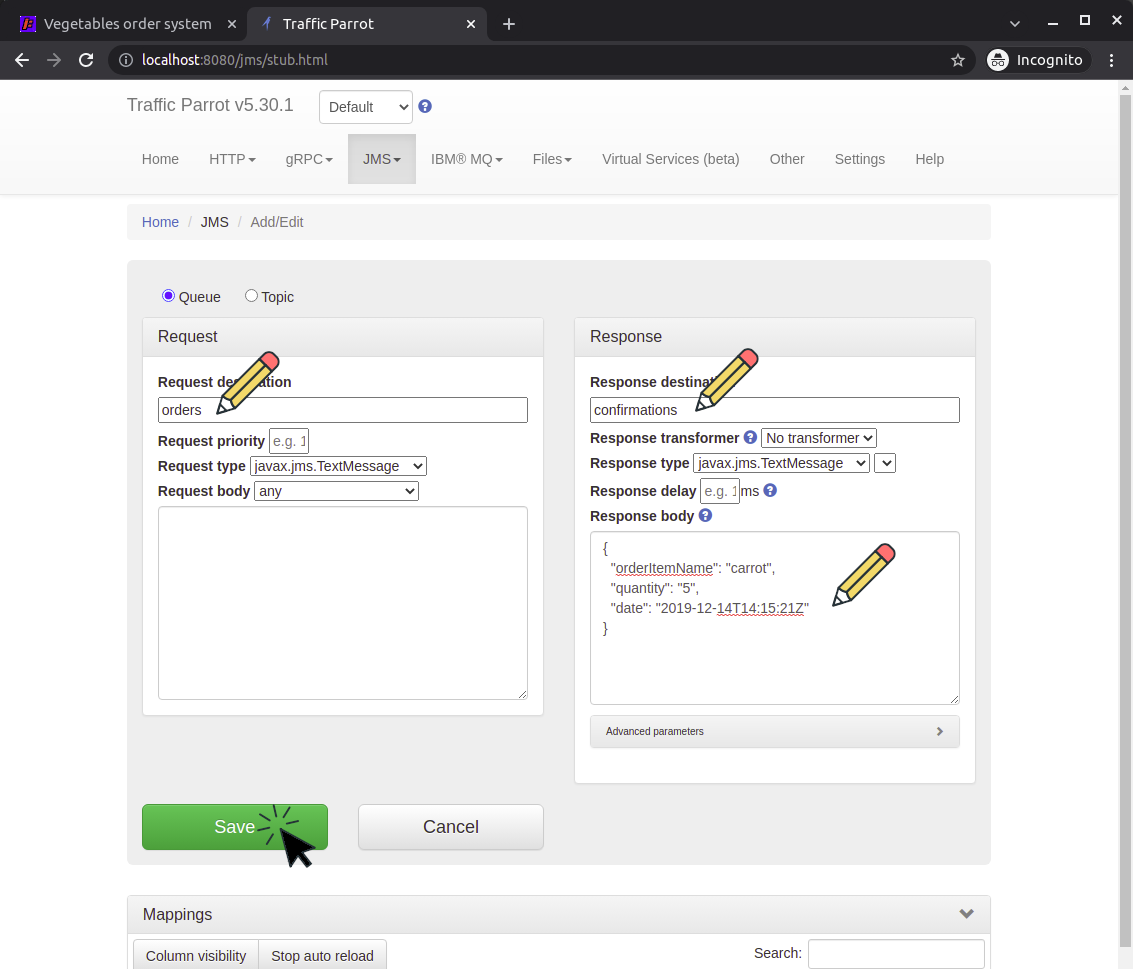
    Vegetable Order System UI
  7. Now, if you open the Vegetable Order System and send a vegetable order, you will get a notification that the order was sent successfully. But you will not see any order confirmations. That is because we do not have the Order Processing System available. That means, we cannot test if the order confirmations messages are displayed correctly in the Vegetable Ordering System. So let us use Traffic Parrot to mock (simulate) the Order Processing System.
  8. Open a web browser, navigate to Traffic Parrot http://localhost:8080 and open the JMS add edit page
    RabbitMQ add/edit page
  9. Add a new request to response JMS message mapping. The documentation of Order Processing System says is it consuming the RabbitMQ request messages from queue orders ("Request destination"), sending response messages to queue confirmations ("Response destination") and the format of those messages ("Response body") is the following:
    {
      "orderItemName": "carrot",
      "quantity": "5",
      "date": "2019-12-14T14:15:21Z"
    }
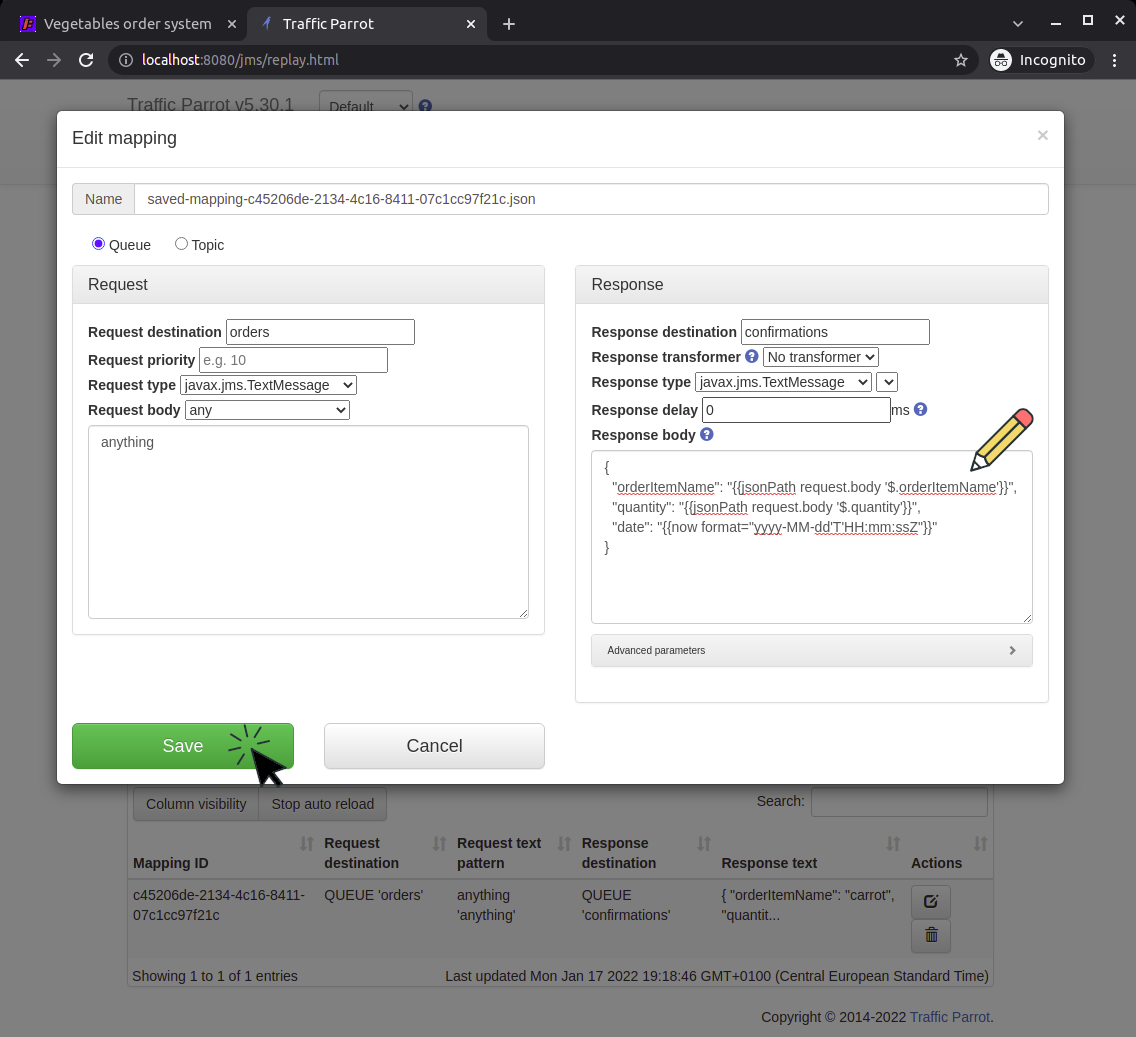
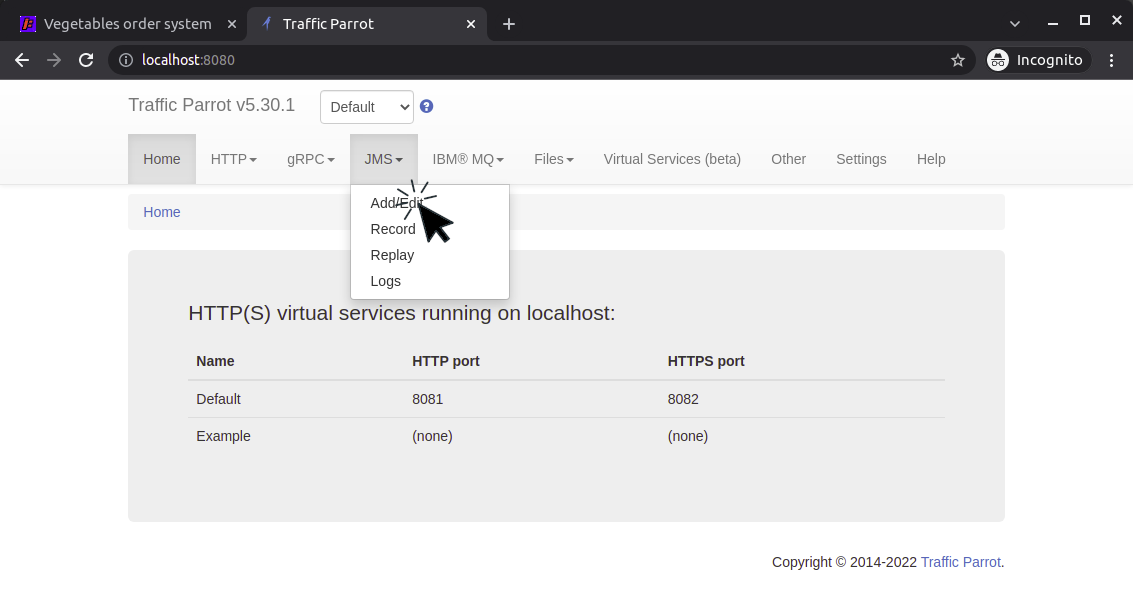
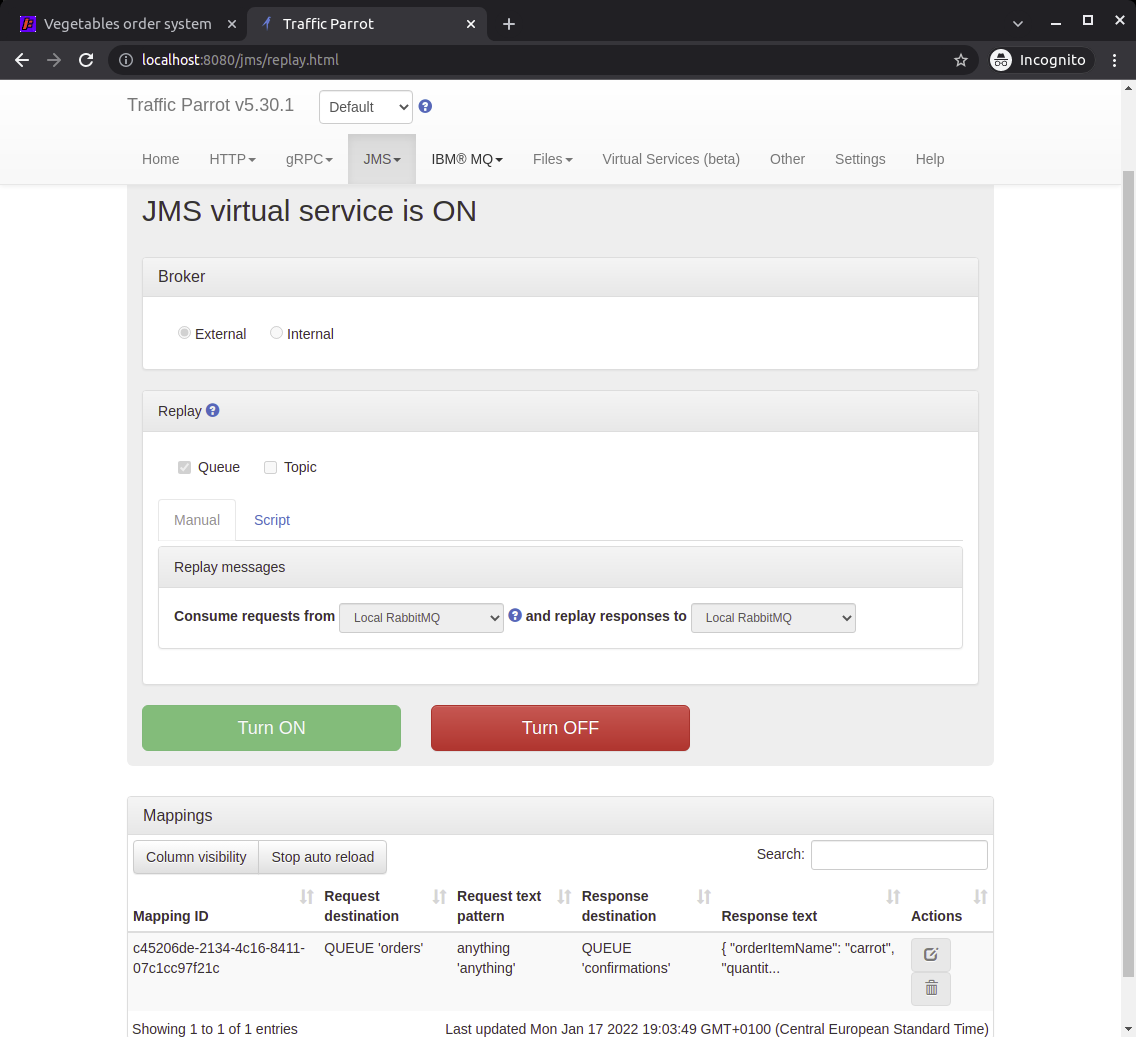
    Based on that documentation fill in the request queue name, response queue name and response body. 
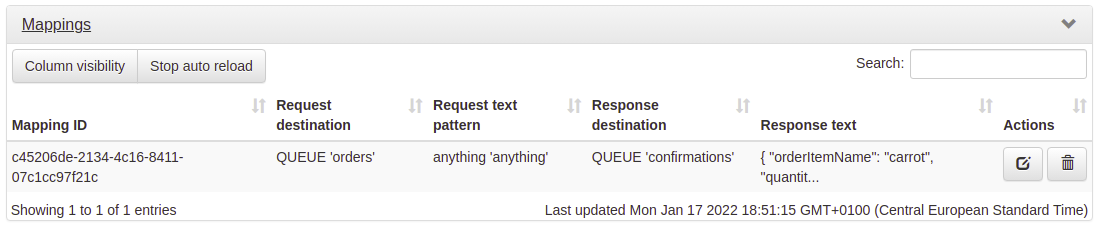
Then, press the "Save" button.
    RabbitMQ add/edit page
  10. Now the new mapping has been added to the list at the bottom of the page
    The mapping has been added
  11. Open jms-connections.json (located in the main Traffic Parrot directory) in a text editor and specify your Rabbit MQ broker details there in the "Local RabbitMQ" section.
      {
        "connectionId": "5",
        "connectionName": "Local RabbitMQ",
        "connectionData": {
          "jmsProvider": "RABBIT_MQ_3",
          "hostname": "localhost",
          "username": "guest",
          "password": "guest",
          "port": 5672,
          "amqpCompatibilityMode": true
        }
      }
  12. Go to the RabbitMQ replay page.
    RabbitMQ replay page
  13. Select "Local RabbitMQ" for both request and response messages. Click "Turn ON" button.
    Replaying
  14. Now that replay is turned on, Traffic Parrot will receive request messages from the orders queue, match them and send responses to confirmations queue.
    Replaying is on
  15. Now, open the Vegetable Order System and send a vegetable order for 5 carrots:
    Replaying is on
  16. Then, you should see an order confirmation message displayed! Notice that it does not matter what order you send and what quantity, you will always receive the same order confirmation for 5 carrots that you have configured in Traffic Parrot. In order to make that order confirmation message dynamic and based on the order vegetable message, please read below how to use dynamic responses.
    Order confirmation visible
  17. This way, using Traffic Parrot, we were able to mock (simulate) the Order Processing System and test that the order confirmation messages are displayed correctly in the Vegetable Ordering System. Please read how to simulate dynamic mock responses to find out how to create dynamic responses or error responses.

Simulating RabbitMQ systems with dynamic mock responses

The recommended way of creating mocks or stubs of third party or backed systems and APIs is to keep them as simple as possible.  Unfortunately, sometimes it is not possible to keep things simple, and it is necessary to create more complex systems or API simulators. In this example, we will go through an example how to create a simulator of an RabbitMQ API that will dynamically generate a list of items in a response based on a request.

In the example above Traffic Parrot simulates the Order Processing System, but the RabbitMQ response message returned is always the same. So, regardless of what type of item and quantity we order the response message is always the same. Let us have a look at how to use Traffic Parrot to create a dynamic RabbitMQ response message!

To use request data in response we will use the handlebar helpers. We will use request.body to access the body of the RabbitMQ request message and then use jsonPath to extract bits of the JSON content {{jsonPath request.body '$.foo.bar'}}

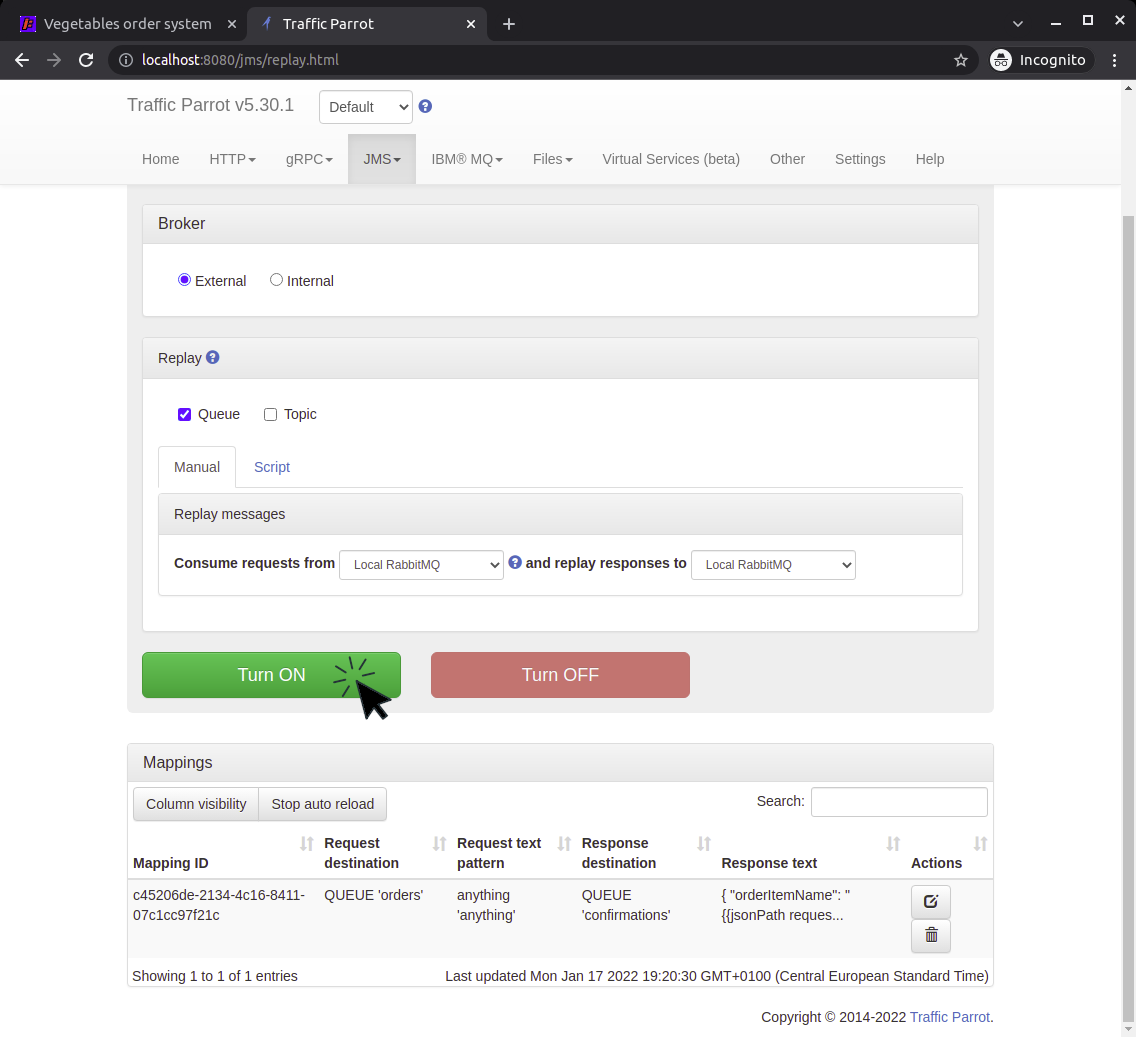
To simulate the Order Processing System using Traffic Parrot and generate dynamic RabbitMQ response messages:
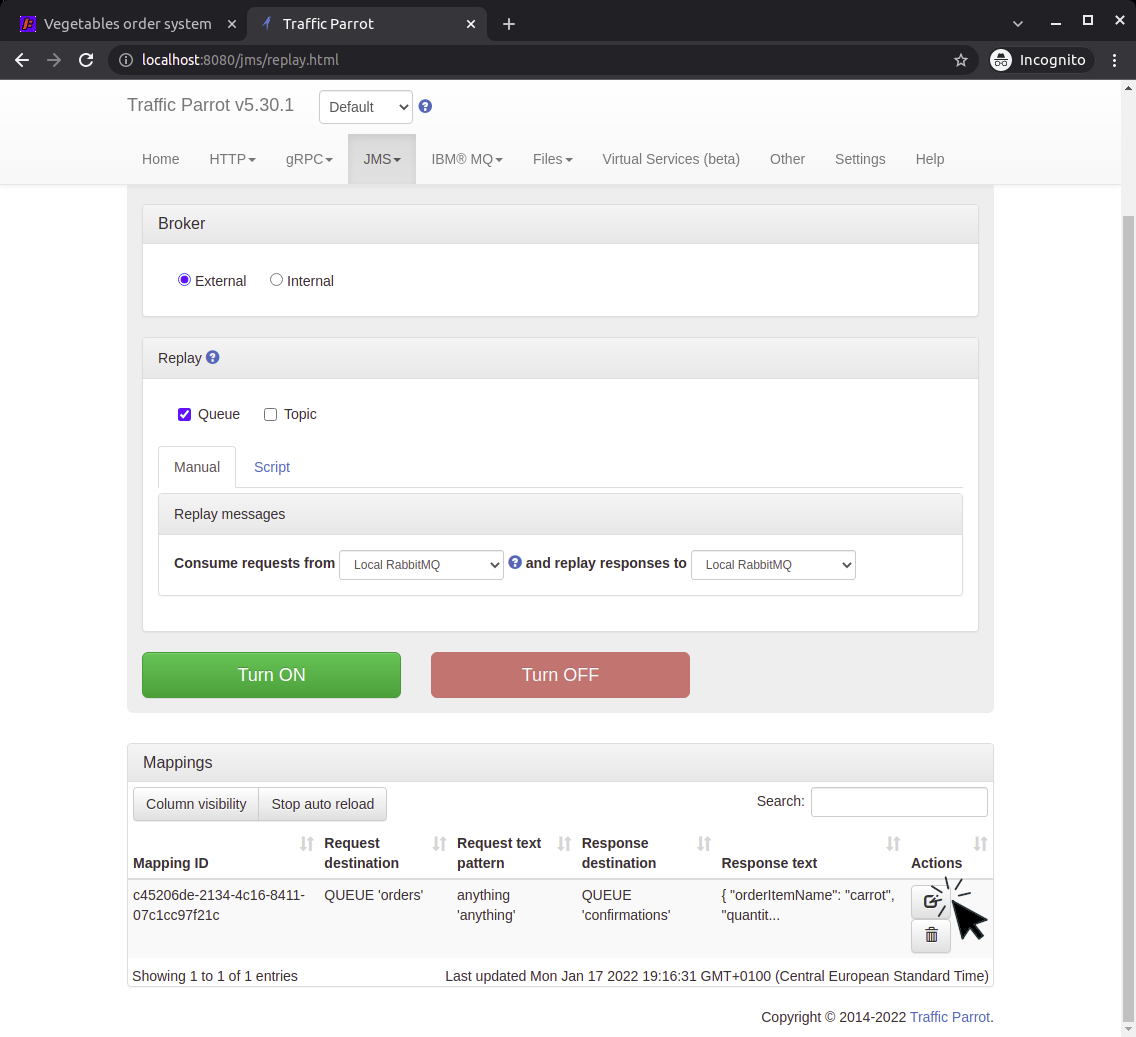
  1. Follow all steps in the tutorial above Using Traffic Parrot to send RabbitMQ response messages. So by now, you should have a working non-dynamic (static) RabbitMQ response being sent by Traffic Parrot back to the Vegetable Ordering system.
  2. Turn off the replay and then click on edit button next to the mapping row at the bottom of the page:
    Click on edit mapping
  3. We know form the documentation of the Order Processing System that the RabbitMQ request message body is going to be in JSON format and will look like this
    {
      "quantity": "5",
      "orderItemName": "carrot"
    }
    so we can now extract data and put it in the RabbitMQ response message using jsonPath like this
    {{jsonPath request.body '$.quantity'}}
    and this
    {{jsonPath request.body '$.orderItemName'}}
    We can also generate a dynamic date in the correct format using
    {{now format="yyyy-MM-dd'T'HH:mm:ssZ"}}
    So, edit the mapping and change the response body to be:
    {
      "orderItemName": "{{jsonPath request.body '$.orderItemName'}}",
      "quantity": "{{jsonPath request.body '$.quantity'}}",
      "date": "{{now format="yyyy-MM-dd'T'HH:mm:ssZ"}}"
    }
    Edit mapping
  4. Turn on the replay again:
    Turn on replay again
  5. Open the Vegetable Order System and send an order for 20 Potatoes:
    Send new order
  6. And you will eventually see an order processed message received in the Vegetable Order System. Notice that the message is a dynamically generated confirmation of what you have ordered, dated today.
    Dynamic mock RabbitMQ message response received
  7. This way we were able to simulate the Order Processing System using Traffic Parrot that received and sends RabbitMQ request and response messages.

Next steps