
A tester or developer uses a web browser to access the console. The console manages the virtual service. The system under test (application under test) connects directly to the virtual service on different ports.
Here is an example of how that could look like for a scenario where the virtual service is replaying messages to an external queue.
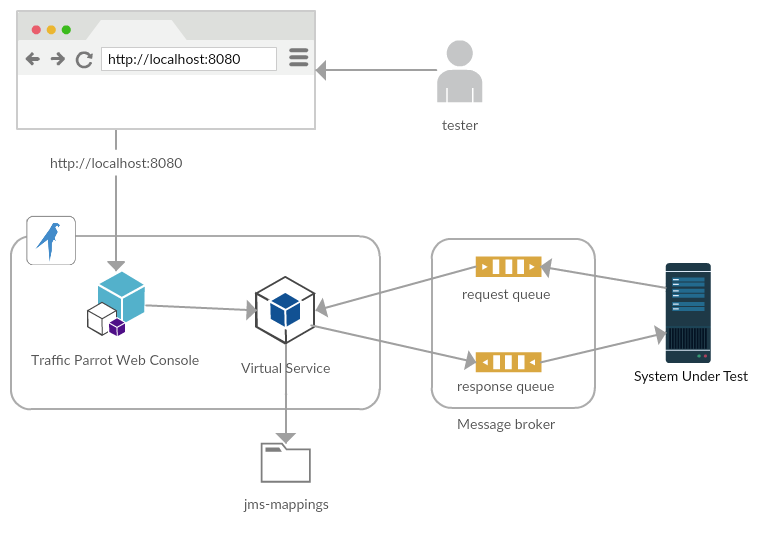 Virtual service replaying IBM® MQ messages to and from a queue
To record from or replay to brokers you will need to tell Traffic Parrot how to connect to them.
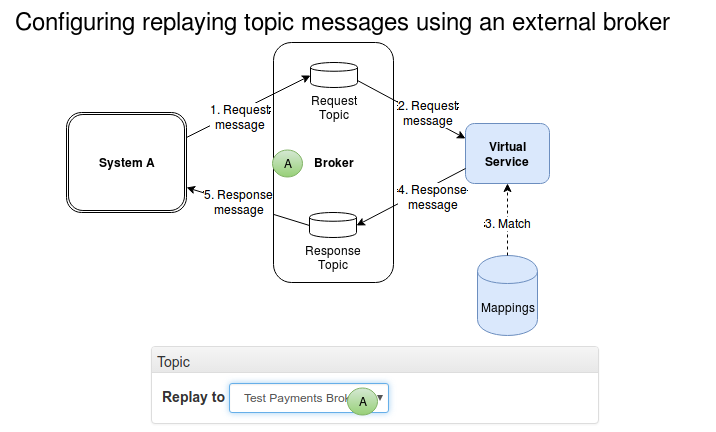
Those connections are displayed in the dropdown menus on the record and replay panels, for example:
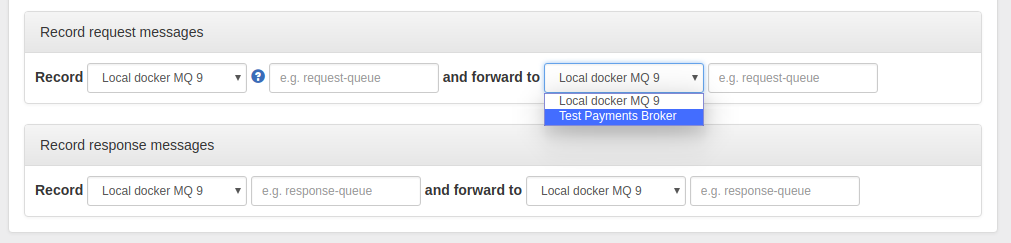
The "Internal broker" connection is available in the dropdown by default when you choose to use an internal broker in the Broker panel.
To define a new connection that will be available in the dropdown in the record and replay panels:[
{
"connectionId": "1",
"connectionName": "Test Payments Broker",
"connectionData": {
"ibmMqVersion": "IBM_MQ_7_5",
"hostname": "mqserver.example.com",
"port": 1415,
"queueManager": "PAYMENT.QM",
"channel": "PAYMENT.SVRCONN",
"username": "payuser",
"password": "paypassword222",
"useMQCSPAuthenticationMode": true,
"readConnectionsToOpen": 1,
"writeConnectionsToOpen": 1,
"sslCipherSuite": null,
"sslPeerName": null
}
},
{
"connectionId": "2",
"connectionName": "Local docker MQ 9",
"connectionData": {
"ibmMqVersion": "IBM_MQ_9",
"hostname": "localhost",
"port": 1414,
"queueManager": "QM1",
"channel": "DEV.APP.SVRCONN",
"username": "app",
"password": "MQ_APP_PASSWORD",
"useMQCSPAuthenticationMode": true,
"readConnectionsToOpen": 1,
"writeConnectionsToOpen": 1,
"sslCipherSuite": null,
"sslPeerName": null
}
}
]
In the current Traffic Parrot version you edit connections directly in the ibm-mq-connections.json file. In near future you will be able to do it via the Web UI as well.
trafficparrot.virtualservice.ibmMqConnectionsUrl=classpath:ibm-mq-connections.jsonto for example
trafficparrot.virtualservice.ibmMqConnectionsUrl=file:/home/john/git/project/trafficparrot-ibm-mq-connections.jsonThis can be useful if you would like to version control it with your application source code.
To connect to IBM® MQ you need jar files provided by IBM that will allow Traffic Parrot to establish connections with MQ.
Before you proceed please read these instructions to double check your actions are inline with the supported way to install WebSphere MQ Java jar files.
If you have any issues with obtaining the jar files please contact us.
Copy those files to trafficparrot-x.y.z/lib/external and restart Traffic Parrot.
trafficparrot.ibmmq.start.queue.replay.on.startup.script=classpath:start-ibmmq-queue-replay-on-startup.txt
To connect Traffic Parrot Native IBM MQ to an SSL/TLS channel, you need to configure the cipher suite and provide the certificates.
[
  {
    "connectionId": "1",
    "connectionName": "Local Docker MQ 9",
    "connectionData": {
      "ibmMqVersion": "IBM_MQ_8",
      "hostname": "localhost",
      "port": 2414,
      "queueManager": "QM1_V8",
      "channel": "DEV.APP.SVRCONN.SSL",
      "username": "app",
      "password": "MQ_APP_PASSWORD",
      "useMQCSPAuthenticationMode": true,
      "readConnectionsToOpen": 1,
      "writeConnectionsToOpen": 1,
      "sslCipherSuite": "TLS_RSA_WITH_AES_128_CBC_SHA",
      "sslPeerName": "OU=TP IBM MQ"
    }
  }
]
In the example above we are also configuring the sslPeerName which allows us to validate the server certificate DN.
To provide the server and client certificates, we will use a trust store and key store. The trust store should contain all certificates, be it CA or direct public keys to validate the IBM MQ queue manager certificate. The key store should include a client certificate that when requested by the IBM MQ queue manager SSL channel is signed by the approved issuer. The key store should also contain a private key associated with the client certificate.
-Djavax.net.ssl.trustStore=certificates/ca-chain.jks
-Djavax.net.ssl.trustStorePassword=trafficparrot
-Djavax.net.ssl.keyStore=certificates/mq-client.jks
-Djavax.net.ssl.keyStorePassword=trafficparrot
-Dcom.ibm.mq.cfg.useIBMCipherMappings=false
For the example above to work, you will need to create the certificates/ca-chain.jks and certificates/mq-client.jks JKS files with the required certificates in them.
Below you can find sample content of the trust store and the key store. In our example, the trust store contains a certificate authority chain of 2 certificates. The intermediate ca was used to sign both client and the IBM MQ queue manager certificates. The key store contains the client private key and a certificate signed by the intermediate ca.
trafficparrot@trafficparrot-pcs:~/Downloads/tp/trafficparrot-linux-x64-jre$ keytool -list -keystore certificates/ca-chain.jks
Enter keystore password:
Keystore type: jks
Keystore provider: SUN

Your keystore contains 2 entries

intermediateca, 13-Jul-2020, trustedCertEntry,
Certificate fingerprint (SHA1): 2E:FB:4F:8A:44:89:CD:FB:EE:25:5B:78:D0:D8:9B:89:A8:1E:1C:9E
rootca, 13-Jul-2020, trustedCertEntry,
Certificate fingerprint (SHA1): 13:D1:98:09:59:66:C7:64:F0:78:C3:8C:C1:C2:68:9D:76:F0:CF:34


trafficparrot@trafficparrot-pcs:~/Downloads/tp/trafficparrot-linux-x64-jre$ keytool -list -keystore certificates/mq-client.jks
Enter keystore password:
Keystore type: jks
Keystore provider: SUN

Your keystore contains 1 entry

1, 13-Jul-2020, PrivateKeyEntry,
Certificate fingerprint (SHA1): 21:9B:F6:A4:12:B0:31:1E:D6:29:B5:D3:C4:19:6F:ED:E4:C3:50:C2
You can enable additional logging that displays total processing time of messages.
trafficparrot.ibmmq.monitorPerformance=trueYou should then see INFO log lines that contain "Total processing time", for example:
2020-08-25 18:32:54,046 INFO DEV.QUEUE.1-replay-responses-ibm-mq-message-scheduler-0 Request message '414D5120514D312020202020202020202E3C455F02FFE524' was received on '2020-08-25T16:32:54.004Z' from 'QUEUE:DEV.QUEUE.1'. Request message putDateTime is '2020-08-25T16:32:53.990Z'. Response message '414D5120514D312020202020202020202E3C455F02FEE524' was sent on '2020-08-25T16:32:54.045Z' to 'QUEUE:DEV.QUEUE.2'. Total processing time 41msYou can increase the logging level by setting it to DEBUG or TRACE, change trafficparrotserver.log4j.properties (last line in the file):
log4j.category.com.trafficparrot.messaging.ibmmq.connection.monitor.ReportingIbmMqPerformanceMonitor=DEBUG
As with HTTP recording Traffic Parrot, during recording incoming and outgoing messages are matched up to provide mappings. Then upon playback receipt of a matching incoming message will trigger generation of an outgoing message.
Before you proceed to recording or replaying messages make sure you have installed the required libraries (required JARs) so that Traffic Parrot can connect to the broker.
Traffic Parrot can form mappings in a number of ways.
The default is to use time based matching. This can be changed in the advanced parameter section of the record page.
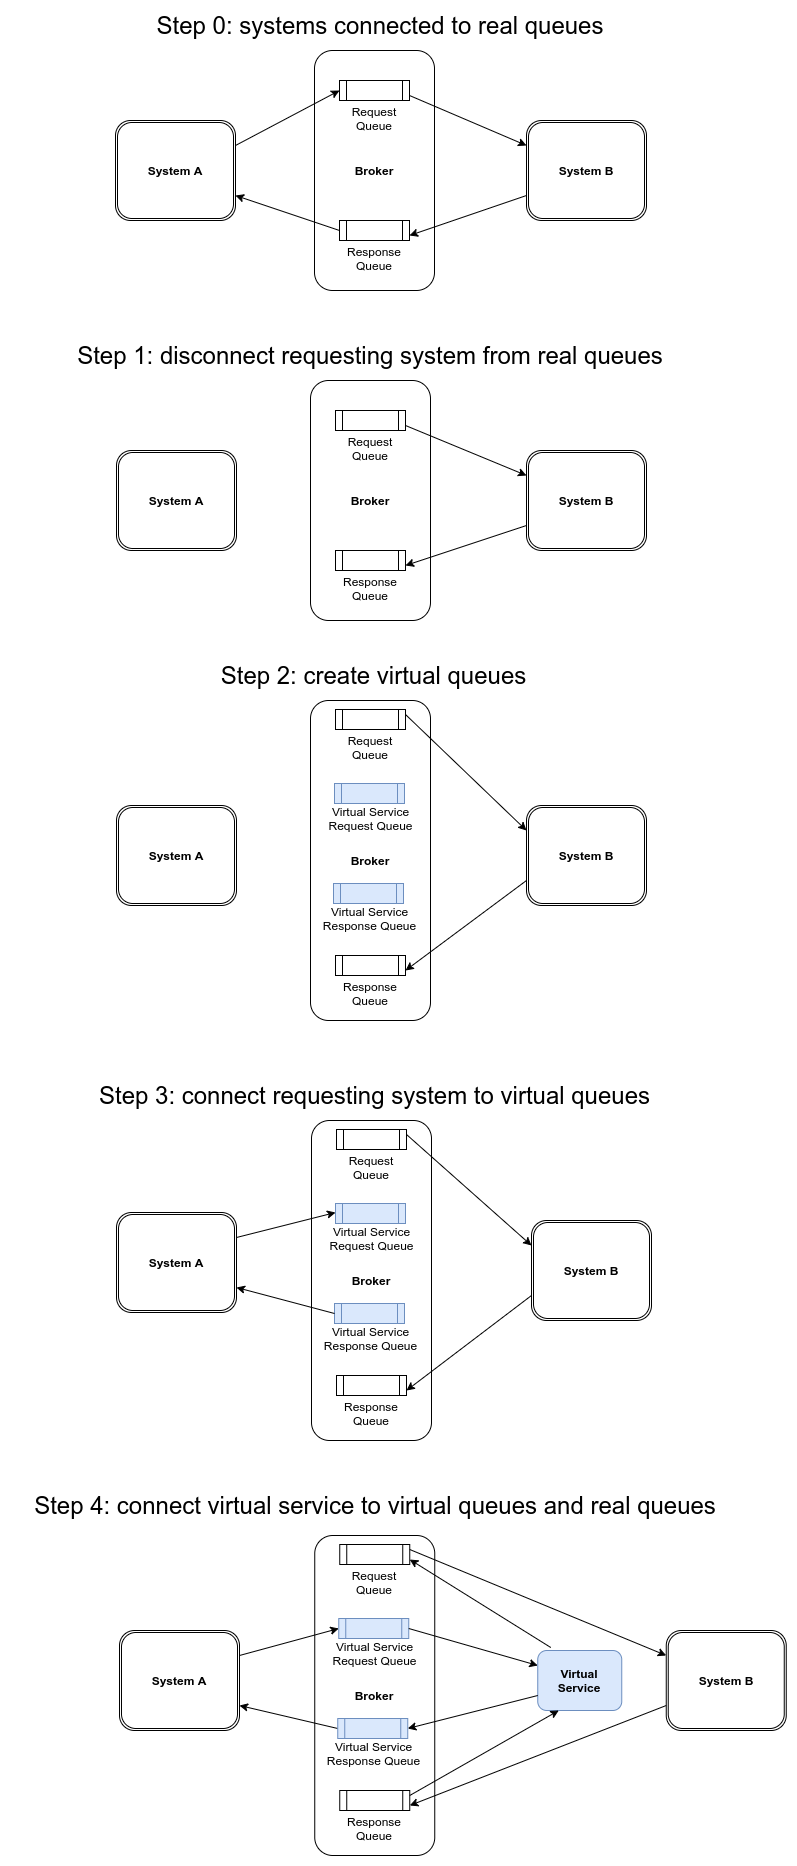
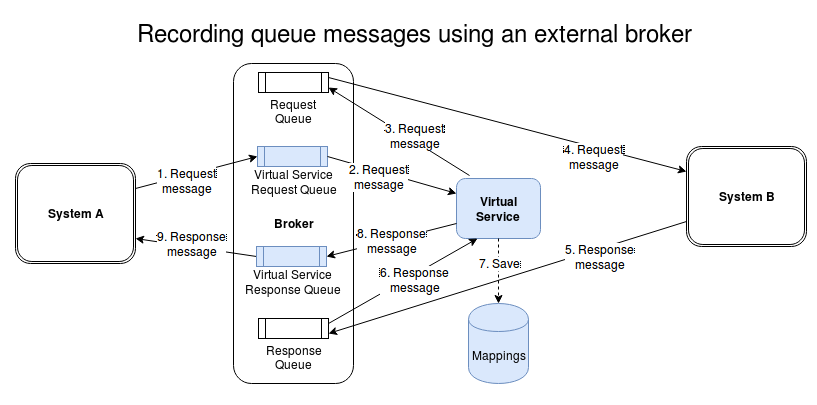
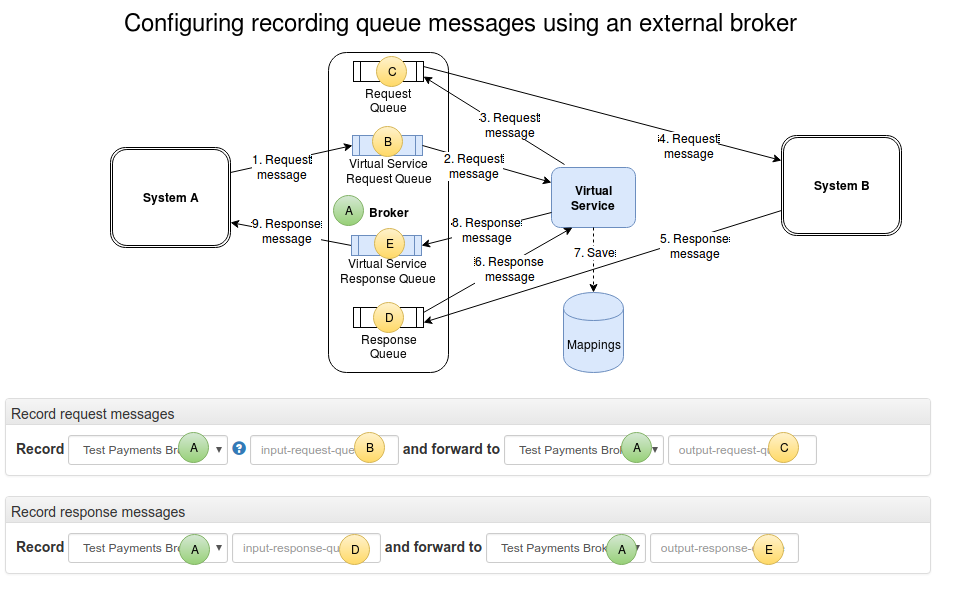
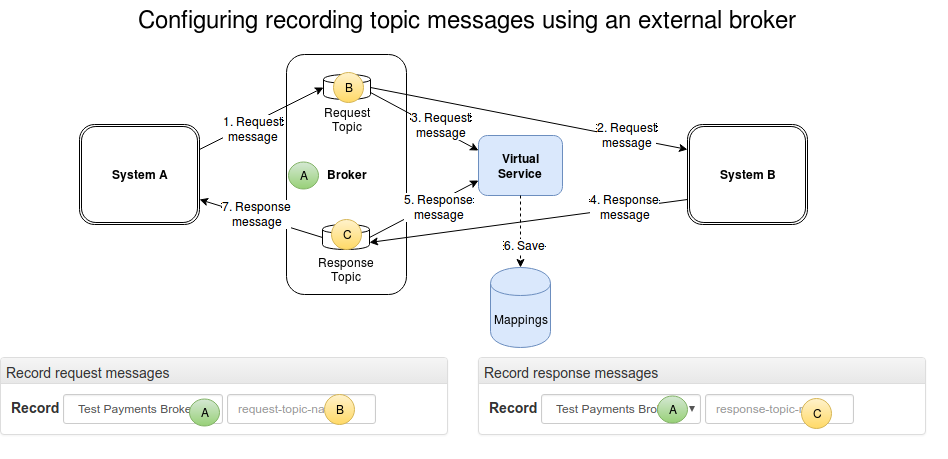
Please see the diagram below for an overview of the steps required for configuring recording of messages between existing systems.
Traffic Parrot does not support running IBM® MQ internally. You will need to use an external broker.
You can use one of the following: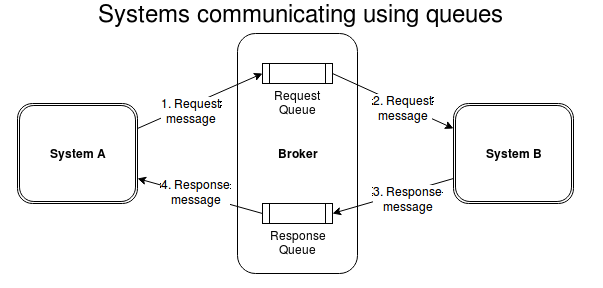
One system generates messages onto a queue; another system consumes these messages and puts responses onto a second queue, which the first system consumes. If our goal is to test the system-under-test in isolation, we must record these interactions in order to replay them.
We will create extra queues on the existing broker that will be used by the virtual service. Then we will reconfigure the system-under-test to connect to these queues instead of the original ones. Traffic Parrot will move messages between these queues and the original queues, recording and creating mappings as it does so.
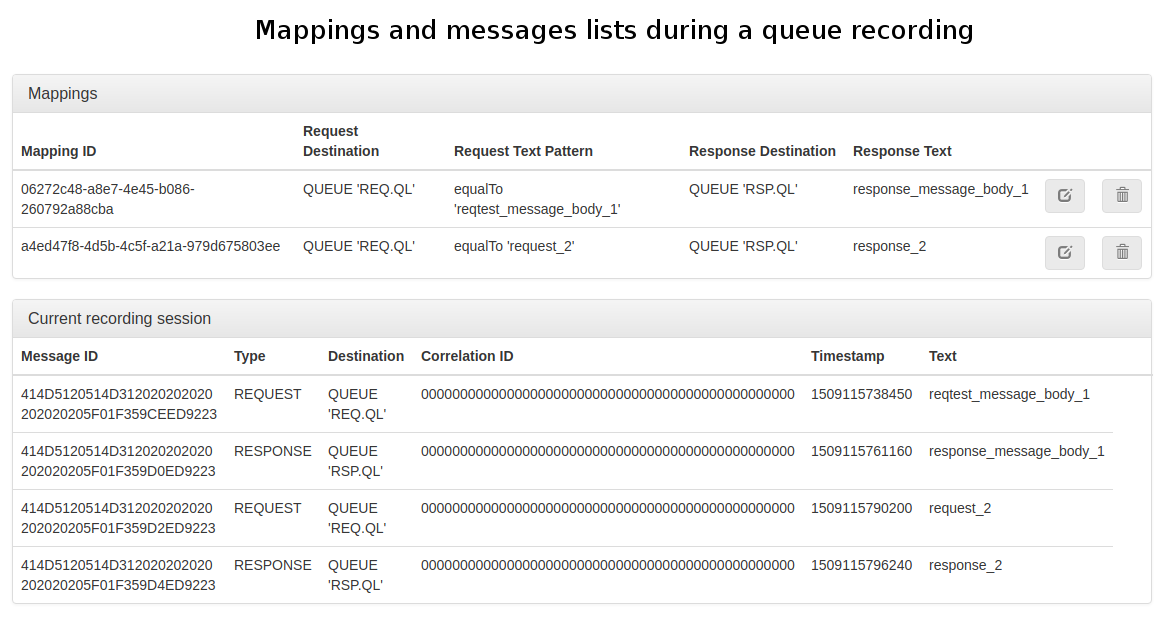
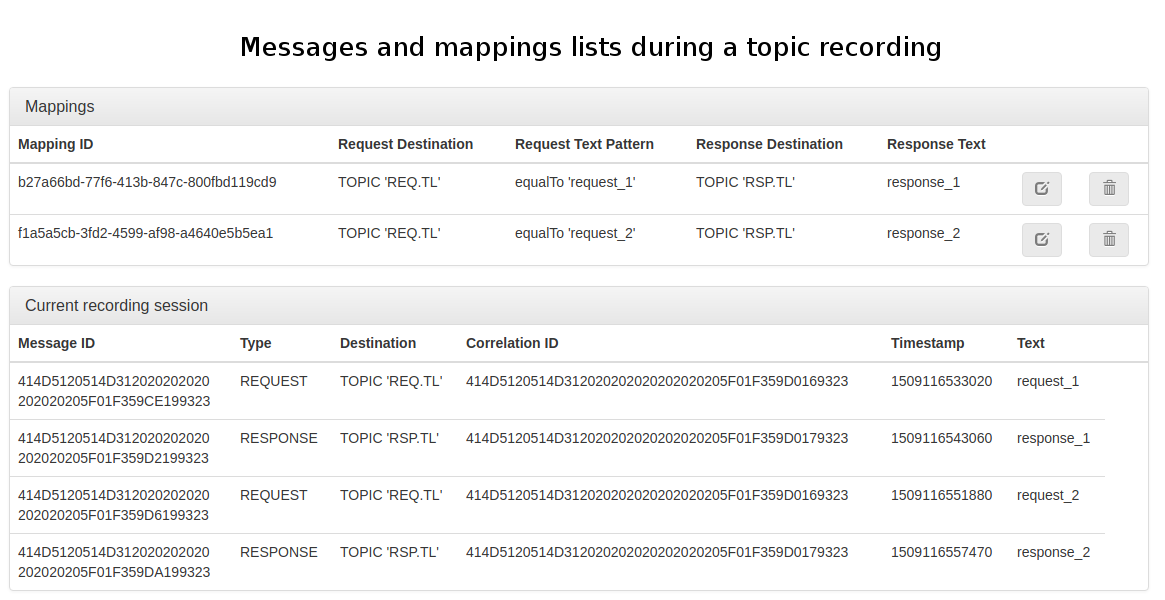
As the system-under-test generates messages they are listed in the bottom table 'Current recording session'. As the second system generates responses to these messages, they are also listed at the bottom, but in addition mappings are generated in the 'Mappings' table showing incoming and outgoing messages that Traffic Parrot has paired up.
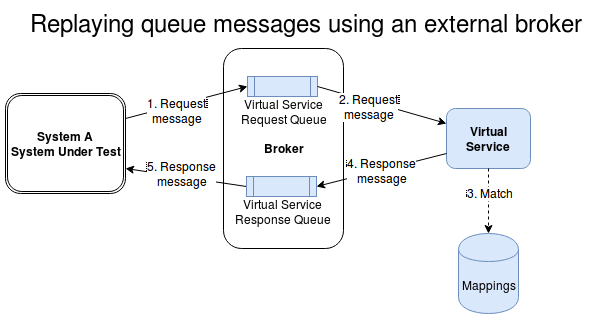
To replay the recorded mappings we will need the same virtual service queues in place as shown on the image below.
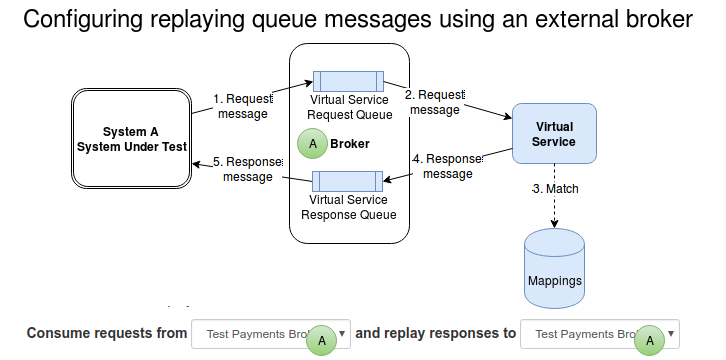
Traffic Parrot does not support running IBM® MQ internally. You will need to use an external broker.
You can use one of the following: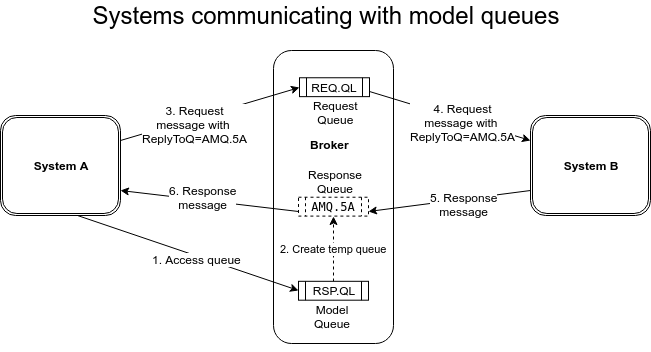
One system obtains a temporary queue based on a model queue. It puts messages onto a request queue with the ReplyToQ set to the temporary queue. Another system consumes these messages and puts responses onto the temporary queue that was in the ReplyToQ field, which the first system consumes. If our goal is to test the system-under-test in isolation, we must record these interactions in order to replay them.
We will create an extra request queue on the existing broker that will be used by the virtual service. Then we will reconfigure the system-under-test to connect to this request queue instead of the original one. Traffic Parrot will move messages between the virtual and original request queue, recording and creating mappings as it does so.
Both the system-under-test and the virtual service will use a model queue that exists on the existing broker. This model queue will be used to create a dynamic response queue. Traffic Parrot will move messages between the virtual and original dynamic queue, recording and creating mappings as it does so.
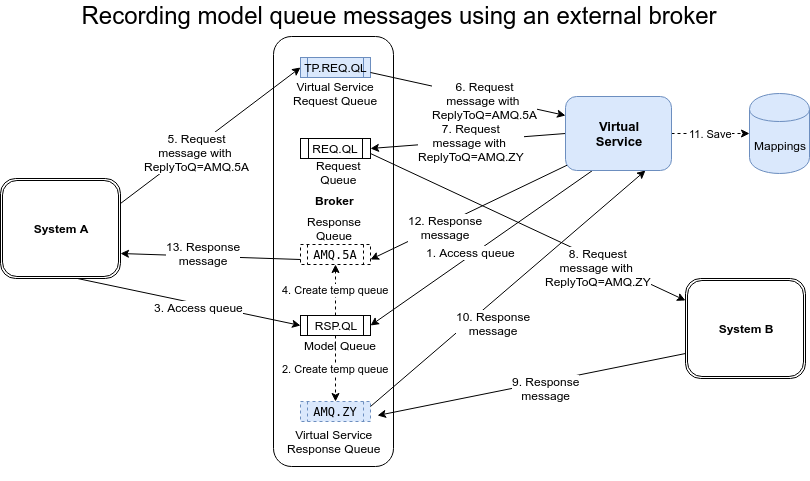
Steps to record are similar to the usual recording steps but the response queues selected should be the same model queue name that exists in the external broker. In addition, the advanced parameter "Model response queues" should be set to "Yes":
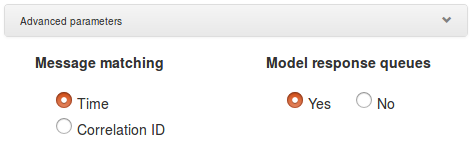
To replay the recorded mappings we will need the same virtual service queues in place as shown on the image below.
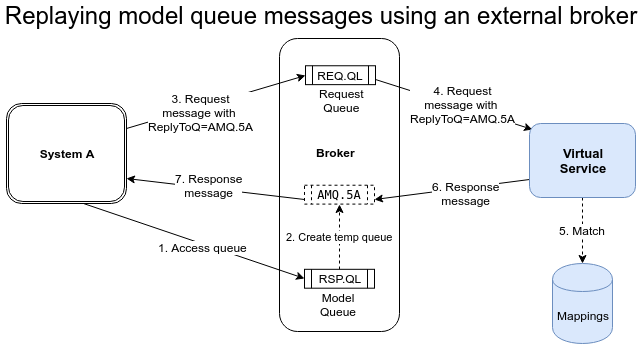
Steps to replay are the same as the usual replay steps. Response messages will be sent to the queue mentioned in th ReplyToQ field of the request message.
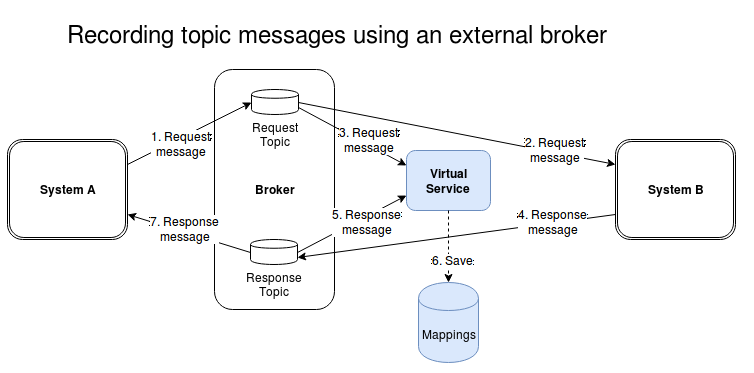
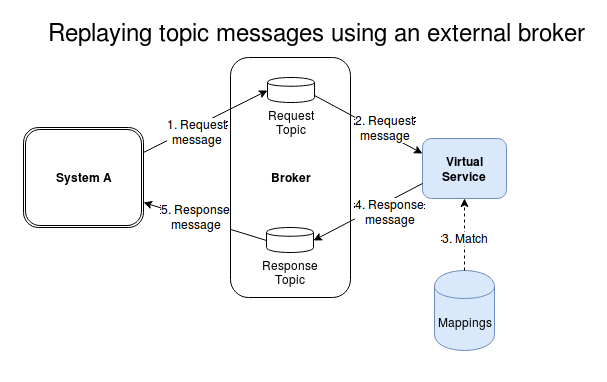
Recording and playback of topics using an external broker is less intrusive than queues because Traffic Parrot can subscribe to a topic just like any other application and receive messages, without affecting the delivery of those messages to other applications.
This diagram shows how the production systems connect:
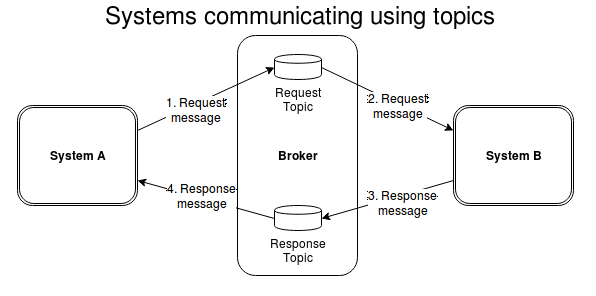
The system-under-test generates messages onto a topic which are received by a number of other systems. One of these systems generates responses onto a different topic (which are received by a number of systems, one of which is the system-under-test).
We will configure Traffic Parrot to connect to the request and response topics and record the messages appearing on both, generating mappings as it goes, as shown on diagram Recording topics using an external broker
#
# This is a sample comment
#
QueueManager:'Local Docker MQ 9'
ProxyRequestQueue:'PROXY_PROCESS_PAYMENT'
LiveRequestQueue:'PROCESS_PAYMENT'
LiveResponseQueue:'PAYMENT_PROCESSESED'
ProxyResponseQueue:'PROXY_PAYMENT_PROCESSESED'


#
# This is a sample comment
#
QueueManager:'Local Docker MQ 9'
ProxyRequestQueue:'PROXY_CREATE_ORDER'
LiveRequestQueue:'CREATE_ORDER'
LiveResponseQueue:'ORDER_CREATED'
ProxyResponseQueue:'PROXY_ORDER_CREATED
You can also use the another script format with syntax:
#
# Order and payment processing
#
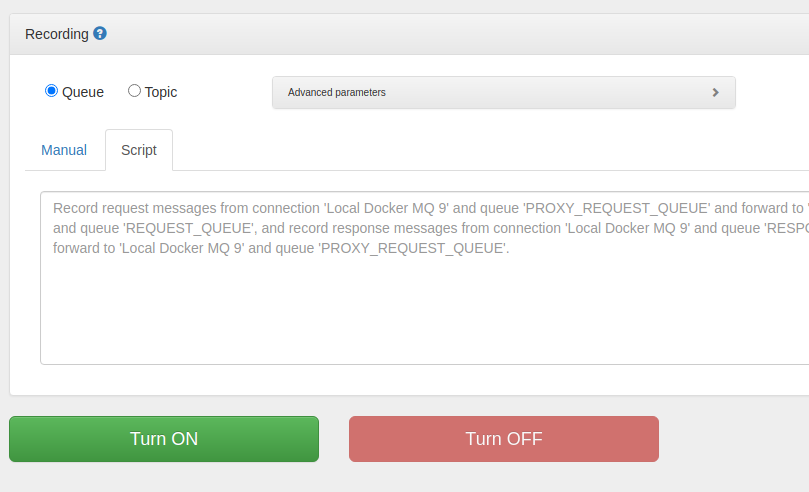
Record request messages from connection 'Local Docker MQ 9' and queue 'PROXY_PROCESS_PAYMENT' and proxy to 'AWS Docker MQ 8' and queue 'PROCESS_PAYMENT', and record response messages from connection 'AWS Docker MQ 8' and queue 'PAYMENT_PROCESSESED' and proxy to 'Local Docker MQ 9' and queue 'PROXY_PAYMENT_PROCESSESED'.
Record request messages from connection 'Local Docker MQ 9' and queue 'PROXY_CREATE_ORDER' and proxy to 'AWS Docker MQ 8' and queue 'CREATE_ORDER', and record response messages from connection 'AWS Docker MQ 8' and queue 'ORDER_CREATED' and proxy to 'Local Docker MQ 9' and queue 'PROXY_ORDER_CREATED'.
Record request messages from connection 'Local Docker MQ 9' and queue 'PROXY_MAKE_SHIPMENT' and proxy to 'AWS Docker MQ 8' and queue 'MAKE_SHIPMENT', and record response messages from connection 'AWS Docker MQ 8' and queue 'ORDER_SHIPPED' and proxy to 'Local Docker MQ 9' and queue 'PROXY_ORDER_SHIPPED'.

#
# Compute statistics
#
Record request messages from connection 'Local Docker MQ 9' and queue 'PROXY_COMPUTE_USER_STATS' and proxy to 'AWS Docker MQ 8' and queue 'COMPUTE_USER_STATS', and record response messages from connection 'AWS Docker MQ 8' and queue 'USER_STATS' and proxy to 'Local Docker MQ 9' and queue 'PROXY_USER_STATS'.
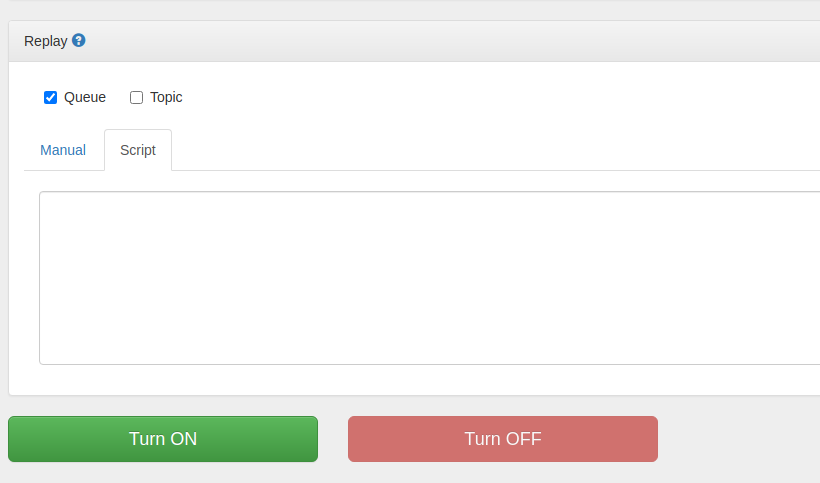
#
# QM1 queue replay
#
RequestQueueManager:'Request QM1'
ResponseQueueManager:'Response QM1'
RequestQueueNames:'REQ_1_A','REQ_1_B'

#
# QM2 queue replay
#
RequestQueueManager:'Request QM2'
ResponseQueueManager:'Response QM2'
RequestQueueNames:'REQ_2_A','REQ_2_B'
When Traffic Parrot receives a request message, it will try to simulate the system it is replacing by sending back a response message on the response queue or topic. To decide which response message to send, it will go through all the request to response mappings it has available to find the response to be sent. For more details how request matching works, see Request matching.
The most common matchers are shown below. All other WireMock request body patterns are also supported.
| Matcher name | Matcher Id | Description |
|---|---|---|
| any | any | Any request body will match. |
| equal to | equalTo | Check that the received request message body is equal to the request body specified in the mapping |
| contains | contains | Check that the received request message body contains the sequence of characters specified in the mapping |
| does not contain | doesNotContain | Check that the received request body does not contain the sequence of characters specified in the mapping |
| matches regex | matches | Check that the received request message body matches the regexp specified in the mapping |
| does not match regexp | doesNotMatch | Check that the received request message body does not match the regexp specified in the mapping |
| equal to JSON | equalToJson | Check that the received request message body is JSON and that it is equal to the request body JSON specified in the mapping |
| matches JSON | matchesJson |
Check that the received request message body matches (allowing for special wildcard tokens) JSON specified in the mapping.
Tokens allowed:
For example a "matches JSON" request body matcher:
{
  "name": "{{ anyValue }}",
  "lastName": "{{ anyValue }}",
  "age": "{{ anyNumber }}",
  "children": "{{ anyElements }}"
}
will match a request body:
{
  "name": "Bob",
  "lastName": "Smith",
  "age": 37,
  "children": [{"name": "sam"}, {"name": "mary"}]
}
|
| matches JSONPath | matchesJsonPath | Check that the received request message body is JSON and that it matches JSONPath
specified in the mapping. For example, if we use the following expression as the request body matcher
$[?(@.xyz.size() == 2)]it will match this request body: {"xyz":[{"a":true}, {"b":false}]}
but will NOT match this one:
{"xyz":["a":true, "b":false, "c":true]}
For more examples see the request matching documentation.
|
| equal to XML | equalToXml | Check that the received request message body is XML and that it is equal to the request body XML specified in the mapping |
| matches XML | matchesXml |
Check that the received request message body matches (allowing for special wildcard tokens) XML specified in the mapping.
Tokens allowed:
For example a matches XML request body matcher:
<example>
  <name>{{ anyValue }}</name>
  <age>{{ anyNumber }}</age>
  <children><tp:AnyElements/></children>
</example>
will match a request body:
<example> <name>Sam</name> <age>29</age> <children><child name="bob"/></children> </example> |
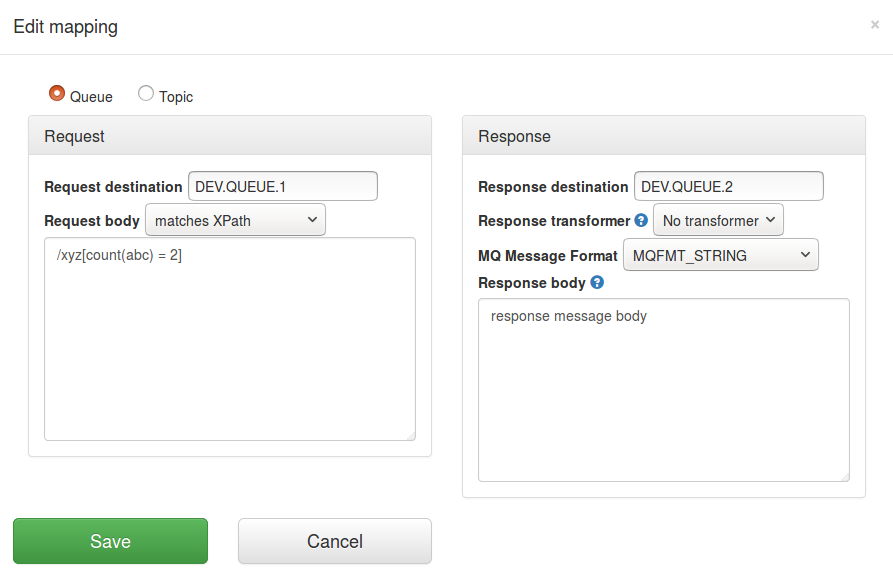
| matches XPath | matchesXPath | Check that the received request message body is XML and that it matches XPath
specified in the mapping. For example, if we use the following expression as the request body matcher
/xyz[count(abc) = 2]it will match this request body: <xyz><abc/><abc/></xyz>but will NOT match this one: <xyz><abc/></xyz> |
| matches SWIFT field | matchesSwiftField |
Match on a specific field within a SWIFT MT message body. Instead of writing a complex regular expression to match the entire message, you can target an individual field by its tag number and apply a regex to just that field's value. The matcher value is a JSON object with two properties:
For example, to match an MT103 message where tag 20 (Transaction Reference) starts with TXNREF: {"field": "20", "matches": "TXNREF.*"}
This will match a SWIFT message containing: :20:TXNREF001 but will NOT match: :20:OTHERREF The matcher handles both full SWIFT envelopes (with block structure) and bare field content. Multi-line field values (e.g., :59: address fields) are supported. If the specified tag appears multiple times, the match succeeds if any occurrence matches. If the tag is not present or the input is not a SWIFT message, the matcher returns no-match (not an error). The corresponding JSON mapping file format is: {
"bodyPatterns": [{
"matchesSwiftField": {
"field": "20",
"matches": "TXNREF.*"
}
}]
}
|
| matches FIX field | matchesFixField |
Match on a specific tag within a FIX protocol message body. Instead of writing a complex regular expression to match the entire message body, you can target an individual tag by its number and apply a regex to just that tag's value. The matcher value is a JSON object with two properties:
For example, to match a NewOrderSingle message (message type D) where tag 35 is D: {"field": "35", "matches": "D"}
This will match an IBM MQ message body containing the FIX-standard SOH-delimited body: 8=FIX.4.4|9=176|35=D|49=SENDER|56=TARGET|11=ORDER123|55=AAPL|54=1|44=150.25|10=128| (where | represents the SOH character, ASCII 0x01) but will NOT match an ExecutionReport message where tag 35 is 8. Tag numbers are treated as opaque string keys, so the matcher works across FIX 4.2, 4.4, 5.0, and FIXT without any FIX-dictionary validation. If the specified tag appears multiple times (for example inside a repeating group), the match succeeds if any occurrence matches. If the tag is not present or the input is not a FIX message, the matcher returns no-match (not an error). The corresponding JSON mapping file format is: {
"bodyPatterns": [{
"matchesFixField": {
"field": "35",
"matches": "D"
}
}]
}
|
 will allow you to edit an existing mapping:
replyToQueueManagerName and replyToQueueName) directly in the mapping JSON file.
Traffic Parrot supports postponing the delivery of a MQ message. This can be useful to better simulate a more realistic scenario where the responding system does not send a response message immediately after receiving the request message.
Use the  field on the edit mapping panel to specify the delay in milliseconds.
The request priority can be set in order to set up a preference order for matching mappings.
The highest priority value is 1. If two or more mappings both match a request, the mapping with the higher priority will be used to provide the response. The default priority is 5.
This can be useful, if you want a "catch-all" mapping that returns a general response for most requests and specific mappings on top that return more specific responses.
Traffic Parrot is able to record and replay messages that could contain text in a variety of formats e.g. JSON, XML or plain text.
Traffic Parrot is able to send zero response messages for a given request message. When a request message is matched to a mapping, no response will be sent.
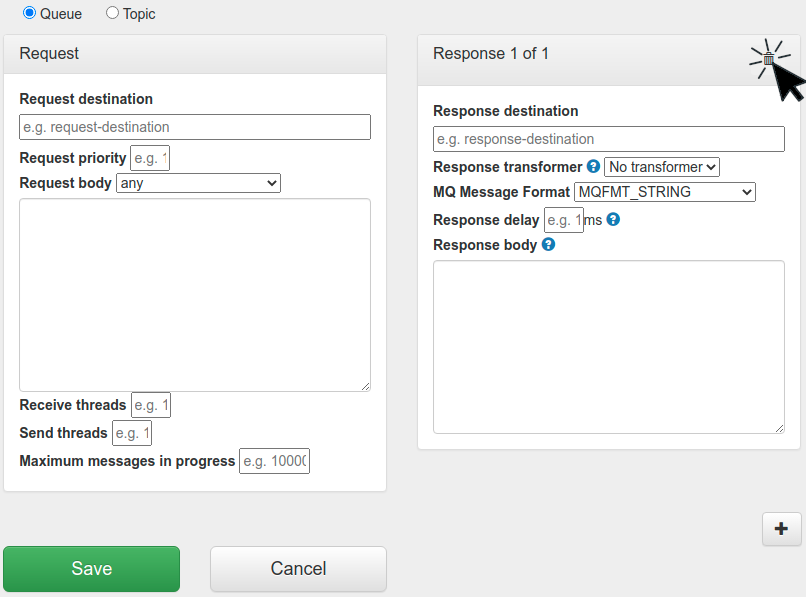
 button at the top of the response mapping pane. This will delete the response message from the mapping.
Traffic Parrot is able to send multiple response messages for a given request message. When a request message is matched to a mapping, all the responses present in that mapping will be sent.
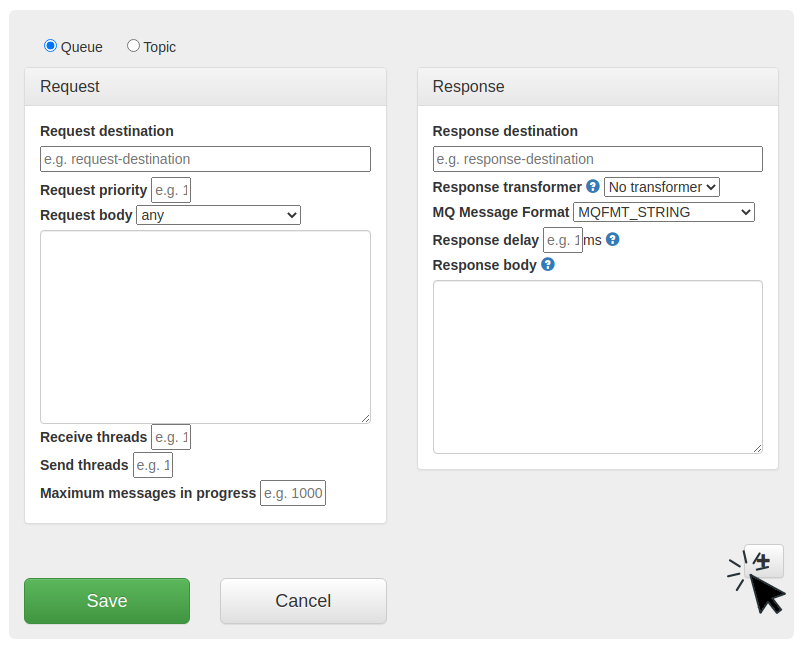
 button below the response in the mapping pane. This will add a new response that will be sent after the first one has been sent.
You can configure the replyToQueueManagerName and replyToQueueName
response header fields directly in the mapping JSON file. These fields support
Handlebars templates, so you can use dynamic values
based on the request message.
To set response headers, add the replyToQueueManagerName and/or
replyToQueueName fields to the response section of your
IBM® MQ mapping JSON file located in ibm-mq-mappings/.
{
  "request": {
    "destination": {
      "name": "DEV.REQUEST.QUEUE",
      "type": "QUEUE"
    },
    "bodyMatcher": {
      "equalTo": "hello"
    }
  },
  "response": {
    "destination": {
      "name": "DEV.RESPONSE.QUEUE",
      "type": "QUEUE"
    },
    "text": "world",
    "replyToQueueManagerName": "MY.QUEUE.MANAGER",
    "replyToQueueName": "MY.REPLY.QUEUE"
  }
}
You can use Handlebars expressions to set response MQMD header fields.
Note that these fields set metadata on the outgoing message; they do not
control where the response is sent. Response routing is handled automatically:
by default, if the request message has a replyToQueueName header set,
the response is sent to that queue; otherwise, it is sent to the
destination.name configured in the mapping.
{
  "request": {
    "destination": {
      "name": "DEV.REQUEST.QUEUE",
      "type": "QUEUE"
    }
  },
  "response": {
    "destination": {
      "name": "DEV.RESPONSE.QUEUE",
      "type": "QUEUE"
    },
    "text": "response body",
    "replyToQueueManagerName": "{{request.header.replyToQueueManagerName}}",
    "replyToQueueName": "{{request.header.replyToQueueName}}"
  }
}When these fields are not set in the mapping JSON:
replyToQueueManagerName defaults to the value from the request message header,
or the producer's queue manager name if the request header is emptyreplyToQueueName defaults to an empty stringSee the dynamic responses page for a full list of available request attributes that can be used in Handlebars templates.
AsyncAPI is an open specification for describing event-driven and message-based APIs (its channels, operations and message schemas) in the same way that OpenAPI describes HTTP APIs. If your team already documents its messaging APIs with AsyncAPI, you can create native IBM® MQ mappings directly from that document instead of writing them by hand.
Go to IBM® MQ in the top navigation bar and then click Import AsyncAPI. Upload a JSON or YAML AsyncAPI 2.x or 3.0 document and Traffic Parrot generates one IBM® MQ mapping per importable channel operation, each serving an example payload generated from the operation's message schema.
After you upload the document, Traffic Parrot shows a preview of the mappings it would create so you can review and select exactly which ones to import. The import page works the same way as the JMS AsyncAPI import, except each selected operation becomes a native IBM® MQ mapping.
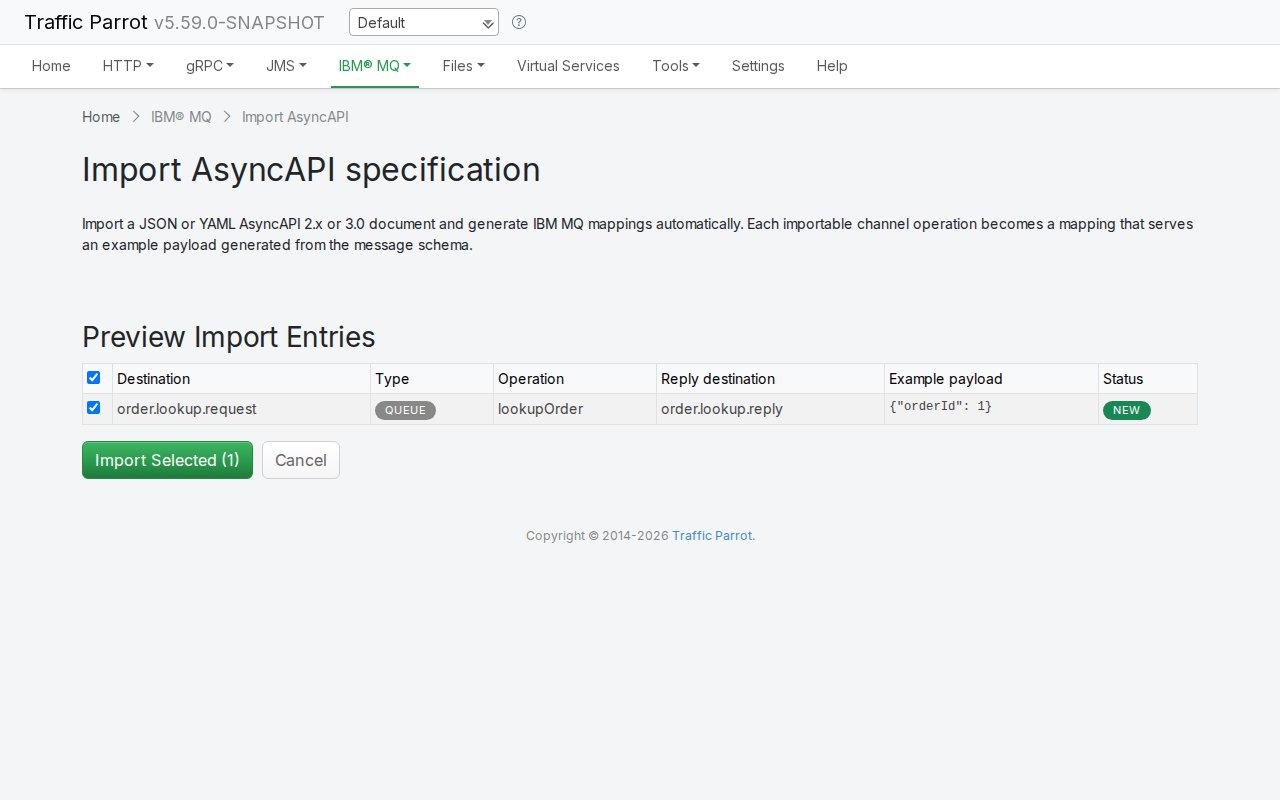
The preview table lists one row per importable operation, with the following columns:
Each row has a checkbox. Use the header checkbox to select or deselect all rows at once, or toggle individual rows. The Import Selected button shows the count of selected rows. Click it to create IBM® MQ mappings only for the checked operations, or click Cancel to discard the preview and return to the file selector.
If the document is malformed, is not a supported AsyncAPI version, or contains no importable operations, the page reports a clear error and no mappings are created.
Each selected operation becomes a native IBM® MQ mapping whose request matches any message on the channel destination and whose response is the example payload generated from the message schema. You can then open the mapping in the IBM® MQ editor to refine the request matchers, response message, response headers or priority just like any other IBM® MQ mapping.
For an AsyncAPI 3.0 operation that carries a reply object, Traffic Parrot creates a request-reply mapping instead: it still receives the request on the operation's own channel, but it publishes the response on the reply channel's destination (shown in the Reply destination column of the preview), and the response is the example payload generated from the reply message's schema. A one-way operation continues to echo its example back on the same channel as before.
AsyncAPI import is part of the native IBM® MQ support and requires the IBM® MQ licensed feature, the same as the rest of the native IBM® MQ functionality.
Traffic Parrot supports both AsyncAPI 2.x and AsyncAPI 3.0 documents with the IBM® MQ and JMS channel bindings. For a 3.0 document, the destination is taken from the channel's address (falling back to the channel name). The destination type is taken from the channel binding: it is a TOPIC when either the ibmmq or the jms binding declares destinationType: topic (case-insensitive); otherwise it defaults to a QUEUE (so a document with no binding, or one whose destinationType is absent, empty or unrecognised, imports as a queue). Both one-way publish/subscribe operations (send and receive) and request-reply operations (those that carry a reply object) are imported; a request-reply operation publishes the reply message's example on the reply channel's destination.
Other channel bindings (AMQP, Kafka, MQTT) and AsyncAPI 4.x are not yet supported. Message payload schemas use JSON Schema (draft-07 for 2.x, draft 2020-12 for 3.0); Traffic Parrot generates an example from common schema constructs, and renders a placeholder payload for advanced constructs it cannot yet turn into an example (for example $defs with internal $ref, patternProperties, prefixItems, const, if/then/else and additionalProperties). You can edit any generated payload in the editor afterwards.
Messaging skeletons offer a quick way to pre-fill a native IBM® MQ mapping form from an operation declared in an imported AsyncAPI specification, in the same way the HTTP skeletons and gRPC skeletons dropdowns pre-fill their forms. Where Import AsyncAPI creates mappings for many operations at once, the skeletons dropdown is for hand-crafting a single mapping that starts from a declared operation.
On the IBM® MQ Add/Edit page, pick an operation from the skeletons dropdown above the form. The form's destination name, destination type (the Queue / Topic radio) and request body/payload pre-fill from the selected operation. To edit the list of operations, place AsyncAPI specifications (JSON or YAML, AsyncAPI 2.x or 3.0) into the trafficparrot-x.y.z/asyncapi configuration directory, or use the import button beside the dropdown to upload one directly.
The dropdown behaves the same as on the JMS page, including the request-reply pre-fill that populates both the request and the reply sides for a request-reply operation; see Messaging skeletons on the JMS page for a screenshot and the full details. It appears on the JMS and IBM® MQ messaging editors only (AsyncAPI has no file-message source, so the file-message editor does not show it).
The headless trafficparrot validate command checks your messaging mappings against your imported AsyncAPI specifications and reports any declared operation that has no backing messaging mapping. The check is identical for JMS and native IBM® MQ mappings: a native IBM® MQ mapping covers a declared AsyncAPI operation in exactly the same way a JMS mapping does, matched by destination identity (QUEUE:name / TOPIC:name). For the messaging under-coverage check, the asyncapi/ specification directory and the messaging-coverage.properties (exclude.destinations) allowlist, see Messaging coverage check on the JMS page; for the shared usage, exit codes and CI-pipeline details see the full validate CLI reference.
Pact is a consumer-driven contract format. As well as the HTTP interactions you can import as HTTP stubs, a Pact contract can describe asynchronous message interactions: the messages a provider publishes for a consumer to handle. If your team captures its messaging contracts as Pact files, you can create native IBM® MQ mappings directly from them instead of writing them by hand.
Go to IBM® MQ in the top navigation bar and then click Import message Pact. Upload a Pact .json file and Traffic Parrot generates one IBM® MQ mapping per message interaction in the contract, each publishing the message's example payload.
Two contract shapes are accepted. A Pact specification v3 contract carries its messages in a top-level messages[] array. A specification v4 contract carries them as interactions[] entries whose type is Asynchronous/Messages. Both are detected automatically. An HTTP-only Pact contract (one with no message interactions) is rejected with a message pointing you to the HTTP Pact import instead.
After you upload the file, Traffic Parrot shows a preview of the mappings it would create so you can review and select exactly which ones to import. The import page works the same way as the JMS message Pact import, except each selected message becomes a native IBM® MQ mapping.
The preview table lists one row per message interaction, with the following columns:
Each row has a checkbox. New rows are checked by default and duplicate rows are left unchecked. Use the header checkbox to select or deselect all rows at once, or toggle individual rows. The Import Selected button shows the count of selected rows. Click it to create IBM® MQ mappings only for the checked messages, or click Cancel to discard the preview and return to the file selector.
If the file cannot be parsed as JSON, or contains no message interactions, the page reports a clear error and no mappings are created.
Review a derived destination before importing. A Pact message interaction carries no destination, so Traffic Parrot derives one from the message's metadata (a destination, queue or topic key, where a topic key makes it a TOPIC) or, failing that, from the message's description. When a destination is derived from the description, the preview shows a warning banner listing each affected message; review it, because the generated name is a best guess and may not match the queue or topic your system under test uses. See How the destination is derived on the JMS page for the full rules.
Each selected message becomes a one-way publish native IBM® MQ mapping. It matches any message on the derived destination and, on receipt, publishes the message's example contents back on that same destination. You can then open the mapping in the IBM® MQ editor to refine the request matchers, response message, response headers or priority just like any other IBM® MQ mapping.
Message Pact imports are one-way only. A Pact message interaction is a fire-and-forget message a provider publishes; the contract has no request that selects it and no reply. The imported mapping therefore just publishes the example payload; it is not a request-matching, request-reply stub. (Request-reply mappings are created only by an AsyncAPI operation that carries a reply object.)
Import message Pact is part of the native IBM® MQ support and requires the IBM® MQ licensed feature, the same as the rest of the native IBM® MQ functionality; the menu link does not appear without it. Pact specification v3 (messages[]) and v4 (Asynchronous/Messages interactions) message contracts are supported; for a v4 contract the example body is read from the message's contents.content envelope. The same import flow is also available for JMS, including a worked example.