Tutorial: Record and replay HTTP requests and responses

For a basic introduction to HTTP record and replay with examples have a look at Record and replay HTTP requests and responses to create API mocks.

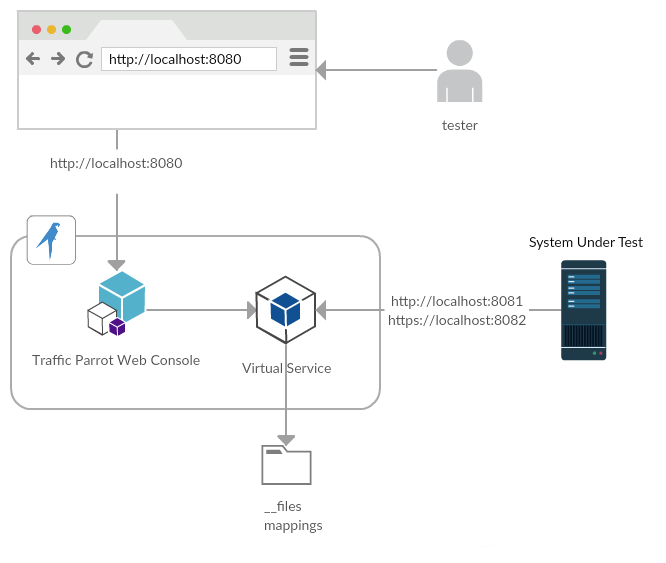
HTTP virtual service architecture

A tester uses a web browser to access the console. The console manages the virtual service. The system under test (application under test) connects directly to the virtual service on different ports.
screenshot

Supported HTTP protocols

Traffic Parrot's HTTP virtual service speaks HTTP/1.0, HTTP/1.1, and HTTP/2 out of the box. HTTP/2 is enabled by default on both the HTTPS port (ALPN-negotiated) and the plain HTTP port (h2c upgrade). There is no Traffic Parrot configuration flag to disable HTTP/2 — the same stubs are served regardless of the protocol the client picks.

Protocol Port Default Supported since
HTTP/1.0, HTTP/1.1 HTTP and HTTPS Always on All versions
HTTP/2 over TLS (ALPN-negotiated) HTTPS only On Traffic Parrot 5.53.0
HTTP/2 cleartext (h2c upgrade) HTTP only On Traffic Parrot 5.53.0

Import and export HTTP mappings

How to export

First, go to HTTP in the top navigation bar and then click Export.

HTTP Export screen titled 'Export mapping files to archive' with explanatory text and a full-width green Download Mappings button

Click the button to download a ZIP file that contains all of the HTTP mappings in the WireMock format.

You can also export programmatically using the Traffic Parrot Management APIs.

Exporting as an OpenAPI specification

As well as the native WireMock-format ZIP, Traffic Parrot can export your HTTP mappings as an OpenAPI 3.0 document. This is the inverse of importing an OpenAPI specification: the mappings you have recorded or built are translated back out into a standard OpenAPI document you can share, diff, or feed into other tooling.

On the Export page (HTTP in the top navigation bar, then Export), alongside the Download Mappings button that downloads the native WireMock-format ZIP, there is an Export as OpenAPI (YAML) button. Click it to download the currently active scenario's mappings as an OpenAPI 3.0 YAML document, with an inferred response schema alongside each example and the coverage report described below embedded in the document. Unlike the native ZIP, which is a round-trippable archive you can re-import unchanged, the OpenAPI document is a standard contract for sharing and tooling.

The OpenAPI export is served off the same export endpoint as the native ZIP by adding the ?format=openapi query parameter, so you can also trigger it programmatically. Without the parameter the endpoint returns the native ZIP as before; with it, the endpoint returns an OpenAPI 3.0 document in YAML (HTTP Content-Type: application/yaml), downloaded as openapi-<timestamp>.yaml.

The same document is also available as JSON by using ?format=openapi-json instead. This returns an identical OpenAPI 3.0 document serialised as JSON (HTTP Content-Type: application/json), downloaded as openapi-<timestamp>.json. Only the serialisation differs — the paths, operations, examples and coverage report described below are the same in both formats. The GUI Export as OpenAPI (YAML) button always downloads YAML; the JSON variant is available through the endpoint.

# Export the active scenario's HTTP mappings as an OpenAPI 3.0 YAML document
curl -X GET "http://localhost:8080/http/management/exportMappings?format=openapi" \
  -o openapi.yaml

# The same document as OpenAPI 3.0 JSON
curl -X GET "http://localhost:8080/http/management/exportMappings?format=openapi-json" \
  -o openapi.json

# Without the format parameter, the same endpoint returns the native WireMock ZIP (unchanged)
curl -X GET "http://localhost:8080/http/management/exportMappings" \
  -o mappings.zip

What gets exported

Traffic Parrot translates the currently active scenario's HTTP mappings into OpenAPI paths and operations:

  • Paths and operations — mappings are grouped by URL path and HTTP method. Two mappings on the same path with different methods become one path with two operations.
  • URL matchers — an exact URL or path becomes a literal OpenAPI path; a path template such as /users/{id} becomes a templated path with path parameters. A regular-expression URL matcher (urlMatching / urlPathMatching) is converted to a best-effort path template — each segment containing a regex metacharacter is replaced with a synthetic path parameter ({p0}, {p1}, …) so the path is always valid OpenAPI — and the original regex is preserved in the operation's description, marked as an approximation.
  • Request matchers — query and header matchers become OpenAPI parameters (in: query / in: header).
  • Responses — each mapping's response body is emitted as a literal example under responses[status].content[contentType].example. The content type is taken from the response's Content-Type header, falling back to application/json when the body is JSON and otherwise text/plain.
  • Response schema — when the response body is JSON, an inferred JSON schema is emitted alongside the example under responses[status].content[contentType].schema. This is what client generators, SDK codegen and documentation portals consume to produce real models, rather than just a sample value. See Inferred response schema below for how the schema is derived and its caveats.

Inferred response schema

For each JSON response body, Traffic Parrot infers a JSON schema and emits it alongside the retained example. The example shows a concrete sample value; the schema describes the shape of the response, which is what client generators, SDK codegen and documentation portals actually read. Inference is conservative and based on the single example body, so it asserts only what that one body proves:

  • The structure is followed recursively — nested objects and arrays produce nested schemas. An array's items schema is inferred from its first element; a mixed-type array therefore takes the first element's shape.
  • Numbers are typed by value: an integral number becomes type: integer, a non-integral number becomes type: number. No numeric format (such as int32/int64) is asserted, because it cannot be known from a single value.
  • A JSON null becomes nullable: true with no type (the type is unknowable from null alone).
  • Every observed object key becomes a property, but no required array is emitted — one example does not prove a field is always present.
  • No enum is inferred — a single observed value is not an enumeration of the allowed values.
  • An empty array yields items: {} (the element type is unknown but OpenAPI still requires an items schema).

A response body that is not JSON — XML, plain text, or an empty body — gets no schema. The literal example is still emitted, and the mapping is recorded in the coverage report with reason no-schema-inferred (disposition APPROXIMATED), so the lossiness stays explicit.

Coverage report

Some mappings have no clean OpenAPI representation — for example regular expression, JSONPath or XPath body matchers, proxy responses, and mappings whose HTTP method has no OpenAPI equivalent. These mappings are never silently dropped. Every mapping's disposition is recorded in a coverage report so you always know exactly what was and was not faithfully captured. Each mapping is reported as one of:

  • REPRESENTED — translated faithfully.
  • APPROXIMATED — translated with a documented caveat (for example a regex URL matcher converted to a synthetic path template, or a JSONPath/XPath/regex request-body matcher that cannot be expressed exactly).
  • OMITTED — left out of the paths (for example a proxy response; a mapping whose HTTP method has no OpenAPI equivalent — OpenAPI operations are per-verb, so an ANY or GET_OR_HEAD method cannot be expressed as a single operation; or a second mapping that would duplicate an already-exported path and method).

In particular, a “match any method” stub — a stub that does not specify a method, which defaults to ANY — is reported as OMITTED with reason unsupported-method:ANY rather than appearing in paths. It still shows up in the coverage report so you can see it was not captured.

The coverage report is surfaced in the exported document in two ways:

  • A root-level OpenAPI extension x-trafficparrot-export-coverage listing every mapping as {mapping, reason, disposition}.
  • A one-line summary in info.description, for example 2 mappings exported (1 approximated), 1 omitted.
openapi: 3.0.1
info:
  title: Traffic Parrot exported HTTP mappings
  description: "2 mappings exported (1 approximated), 1 omitted."
  version: 1.0.0
paths:
  /users/{id}:
    get:
      parameters:
        - name: id
          in: path
          required: true
          schema:
            type: string
      responses:
        "200":
          description: Response
          content:
            application/json:
              schema:
                type: object
                properties:
                  id:
                    type: integer
                  name:
                    type: string
              example: '{"id": 1, "name": "Alice"}'
x-trafficparrot-export-coverage:
  - mapping: /users/{id}
    reason: represented
    disposition: REPRESENTED
  - mapping: /search
    reason: regex-url
    disposition: APPROXIMATED
  - mapping: /health
    reason: unsupported-method:ANY
    disposition: OMITTED

Current limitations

The following are not yet supported and are planned for later releases:

  • Single example per response — the schema is inferred from one example body; there is no union or merge across multiple examples.
  • Single scenario — only the currently active scenario is exported; there is no multi-scenario merge.
  • No security schemes are emitted.
  • OpenAPI 3.0 only (not 3.1).

Exporting recorded traffic as a HAR file

Traffic Parrot can export the HTTP traffic it has served as a HAR 1.2 (HTTP Archive) document, so you can drive a load or resilience test through your own engine. Unlike the native ZIP and the OpenAPI export above — both of which export the deduplicated mappings — the HAR export is taken from the live request journal: the ordered, timed stream of inbound requests Traffic Parrot has served during the current session. That preserves the request order and per-request timing a load profile needs, which the deduplicated mappings discard.

On the Export page (HTTP in the top navigation bar, then Export), alongside the Download Mappings and Export as OpenAPI (YAML) buttons, there is a Download recorded traffic (HAR) button. Click it to download the current request journal as a HAR 1.2 file, named recorded-traffic-<timestamp>.har.

The HAR export is served off the same export endpoint as the native ZIP by adding the ?format=har query parameter (the same way ?format=openapi selects the OpenAPI export), so you can also trigger it programmatically. Without the parameter the endpoint returns the native ZIP as before; with it, the endpoint returns a HAR 1.2 document (HTTP Content-Type: application/json), downloaded as recorded-traffic-<timestamp>.har.

# Export the recorded HTTP request journal as a HAR 1.2 document
curl -X GET "http://localhost:8080/http/management/exportMappings?format=har" \
  -o recorded-traffic.har

# Without the format parameter, the same endpoint returns the native WireMock ZIP (unchanged)
curl -X GET "http://localhost:8080/http/management/exportMappings" \
  -o mappings.zip

What gets exported

Each request in the journal becomes one HAR log.entries entry, ordered by the time the request arrived. Every entry carries:

  • Request — the HTTP method, the full URL, the request headers, the query string, and the request body (as postData) when one was sent.
  • Response — the HTTP status, the response headers, and the response body.
  • TimingstartedDateTime (when the request arrived) and time (how long Traffic Parrot took to serve it, in milliseconds), so the relative arrival times and per-request durations are preserved for the load profile.

Driving a load or resilience test

Traffic Parrot does not run the load itself — the HAR file is the hand-off to your own load engine. The exported document is a standard HAR 1.2 file, so it can be fed into the common HAR-to-load-test converters, for example the Gatling HAR Converter (which generates a Gatling simulation from a HAR file) or Grafana har-to-k6 (which generates a k6 script from a HAR file). You then run the generated test on that engine against whatever target you choose.

Journal size limit

The HAR export reads the in-memory request journal, which keeps only the most recent requests — bounded by the trafficparrot.virtualservice.maxRequestJournalEntries property (default 1000; older entries age out as new requests arrive). On a long recording session this means only the most recent 1000 requests are exported. If you need a longer history to export, raise maxRequestJournalEntries in your trafficparrot.properties before recording (a larger journal uses more memory — see the property reference). If the journal is disabled entirely (maxRequestJournalEntries=0, as some performance-tuning profiles set it), the export is a valid but empty HAR with no entries.

First-slice limitations

This is the first release of the HAR export. The following are not yet supported and are planned for later releases:

  • Text bodies — request and response bodies are exported as text (the target is HTTP/JSON traffic); binary or Base64-encoded body fidelity is not yet preserved.
  • HTTP only — the recorded request journal exported is the HTTP one; there is no messaging or gRPC HAR export.

How to import

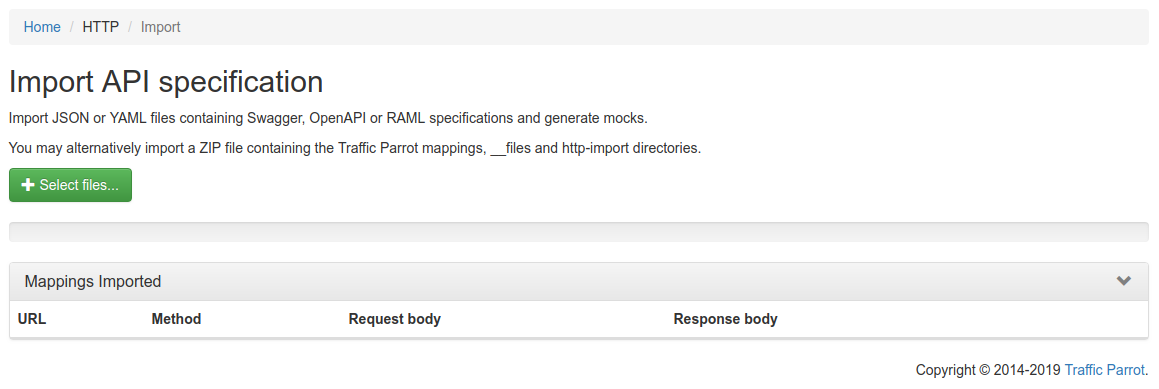
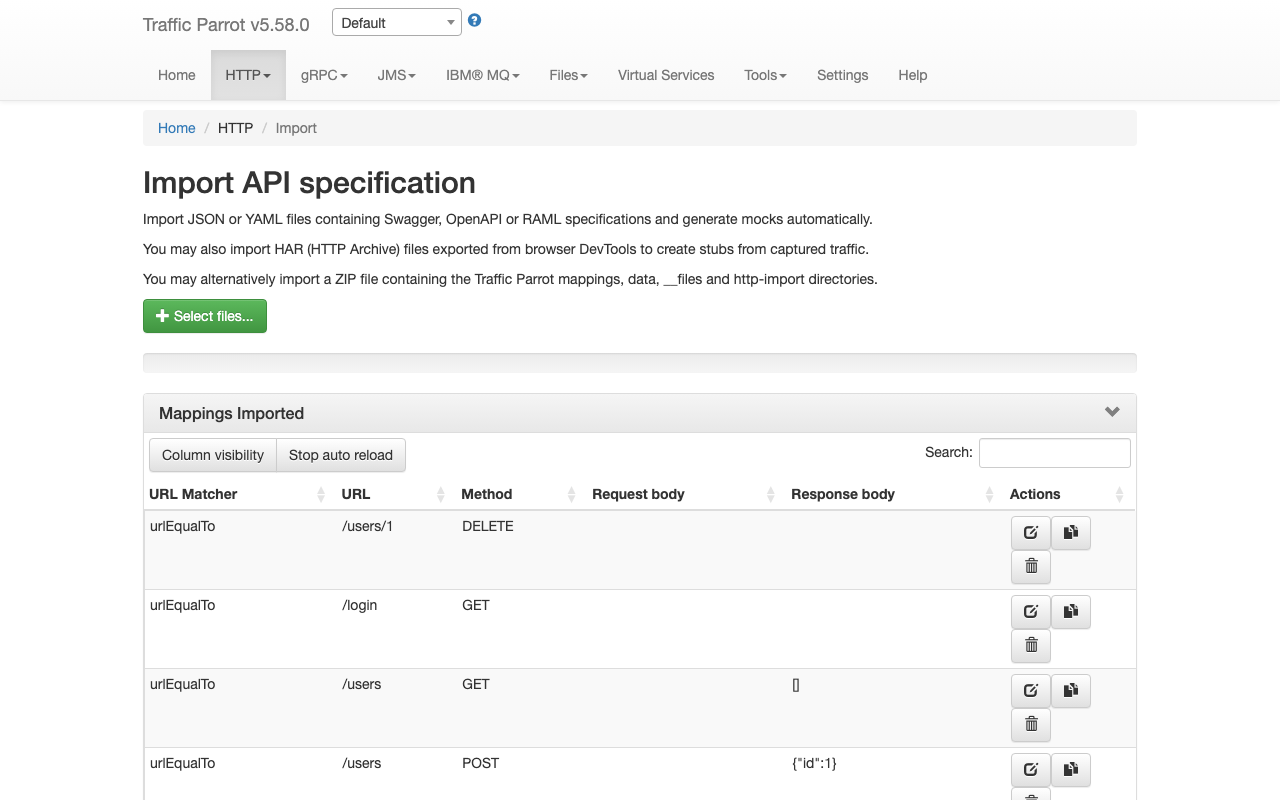
First, go to HTTP in the top navigation bar and then click Import.

HTTP Import API specification screen for importing Swagger, OpenAPI or RAML files (or a ZIP of mappings), with a green Select files button and an empty Mappings Imported table

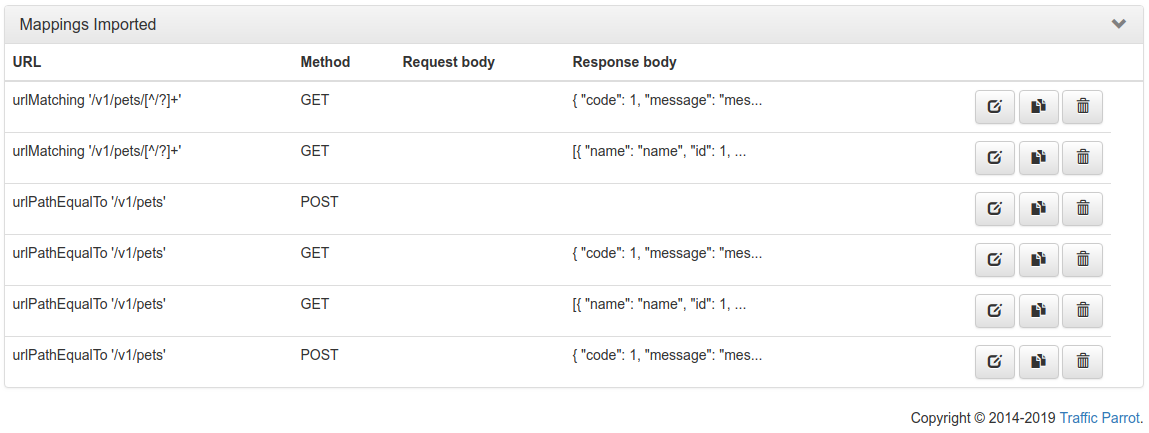
Click the button and select the file(s) to import using the file picker. Traffic Parrot will display the mappings that were successfully imported in the table below.

Mappings Imported table listing six generated /v1/pets mappings — GET and POST, using urlMatching and urlPathEqualTo URL patterns with JSON response bodies — each row with edit, copy and delete buttons

You can also import programmatically using the Traffic Parrot Management APIs.

Supported formats

Traffic Parrot has support for the following formats to import:
  • WireMock mappings in ZIP format
  • Swagger 1.x and 2.x (both YAML and JSON)
  • OpenAPI 2.x and 3.x (both YAML and JSON)
  • RAML 0.8
  • HAR 1.1 and 1.2 (HTTP Archive files exported from browser DevTools)
  • Pact v2, v3 and v4 (consumer-driven contract files, HTTP interactions only)

You can also import directly from a URL — see Importing from a URL.

Importing HAR files

HAR (HTTP Archive) files let you create stubs from captured network traffic rather than writing them from scratch. To obtain a HAR file:

  1. Open the browser DevTools (press F12 or right-click and select "Inspect")
  2. Go to the Network tab
  3. Interact with the application to capture the HTTP traffic you want to mock
  4. Right-click on any request in the network list and select Save all as HAR with content (Chrome) or Save All As HAR (Firefox)

Then import the .har file. Traffic Parrot creates a stub mapping for each HTTP request/response pair, named with a [HAR Import] prefix followed by the status code, HTTP method, and URL path for easy identification.

What gets imported

  • Request matching — HTTP method and exact URL path including query string parameters
  • Content-Type matching — when the original request included a Content-Type header, the stub also matches on it
  • Response — status code, body (base64-encoded bodies are decoded automatically), and Content-Type header

By default, all other request headers (Accept, User-Agent, Cookie, Authorization, etc.) and all non-Content-Type response headers are excluded, to keep stubs flexible and reusable. If you need the stub to reproduce the recorded exchange faithfully — keeping every header — use the Preserve full fidelity (all headers) option described below. HAR files can also be placed inside ZIP archives in the http-import/ directory.

Preserve full fidelity (all headers)

On the import preview screen, next to the Import Selected button, is a Preserve full fidelity (all headers) checkbox. It is off by default, which produces the flexible stubs described above. The checkbox applies to the whole import — it is a bulk setting for all selected entries, not a per-entry one.

When you tick it, every imported stub reproduces its recorded request and response exactly:

  • Request — every recorded request header, including Content-Type, becomes an exact request matcher (matched with the full recorded value).
  • Response — every recorded response header is emitted on the stub response, including the exact Content-Type with its charset.

The request and response bodies are imported the same way in both modes (base64-encoded bodies are decoded automatically); only header handling changes.

Caution: full fidelity makes stubs strict, and often single-use. Turning every recorded header into an exact request matcher means the stub only matches a request that is byte-for-byte and environment-identical to the recording. Headers such as Host, Cookie and Authorization tie the stub to a specific host, session or token, and a Content-Length matcher only matches a request whose body is exactly the same length. Leave the option off (the default) for reusable stubs, and turn it on only when you specifically want a faithful reproduction of the exact recorded exchange.

HTTP/2 pseudo-headers (:method, :authority, :scheme, :path and :status), which appear in HAR files exported from browsers, are automatically excluded in full-fidelity mode — they are never turned into request matchers or emitted as response headers.

This option applies to HAR import only; it does not affect OpenAPI, Swagger, RAML, Pact or WireMock ZIP imports.

Importing Pact contracts

Pact is a consumer-driven contract format. A Pact file records the requests a consumer makes and the responses it expects from a provider, so it is a convenient source of stubs when you want a virtual service to stand in for that provider. Traffic Parrot imports Pact specification v2, v3 and v4 files (the Synchronous/HTTP interactions of a v4 contract).

There is nothing extra to configure. Import the Pact .json file the same way you import any other format — Traffic Parrot detects that the file is a Pact contract automatically, so there is no format to choose. Each HTTP interaction in the contract becomes one stub mapping, named with a [Pact Import] prefix followed by the status code, HTTP method, and URL path. When an interaction has a provider state, the state is appended to the name to make it easy to identify.

What gets imported

  • Request matching — HTTP method, URL path and query string, request headers, and request body
  • Response — status code, response headers, and response body

JSON request bodies are matched tolerantly — extra elements and array ordering are ignored — which mirrors the way Pact matches a body by structure rather than byte-for-byte. XML and other bodies are matched against the example value from the contract.

The only structural difference between the versions is how the body is stored. In a v4 contract each request and response body is wrapped in a body object that carries the payload under content and its media type under contentType; Traffic Parrot reads the payload from content and uses the declared contentType to decide how to match the body. Everything else — method, path, query, headers, matching rules and provider states — is imported the same way as for v2 and v3.

Pact matching rules

Where a Pact contract declares matchingRules, Traffic Parrot honours the rules that map onto its own request matchers and falls back to an exact match for the rest. When a rule falls back, the import reports a warning listing the affected rules so you know which matchers became literal and may want to relax by hand on the imported mapping.

Pact matching rule How Traffic Parrot imports it
Request header regex Honoured — the header is matched with the regular expression
Request path regex Honoured — the URL path is matched with the regular expression
Request JSON body (default type matching) Honoured — matched tolerantly (extra elements and array order ignored)
Field-level body type / regex rules Falls back to an exact match of the example body, with a warning
Query parameter matchers Falls back to an exact match of the example query string, with a warning
integer, decimal, min, max, timestamp, include rules Fall back to an exact match of the example value, with a warning

Message (asynchronous) interactions

This HTTP import handles the HTTP interactions of a Pact contract. A Pact contract can also describe asynchronous message interactions — a top-level messages[] array in a specification v3 contract, or Asynchronous/Messages interactions[] in a v4 contract. Import those as messaging stubs from the messaging pages instead: Import a message Pact contract on the JMS page, or Import a message Pact contract on the native IBM® MQ page. When a v4 contract mixes HTTP and message interactions, this HTTP import brings in the HTTP interactions and skips the message interactions with a warning; a contract that contains only message interactions is reported as having no HTTP interactions to import — use the JMS or IBM® MQ message Pact import for it.

Not supported in this release

This first release imports HTTP interactions only. The following are not yet supported:

  • Generating dynamic (templated) responses from a contract — the example responses from the contract are imported as-is.
  • Provider verification and pulling contracts from a Pact Broker. Import a contract file you already have on disk.

Importing from a URL

Instead of downloading a specification to disk and then uploading it, you can paste a URL into the Import page and let Traffic Parrot fetch the document for you. This is convenient when the specification is published at a stable address — for example a running service's /v3/api-docs endpoint, or a hosted OpenAPI, HAR or Pact file.

Traffic Parrot fetches the document server-side and feeds it into the same content-based import pipeline as an uploaded file. The format is detected from the content, so Swagger/OpenAPI, HAR and Pact specifications can be imported by URL exactly the way you would import them from a file. As with file upload, OpenAPI, HAR and Pact documents show a preview before importing.

Enabling the feature

Importing from a URL is off by default and must be enabled by an administrator. Until it is enabled the URL field is not shown on the Import page and the underlying server endpoint stays inert. Set the following two properties in trafficparrot.properties and restart Traffic Parrot:

  • trafficparrot.http.importfromurl.enabled=true — turns the feature on. While this is false (the default), the URL field is absent from the Import page.
  • trafficparrot.http.importfromurl.allowedHosts — a comma-separated allow-list of host or host:port entries that Traffic Parrot is permitted to fetch from. It is default-deny: when the feature is enabled but the allow-list is empty, every fetch is refused (fail-closed) with a message asking you to configure the allow-list. Only URLs whose host matches an allow-listed entry are fetched.

Both property names are described in full on the Configuration reference page.

Why the allow-list is required

Because Traffic Parrot makes the fetch from its own host, an unrestricted version could be used to probe addresses inside your network — a server-side request forgery (SSRF) risk. The host allow-list keeps the feature confined to a set of addresses you trust. In addition, Traffic Parrot rejects URLs that resolve to loopback, link-local, cloud-metadata (169.254.169.254) or private (RFC 1918 / IPv6 unique-local) addresses — even if such a host is allow-listed — guards against DNS rebinding, restricts the scheme to http and https, and caps the response size and the connect and read timeouts. Keep the allow-list as tight as possible.

How to import from a URL

  1. Enable the two properties above and restart Traffic Parrot.
  2. Go to HTTP in the top navigation bar and click Import.
  3. Paste the specification URL into the URL field.
  4. Click Fetch & preview.
  5. For an OpenAPI, HAR or Pact specification, review and filter the preview and select the entries you want.
  6. Click Import Selected to create the stubs.

RAML and WireMock ZIP specifications cannot yet be imported from a URL; for those formats, download the file and import it from disk instead.

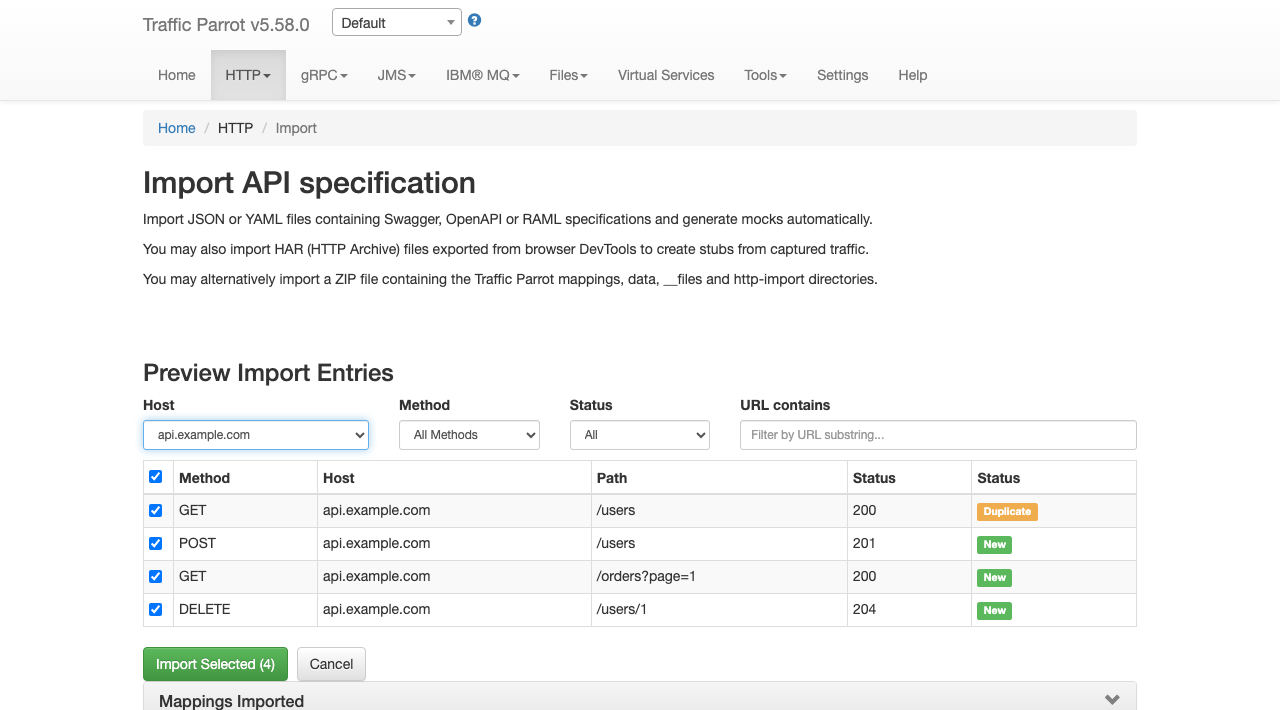
Preview and filter before importing

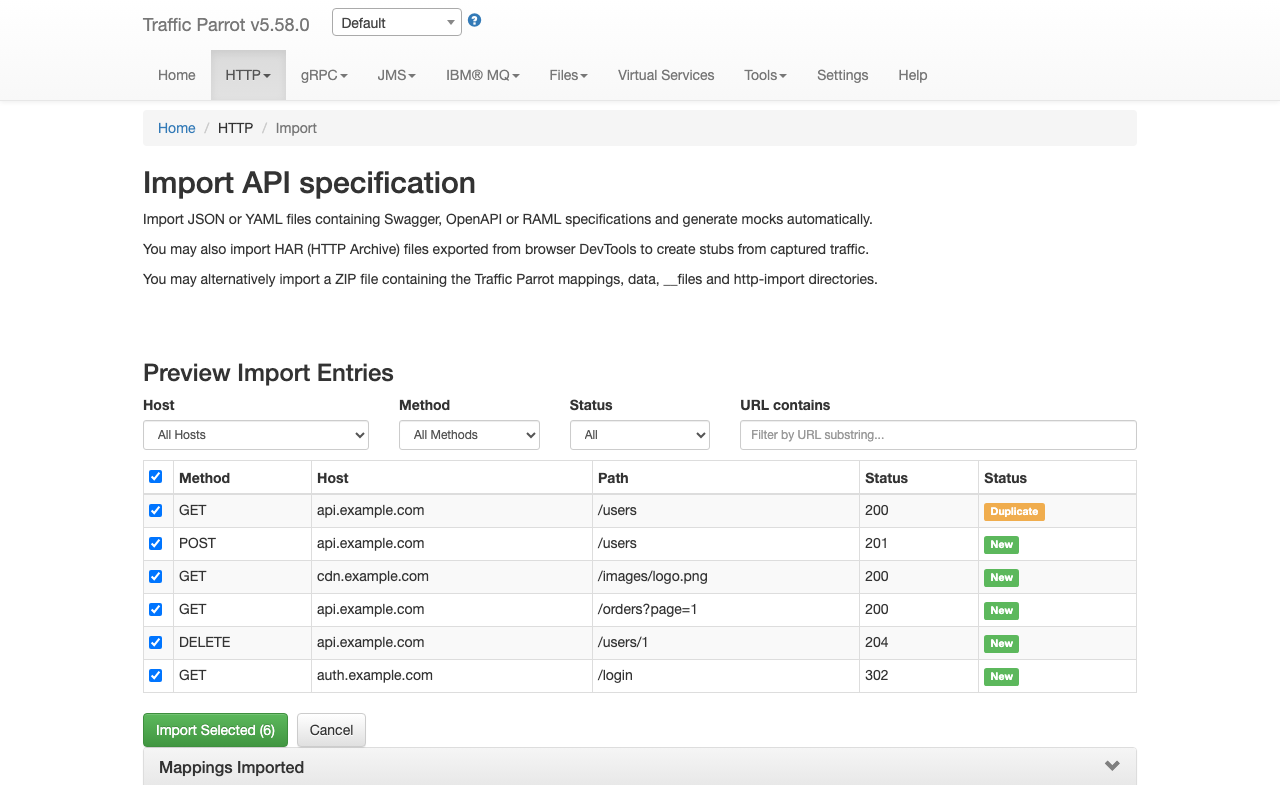
When you upload a HAR, OpenAPI, or Pact file, Traffic Parrot shows a preview of the entries before importing. This lets you review, filter, and select exactly which stubs to create.

Filtering entries

The preview panel provides four filters that you can use to narrow down the entries:

  • Host — dropdown auto-populated with the unique hosts found in the file
  • Method — dropdown auto-populated with the HTTP methods found in the file (GET, POST, PUT, DELETE, etc.)
  • Status — dropdown to filter by status code range (2xx, 3xx, 4xx, 5xx)
  • URL contains — text input to filter by URL. It matches against the request path (and query string), not the host (use the Host dropdown for that). Plain text matches any path that contains it (e.g. users matches /api/users). If the text includes a glob wildcard — * for any sequence of characters or ? for any single character — the filter switches to an anchored, case-insensitive glob match where the whole path must match the pattern. For example /api/* matches paths beginning /api/, *.json matches paths ending .json, and /users/? matches /users/1 but not /users/12. To match a literal ? in a path, filter by plain substring without any other wildcard.

All filtering happens instantly in the browser without extra server requests. Filters combine with AND logic (e.g. selecting host "api.example.com" and method "POST" shows only POST requests to api.example.com).

This is a preview convenience that controls which entries are shown for selection; it does not change how the imported stubs match requests at runtime.

Selecting entries

Each entry has a checkbox. Use the header checkbox to select or deselect all visible (filtered) entries at once. You can also toggle individual entries. The "Import Selected" button shows the count of selected entries and is disabled when no entries are selected.

Duplicate detection and conflict resolution

The Duplicate column shows whether each entry is new or already exists. Entries that do not match any existing stub display a green "New" badge and are imported as-is. If an entry matches an existing stub with the same HTTP method and exact request URL — one created from a different import or added by hand — a yellow "Duplicate" badge appears instead.

Previously a duplicate could only be skipped. Now each duplicate entry offers an explicit action in the On duplicate column, and a single For duplicates: control above the table sets the action for all duplicates in one click. A per-row choice overrides the bulk default for that row. The three actions are:

  • Skip (the default) — do not import the duplicate; the existing stub is left unchanged. This is the behaviour of earlier releases, so imports you do not touch keep working exactly as before.
  • Overwrite — remove the existing stub for that method and URL and add the imported one, so no duplicate is left behind. If more than one existing stub matched, all of them are replaced by the single imported stub.
  • Import as new — keep both. The existing stub is untouched and the imported stub is added under a disambiguated name (<name> (copy), then (copy 2), (copy 3), and so on) so the two are easy to tell apart in the mappings list.

Re-importing the same file still replaces the mappings it created last time, so those entries show as New rather than Duplicate; the conflict actions apply to a clash against a stub from a different import or one you created manually. To keep two revisions of the same endpoint side by side, capture them under different file names and choose Import as new.

Known limitation: duplicate detection compares the HTTP method and the exact request URL string. An existing stub that matches its URL with a pattern or regular expression (rather than an exact URL) is not recognised as a duplicate, so the imported entry is added as a separate stub whichever action you choose.

Importing selected entries

Click "Import Selected" to create stubs only for the checked entries. The imported mappings appear in the table below. Click "Cancel" to discard the preview and return to the file selector.

For HAR imports, a Preserve full fidelity (all headers) checkbox sits next to the "Import Selected" button. Leave it unticked for flexible stubs, or tick it to reproduce every recorded request and response header exactly — see Preserve full fidelity (all headers).

Format support

The preview and filter flow is available for HAR, OpenAPI/Swagger, and Pact files. RAML files and WireMock ZIP archives are imported directly without a preview step.

Importing via REST API (curl)

You can import mapping files programmatically using the REST API instead of the web UI. This is useful for CI/CD pipelines and automation scripts.

Send a POST request to /http/management/importMappings with the file(s) as a multipart form upload:

# Import a single file (HAR, OpenAPI/Swagger, RAML, or WireMock ZIP)
curl -X POST http://localhost:8080/http/management/importMappings \
  -F "files[]=@capture.har"

# Import multiple files at once
curl -X POST http://localhost:8080/http/management/importMappings \
  -F "files[]=@api-spec.yaml" \
  -F "files[]=@capture.har"

On success, the response contains the IDs of the imported mappings:

{"mappings":["id1","id2",...]}

On failure, the response returns HTTP 400 with an error message:

{"result":"error message"}

An upload larger than trafficparrot.multipart.upload.max.size.mb (default 10 MB) is rejected with HTTP 413 and a {"result": …} error body, and the mappings are not imported.

This endpoint supports all supported import formats: HAR, Swagger/OpenAPI, RAML, Pact, and WireMock ZIP.

Preview before importing

You can preview the entries that would be created before committing to an import. Send a POST request to /http/management/previewImport:

curl -X POST http://localhost:8080/http/management/previewImport \
  -F "file=@capture.har"

The response contains a list of entries with their method, host, path, and status code:

{
  "previewSupported": true,
  "entries": [
    {"index": 0, "method": "GET", "host": "api.example.com", "pathWithQuery": "/users", "statusCode": 200, "duplicate": false},
    {"index": 1, "method": "POST", "host": "api.example.com", "pathWithQuery": "/users", "statusCode": 201, "duplicate": false}
  ],
  "hosts": ["api.example.com"],
  "methods": ["GET", "POST"]
}

For file types that do not support preview (RAML, WireMock ZIP), the response returns {"previewSupported": false}.

Filtered import

To import only specific entries, send a POST request to /http/management/importSelectedEntries with the file and filter parameters:

# Import specific entries by index (from the preview response)
curl -X POST http://localhost:8080/http/management/importSelectedEntries \
  -F "file=@capture.har" \
  -F "selectedIndices=0,2,5"

# Import entries matching filter criteria
curl -X POST http://localhost:8080/http/management/importSelectedEntries \
  -F "file=@capture.har" \
  -F "hostFilter=api.example.com,auth.example.com" \
  -F "methodFilter=GET,POST" \
  -F "statusFilter=2xx,4xx" \
  -F "urlFilter=/api/v1,/users"

Available filter parameters (all accept comma-separated values):

Parameter Description
selectedIndices Entry indices from the preview response (e.g. 0,2,5). Takes precedence over other filters.
hostFilter Include only entries matching these hosts (e.g. api.example.com,auth.example.com)
methodFilter Include only entries matching these HTTP methods (e.g. GET,POST)
statusFilter Include only entries matching these status ranges (e.g. 2xx,4xx)
urlFilter Include only entries whose URL contains one of these substrings (e.g. /api/v1,/users)

Filters combine with AND logic across filter types and OR logic within each filter type. For example, hostFilter=api.example.com&methodFilter=POST,PUT imports POST and PUT requests to api.example.com. If no filter parameters or indices are provided, all entries are imported.

Preserving full fidelity (all headers)

Both /http/management/importMappings and /http/management/importSelectedEntries accept an optional preserveAllHeaders parameter — the REST equivalent of the Preserve full fidelity (all headers) checkbox in the UI. Set it to true to turn every recorded request header into an exact request matcher and emit every recorded response header on the stub response. Omit it (or set it to false) for the default flexible behaviour.

# Direct upload, preserving all headers
curl -X POST http://localhost:8080/http/management/importMappings \
  -F "files[]=@capture.har" \
  -F "preserveAllHeaders=true"

# Filtered import, preserving all headers
curl -X POST http://localhost:8080/http/management/importSelectedEntries \
  -F "file=@capture.har" \
  -F "selectedIndices=0,2,5" \
  -F "preserveAllHeaders=true"

Resolving duplicate entries

When a selected entry duplicates an existing stub (same method and exact URL), you can control what happens to it — the REST equivalent of the conflict-resolution dropdowns in the UI. Pass an optional conflict-strategy parameter to set the action for every duplicate in the request, and an optional conflictStrategies parameter to override it for individual entries by index:

# Overwrite every duplicate with the imported entry
curl -X POST http://localhost:8080/http/management/importSelectedEntries \
  -F "file=@capture.har" \
  -F "selectedIndices=0,1,2" \
  -F "conflict-strategy=overwrite"

# Skip duplicates by default, but overwrite entry 0 and import entry 2 as a new stub
curl -X POST http://localhost:8080/http/management/importSelectedEntries \
  -F "file=@capture.har" \
  -F "selectedIndices=0,1,2" \
  -F "conflictStrategies=0:overwrite,2:importAsNew"
Parameter Description
preserveAllHeaders true keeps every recorded request header (as an exact matcher, including Content-Type) and every recorded response header; absent or false gives the default flexible stub (method, URL and request Content-Type matcher; response status, body and Content-Type).
conflict-strategy Action for every duplicate entry in the request: skip (the default), overwrite, or importAsNew. Omit the parameter entirely for the previous behaviour, where every selected entry is added and duplicates are ignored.
conflictStrategies Per-entry overrides as comma-separated index:action pairs (e.g. 0:overwrite,2:importAsNew), where index is the entry's index from the preview. An entry's own strategy takes precedence over the request-level conflict-strategy.

This parameter affects HAR imports only; it is ignored for other formats. Full fidelity makes stubs strict, so review the caution above before enabling it for reusable stubs. HTTP/2 pseudo-headers are excluded automatically.

overwrite removes every existing stub that matches the entry's method and URL before adding the imported one; importAsNew keeps the existing stub and adds the imported one under a disambiguated name (<name> (copy)). As in the UI, duplicate detection is an exact method-and-URL match, so an existing stub that matches its URL by pattern or regular expression is not treated as a duplicate.

Dynamic responses

When importing from a specification format such as Swagger or OpenAPI, it is possible to use dynamic responses in the example responses in the specification.

Dynamic responses typically result in usage of the {{...}} notation that is not valid JSON or YAML. In these cases, you will need to specify the response as an escaped string when using JSON or YAML based import formats such as Swagger and OpenAPI.

You can find examples of dynamic OpenAPI responses in the examples project.

Matching response code

Traffic Parrot also supports selecting the response to return using a special test request header

x-traffic-parrot-select-response-status

that contains the status code of the response to return.

In this way, you can define OpenAPI examples for each status code, and then when you import them into Traffic Parrot, you can select a response by providing the test header with the response status code.

For example:
POST /example HTTP/1.1
x-traffic-parrot-select-response-status: 400

HTTP/1.1 400 Bad Request
{
  "example": "Message from OpenAPI example"
}
This feature can be enabled in trafficparrot.properties by setting:
trafficparrot.openapi.import.mode=SELECT_RESPONSE_STATUS
trafficparrot.openapi.skeletons.mode=SELECT_RESPONSE_STATUS
  • When OpenAPI response examples are present, they are used directly as mock responses
  • Otherwise, OpenAPI schema data types and field structures are used to generate a valid mock response
  • The request header x-traffic-parrot-select-response-status can be set to a numeric response code to select which response to return
  • The default response returned is the success response
  • The request body is not included in matching, to simplify the response selection
  • The request URL is used for matching, including checking for mandatory path and query parameters

Add/Edit HTTP mappings

Usage

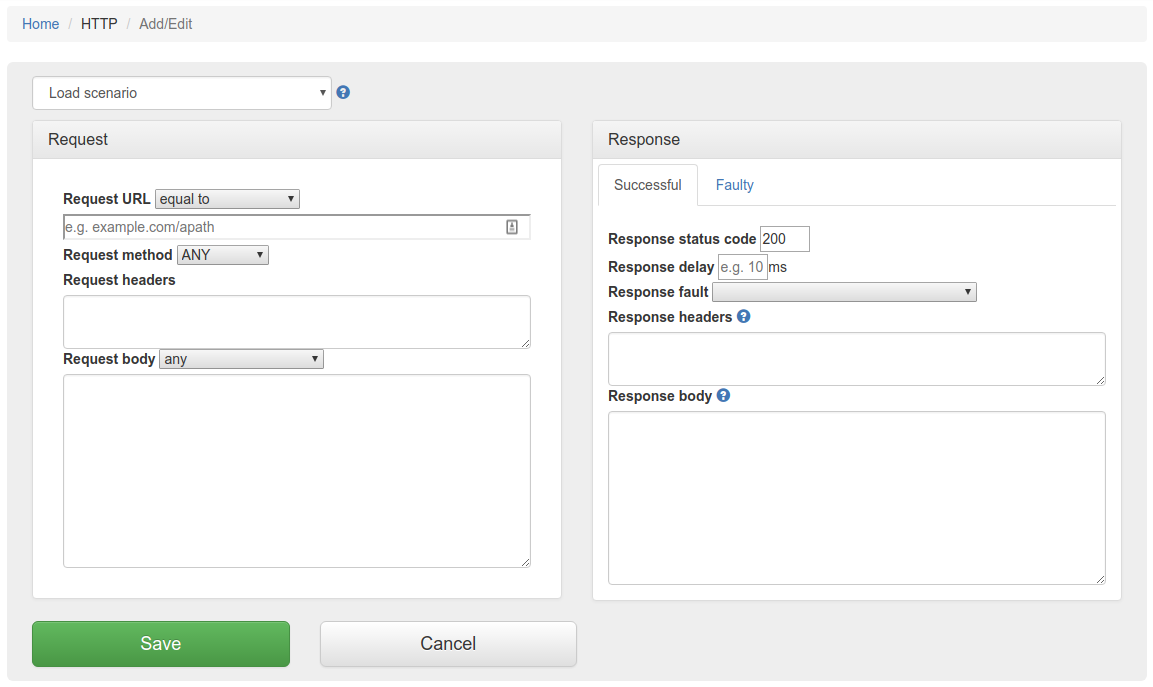
First, go to HTTP in the top navigation bar and then click Add/Edit.

HTTP Add/Edit screen with a Load scenario dropdown, a Request panel (URL match type, method, headers, body) and a Response panel on the Successful tab showing status code 200, response delay, fault, headers and body fields, alongside a Faulty tab

Fill in the Request/Response fields and click Save to configure a mapping.

You can also select from the HTTP skeleton dropdown which will populate the Request/Response fields for that skeleton.

After saving the mapping, it will appear in the list of mappings. Mappings table with one row: urlEqualTo '/api/resources', method GET, response body Service 1, with edit and delete buttons

Clicking the edit button Edit button will allow you to edit an existing mapping.
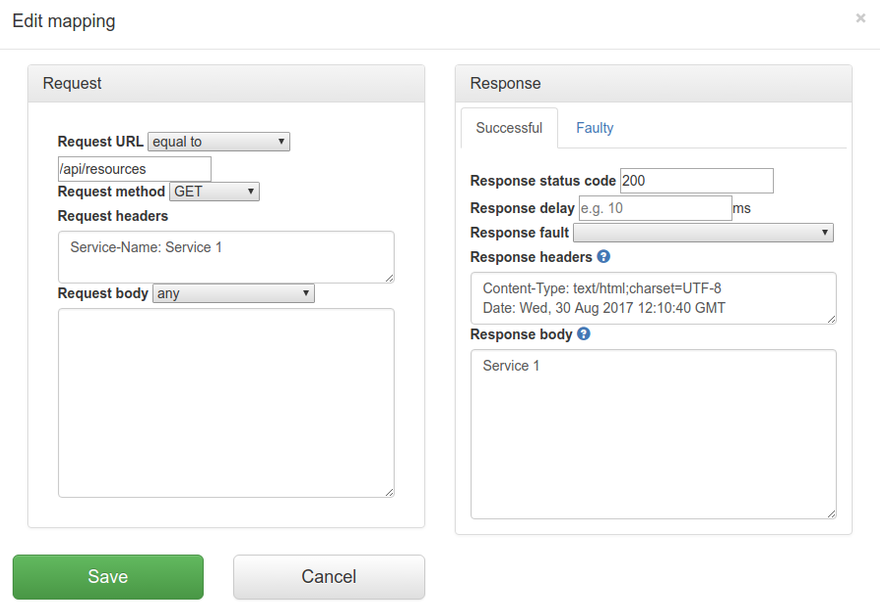
Edit mapping dialog for the GET /api/resources mapping: request URL equal to /api/resources with a Service-Name request header, and the Successful response tab showing status 200, Content-Type and Date response headers and the response body Service 1

Query parameters

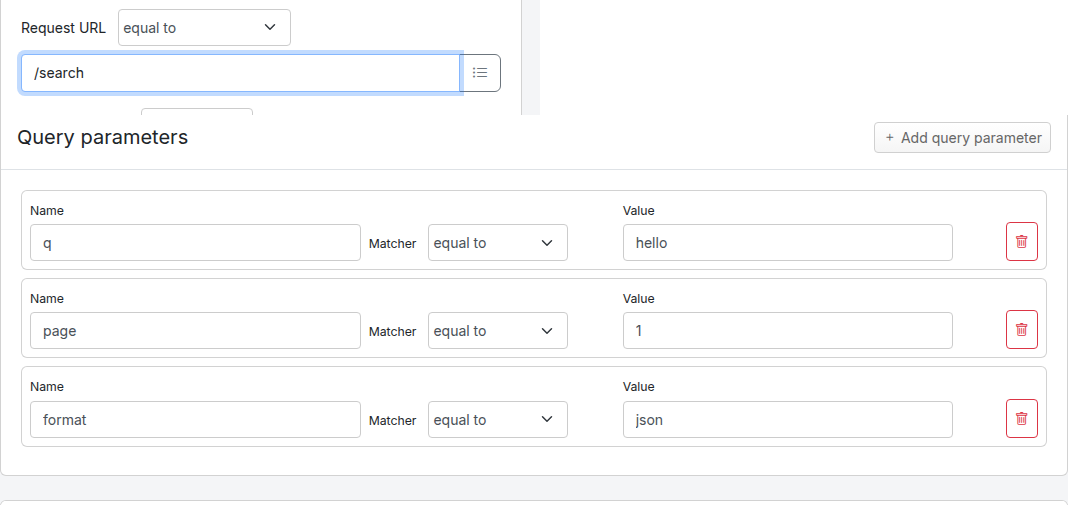
The Edit Mapping panel has a dedicated Query parameters panel below the Request / Response panels that lets you match individual query string parameters without putting them in the URL field or hand-writing a URL regex.

When a mapping has no query parameter matchers, the panel shows only its heading and the Add query parameter button. Click Add query parameter to add the first row; each additional click appends another row. Each row exposes a parameter name, a matcher dropdown, an optional value, and a remove button.

Query parameters panel on the Edit Mapping form, showing three example rows: q equal to hello, page matches regex [0-9]+, and debug absent.
Matcher Behaviour Value field
equal to The query parameter must be present and its value must be exactly the value you entered. Required
contains The query parameter must be present and its value must contain the entered substring. Required
matches regex The query parameter must be present and its value must match the entered Java regular expression. Required
absent The query parameter must not be present on the request. The mapping does not match if the request includes the named parameter (with any value). Hidden — no value is needed

Saving the mapping produces standard WireMock queryParameters JSON. Each row becomes one entry, keyed by parameter name:

{
  "request": {
    "method": "GET",
    "urlPath": "/search",
    "queryParameters": {
      "q":       { "equalTo": "test" },
      "page":    { "matches": "[0-9]+" },
      "preview": { "absent": true }
    }
  },
  "response": {
    "status": 200,
    "body": "..."
  }
}

Loading a mapping that already contains a queryParameters block populates the rows on the form — the round-trip is preserved, so editing and re-saving a mapping does not change or drop existing query parameter matchers.

A mapping with queryParameters matches loosely — a request that includes additional query parameters not listed in the mapping still matches, provided every listed parameter satisfies its matcher. To match only on the path, use urlPath or urlPathPattern in the URL field; using url or urlPattern together with queryParameters is supported but the URL must not itself include a query string.

Caution: when matching on query parameters, set the URL match mode to path equal to or path matches regex — not equal to or matches regex, which match the whole URL (including the query string) and will conflict with the separate query parameter matchers. The Edit Mapping panel shows an inline warning beneath the URL match mode if you combine a full-URL mode with one or more query parameter rows.

When to use Query parameters vs. the URL field
Use case Recommended approach
Match one or more specific query parameters, where parameter order in the request URL is not known or not stable Use the Query parameters section with one row per parameter
Match against a value pattern, a substring, or "this parameter must be absent" Use the Query parameters section with the matches regex, contains, or absent matcher
Match the entire URL including a fixed query string, character-for-character Use equal to on the URL field with the full path plus query string (e.g. /search?q=test&page=1)
Match the same parameter appearing more than once on the request (e.g. ?tag=a&tag=b) Use matches regex on the URL field with a lookahead pattern such as ^/search\?(?=.*\btag=a\b)(?=.*\btag=b\b).*$. Multi-occurrence parameters are deliberately not surfaced in the Query parameters section.

The older approaches (full query string in urlEqualTo, lookahead regex in urlMatching) continue to work for existing mappings — the new section is additive. For most cases though, the Query parameters section produces a mapping that is easier to read, easier to edit, and tolerant of parameter ordering in the incoming request.

Convert query string to rows

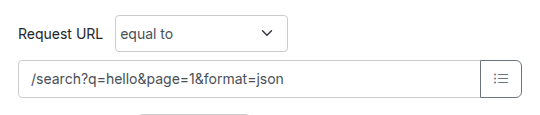
Pasting a full URL (e.g. one copied from a browser or a curl command) into the Request URL field leaves the query string baked into the URL value, which means the mapping then matches the exact query string only. To convert that query string into per-parameter rows in the Query parameters section in one click, use the Convert query string to rows link that appears directly below the Request URL input on the Edit Mapping panel.

Clicking the link parses each name=value pair from the URL's query string, appends one row per pair to the Query parameters section with the matcher set to equal to, and strips the query string from the Request URL field. URL-encoded characters in values (e.g. %20) are decoded automatically. The link does not save the mapping — the form changes are staged in the browser and you still need to click Save to commit them.

Before clicking the link, the Request URL field still contains the full URL with its query string and the Query parameters section is empty:

Edit Mapping panel with Request URL set to /search?q=hello&page=1&format=json and an empty Query parameters section; the Convert query string to rows link is visible directly below the URL input.

After clicking the link, the query string has been stripped from the URL and one equal to row has been appended for each name=value pair:

Edit Mapping panel after clicking Convert query string to rows: Request URL is now /search and the Query parameters section contains three rows: q equal to hello, page equal to 1, format equal to json.

Example: with the Request URL set to /search?q=hello%20world&page=1, clicking Convert query string to rows rewrites the URL field to /search and adds two rows under Query parameters: name q with matcher equal to and value hello world, and name page with matcher equal to and value 1. Existing rows are not touched — converted rows are appended to whatever rows are already present.

If the URL has no query string the link is a no-op. Multi-occurrence parameters (e.g. ?tag=a&tag=b) produce one row per occurrence, but because the saved queryParameters JSON is keyed by parameter name, only the last row for a given name takes effect at match time. To match the same parameter appearing more than once, keep using the urlMatching lookahead workaround described in the Query parameters section above.

Priority

The request priority can be set in order to set up a preference order for matching mappings. This works in the same way that priority works in WireMock.

The highest priority value is 1. If two or more mappings both match a request, the mapping with the higher priority will be used to provide the response. The default priority is 5.

This can be useful, if you want a "catch-all" mapping that returns a general response for most requests and specific mappings on top that return more specific responses.

Enable/disable mappings

You can temporarily disable a mapping without deleting it. Disabled mappings remain in the mapping list but are skipped during request matching, so no incoming request will match them.

In the mapping list, each mapping has a toggle button (eye icon) in the actions column. Click the toggle to disable a mapping. The mapping row appears dimmed to indicate it is disabled. Click the toggle again to re-enable it.

This is useful for:

  • Temporarily removing a mapping from matching without losing its configuration
  • Simulating service failures by disabling specific response mappings
  • A/B testing different response configurations

The enable/disable state is stored in the mapping's metadata as tp.enabled. Mappings without this metadata field default to enabled, so existing mappings are not affected.

Proxy responses for request passthrough

Traffic Parrot supports responding with a HTTP response including headers, body and status code, from another HTTP server.

This can be used to forward the requests you don't have mappings for to another endpoint.

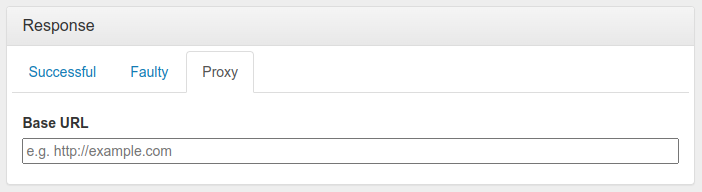
Response panel with the Proxy tab selected, alongside Successful and Faulty tabs, showing a Base URL field with placeholder e.g. http://example.com for proxying unmatched requests to a real service

You can use this to provide a default response for unmatched requests:

  1. Set a low priority like 10 for the mapping with the proxy response
  2. Leave default priority for other non-proxy response mappings
  3. Now any unmatched requests will return a response from the proxy mapping

Alternatively, you can configure automatic passthrough for all unmatched requests using the HTTP Passthrough Proxy property. This creates the catch-all proxy mapping automatically on startup.

Webhooks or callbacks

Traffic Parrot can also be configured to send an additional HTTP request after the mock response has been returned. This is called HTTP webhooks or callbacks.

It is possible to enable the callback based on a script evaluation condition. For example, this can be used to only send the callback if the mock response contains a particular success code.

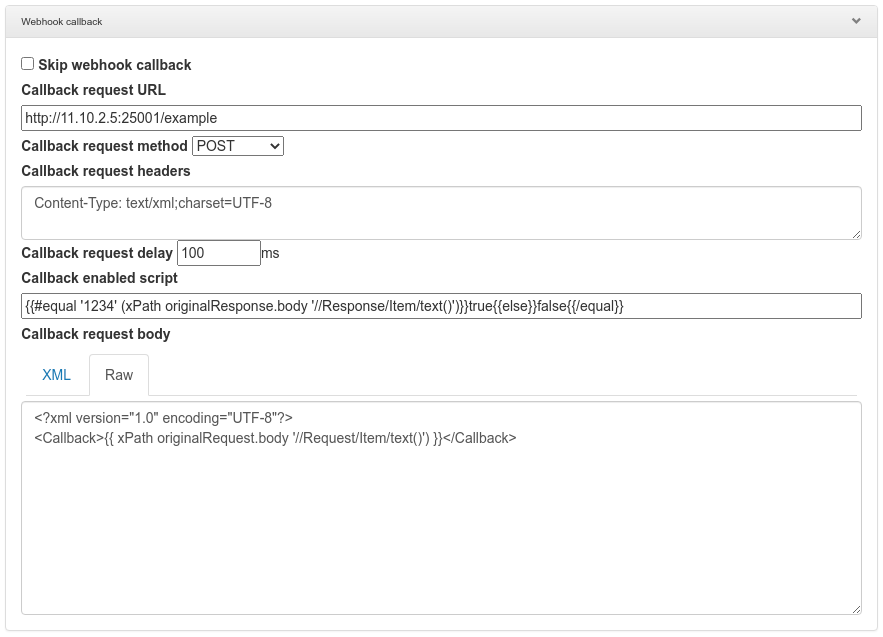
Webhook callback panel with fields for the callback request URL, POST method, headers, a 100 ms delay, an enabled-script condition using a handlebars xPath expression, and an XML callback request body

Request matcher script

Another way to match HTTP requests is with a request matcher script. If the expression evaluates to true, then the request is matched, otherwise it is not matched.

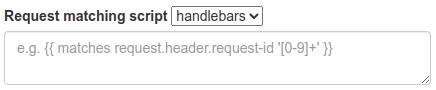
For example, Handlebars templating can be used to match a request header using a regular expression: Request matching script field with a handlebars language dropdown and an example expression matching a request-id header against a regular expression

HTTP skeletons

HTTP skeletons offer a quick way to generate a template of a mapping that matches an endpoint defined in an OpenAPI specification file. We may also add support for other specifications e.g. RAML in the future.

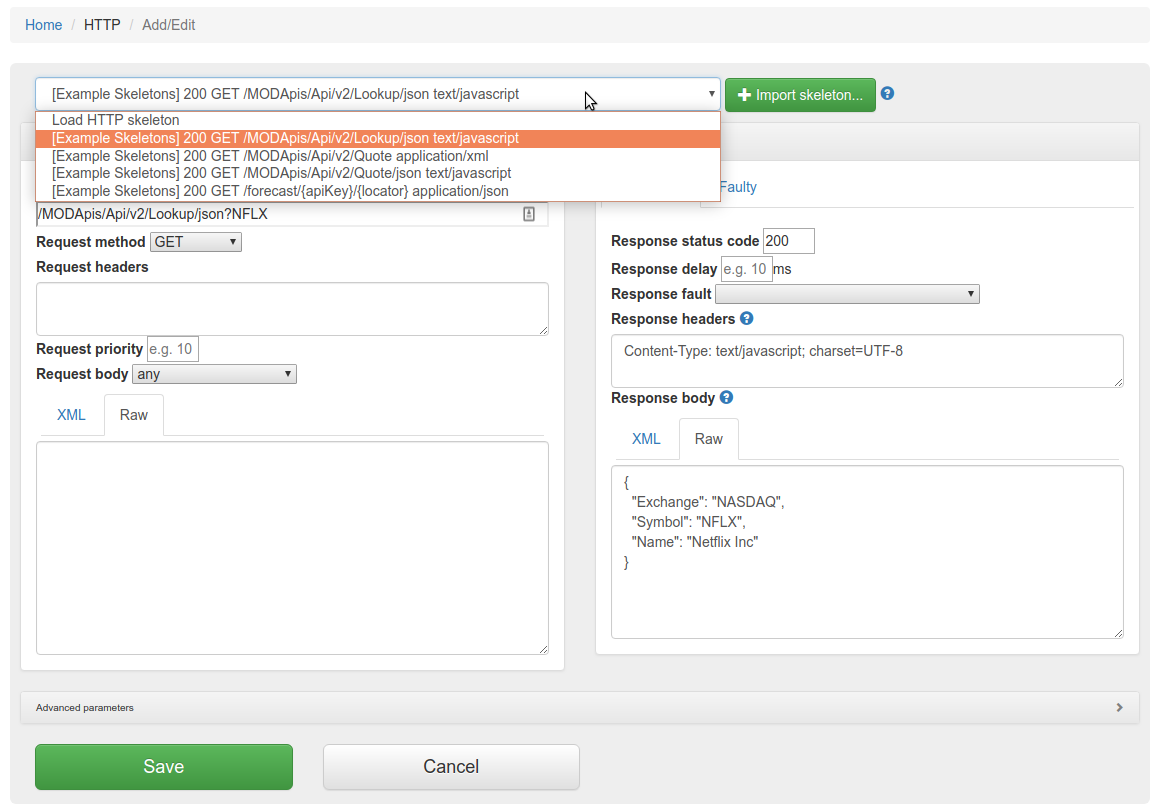
HTTP Add/Edit screen with the Load HTTP skeleton dropdown open listing example skeleton mappings, a green Import skeleton button, and request and response fields populated from the selected skeleton (a NASDAQ/NFLX JSON example)

In order to edit the list of elements on the HTTP skeletons dropdown on the Add/Edit page you will need to place OpenAPI specifications into the file trafficparrot-x.y.z/openapi configuration directory. JSON and YAML OpenAPI files are supported.

Alternatively, you can use the Import skeleton button button to import OpenAPI files. If you import a file with the same name as a file that was previously imported, it will be overwritten.
OpenAPI schema check

Traffic Parrot can validate your HTTP mappings against OpenAPI specification files at startup. This helps you detect drift between your API specifications and your virtual service mappings — for example, when an endpoint is renamed or removed from the specification but the corresponding mapping is not updated.

When enabled, Traffic Parrot checks that each HTTP mapping's URL path and HTTP method match an operation defined in at least one of the loaded OpenAPI specification files. If any mappings reference endpoints not found in the specifications, startup is prevented and detailed error messages are logged.

Enabling the check

To enable the OpenAPI schema check, set the following property in trafficparrot.properties:

trafficparrot.virtualservice.openapi.check.mapping.schema.on.startup=true

By default this property is set to false, so the check does not run and existing behaviour is unchanged.

Setting up OpenAPI specifications

Place your OpenAPI specification files (JSON or YAML, versions 2.x and 3.x) in the scenarios/{scenario}/openapi/ directory. If multiple specification files are present, all operations from all files are aggregated before the check runs.

If no OpenAPI specification files are found, the check passes silently and startup proceeds as normal.

What is checked

  • Each HTTP mapping's URL path is compared against the paths defined in the OpenAPI specifications
  • The HTTP method of each mapping must match a method defined for that path in the specification
  • URL matching supports exact paths, path-only matching, and path templates with parameters — mappings using regex URL patterns are skipped
  • Mappings without a method or with the ANY method are skipped

Error reporting

When violations are found, Traffic Parrot prevents startup and logs detailed error messages including the mapping ID, URL, HTTP method, and the reason for the mismatch. This is similar to the gRPC schema check feature.

Validate mappings against your schemas from the command line

The trafficparrot validate command checks your mappings against their bound schemas without starting the server, so you can run it as a step in a continuous integration pipeline. It loads the mappings from a files-root directory, validates each one against the OpenAPI specifications (for HTTP) and proto files (for gRPC) in that directory, prints a report, and exits with a status code your pipeline can act on. This is the headless equivalent of the startup-time OpenAPI schema check and gRPC schema check, with an additional under-coverage check (described below) for HTTP mappings, gRPC mappings, and messaging mappings. It also checks your messaging (JMS, native IBM® MQ and file-message) mappings against your imported AsyncAPI specifications — see Messaging coverage check on the JMS page.

The command performs two complementary checks for each protocol, giving you a bidirectional view of how your mappings and your schemas line up. For HTTP the schema is your OpenAPI specifications; for gRPC it is your proto files; for messaging it is your AsyncAPI specifications:

  • Schema drift — every mapping must match a declared schema element. For HTTP, a mapping whose URL path and method are not found in any loaded specification is reported as drift (for example, an endpoint that was renamed or removed from the specification but whose mapping was not updated). For gRPC, a mapping referencing a method that is not present in the bound proto files is reported.
  • Under-coverage — every declared schema element must have at least one backing mapping. For HTTP, an operation (a path and method) that no mapping covers is reported; for gRPC, a proto method that no mapping covers is reported; for messaging, an AsyncAPI operation whose destination no mapping covers is reported. This means a partially-mocked API or service cannot silently drift from its contract. Operations, proto methods and destinations you have deliberately chosen not to mock can be excluded with an allowlist.

Running the command

Pass the files-root directory — the directory that contains your mappings/ and openapi/ directories — as the first argument:

trafficparrot validate /path/to/files-root

The OpenAPI specifications are read from <files-root>/openapi/ (JSON or YAML, versions 2.x and 3.x; all files in the directory are aggregated before the checks run) and the HTTP mappings are read from <files-root>/mappings/. If no OpenAPI specifications are present, the HTTP schema-drift and under-coverage checks contribute nothing and only the gRPC check runs.

When everything lines up, the command prints No mapping schema drift detected. and exits 0. When drift or an uncovered operation is found, it prints one labelled section per problem class. For example, a specification declaring four operations with only one of them mapped reports:

Some OpenAPI operations have no backing mapping (under-coverage): (3)
No mapping covers operation: DELETE /pets/{petId}
No mapping covers operation: GET /pets/{petId}
No mapping covers operation: POST /pets

The path shown is the effective path, including any base path declared in the specification's servers entry (for example, GET /api/v1/items for a specification served under /api/v1).

Mappings that use a regular-expression URL pattern, or the ANY HTTP method, cannot be matched to a specification operation and are skipped when deciding whether an operation is covered. An operation reachable only through such a mapping is therefore reported as uncovered.

gRPC under-coverage

The same under-coverage check applies to gRPC mappings: every method declared in the bound proto files must have at least one backing gRPC mapping. The gRPC under-coverage check and its grpc-coverage.properties allowlist are documented on the gRPC page — see Validating gRPC mappings.

Messaging under-coverage

The same under-coverage check applies to messaging mappings: every operation declared in your imported AsyncAPI specifications (read from <files-root>/asyncapi/) must have at least one backing messaging mapping — JMS, native IBM® MQ or file-message. A declared operation that no mapping covers is reported as under-coverage. The messaging under-coverage check and its messaging-coverage.properties allowlist are documented on the JMS page — see Messaging coverage check.

Exit codes

The command exits with one of three status codes so a pipeline can fail the build on drift while still distinguishing a genuine drift failure from a misconfiguration:

Exit code Meaning
0 No drift — every mapping matches the specification or proto files, and every operation and proto method has a backing mapping (or is allowlisted).
1 Drift detected — one or more mappings do not match the specification or proto files, one or more operations or proto methods have no backing mapping, or an allowlist refers to an operation or method that is not in the specification or proto files.
2 Usage or configuration error — the files-root path is missing or is not a directory, or it contains no mappings to validate.

The check fails closed: a files-root with no mappings (a wrong path or an empty mappings/ directory) is reported as a configuration error (2), never as a clean 0.

Allowlisting operations and methods you do not mock

If your virtual service intentionally mocks only part of an API, you can mark the remaining operations as deliberately unmocked so that they do not fail the under-coverage check. Create a file named openapi-coverage.properties in the files-root directory (next to your openapi/ and mappings/ directories) and list the excluded operations in the exclude.operations property:

exclude.operations=GET /pets/{petId}, POST /orders

Each entry is a METHOD path token. Entries are separated by commas. The method is case-insensitive. The path is the effective path — including any base path from the specification's servers entry — written exactly as it appears in the report (with {parameter} placeholders). If the file is absent, no operations are excluded.

To stop the allowlist from quietly going stale, an entry that does not match any operation in the loaded specifications is itself reported as drift and causes a non-zero exit code. Remove or correct an entry once the operation it refers to no longer exists in the specification.

gRPC has a parallel allowlist, configured through a grpc-coverage.properties file with an exclude.methods property — see Validating gRPC mappings for the gRPC allowlist specifics. Messaging has a parallel allowlist too, configured through a messaging-coverage.properties file with an exclude.destinations property — see Messaging coverage check for the messaging allowlist specifics.

Using it in a CI pipeline

Run the command as a pipeline step and check its exit status. With the default shell behaviour the non-zero exit code on drift fails the step automatically; you can also inspect $? explicitly:

trafficparrot validate /path/to/files-root
if [ "$?" -ne 0 ]; then
    echo "Mappings have drifted from the OpenAPI specification"
    exit 1
fi

Running the check on every change keeps your virtual service mappings in step with the API contract they stand in for: a renamed or removed endpoint, or a new operation that has not yet been mocked, fails the build instead of silently reaching a downstream environment.

SOAP

Record SOAP and generate dynamic responses

Traffic Parrot helps with SOAP and XML mocking by providing an XML editor, the matchesXML request body matcher and dynamic response helpers such as xPath and xPathList.

Please see the video below for a full demo of recording SOAP requests and responses, and then generating dynamic responses.

Please download Traffic Parrot and the sample UV Index SOAP application and follow the demo in the video below.

If you cannot see a video frame below please download it here

Recording HTTP

Configuration

To record HTTPS traffic against any host, point your browser or application's proxy setting at Traffic Parrot and import the Traffic Parrot CA certificate into the client's trust store. See the configuration guide Recording HTTPS via the browser proxy.

If your system requires the use of an outbound HTTP proxy (e.g. in a corporate environment) you will need to make sure Traffic Parrot was started using those proxy settings so that it can correctly record. See the configuration guide HTTP proxy settings.

If you need to record a system with a certificate that is not trusted by default, you will need to specify the trust store properties. See the configuration guide Outbound HTTPS certificates.

If you need to record a system that requires a client certificate for authentication, you will need to specify the key store properties. See the configuration guide Outbound HTTPS certificates.

Usage

First, navigate to the recording page by clicking HTTP in the top navigation bar and then click Record.

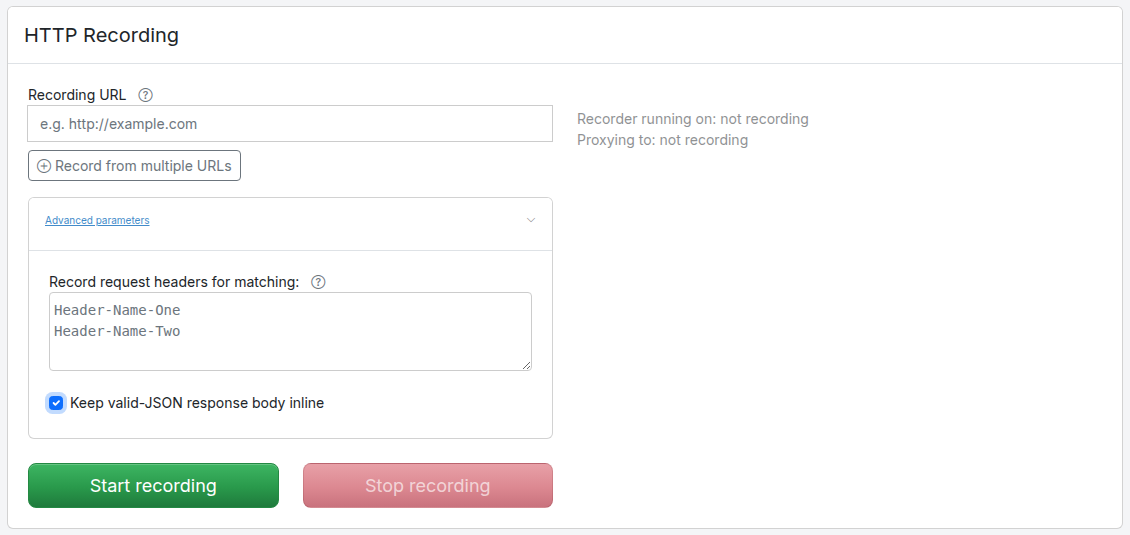
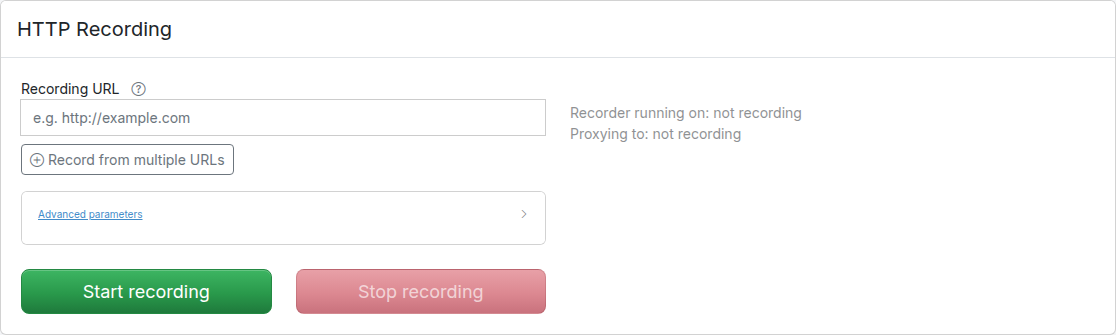
In order to record traffic to a URL, simply enter the Recording URL and click Start recording.

HTTP Recording screen with a Recording URL field, a Record from multiple URLs button, 'not recording' status text, a green Start recording button and a disabled Stop recording button

All traffic received by the Traffic Parrot virtual service will be proxied to the host in the Recording URL and recorded as mappings.

To record HTTPS traffic to any host without specifying a single Recording URL, point your client's proxy setting at Traffic Parrot instead. See Recording HTTPS via the browser proxy.

Mappings table with one row: urlEqualTo '/api/resources', method GET, response body Service 1, with edit and delete buttons

Clicking the edit button Edit button will allow you to edit the recorded mapping.

Edit mapping dialog for the GET /api/resources mapping: request URL equal to /api/resources with a Service-Name request header, and the Successful response tab showing status 200, Content-Type and Date response headers and the response body Service 1

Existing mappings

If there are existing mappings present before a recording starts, these mappings will be used to return responses instead of recording a new response.

For example, if there is a mapping with path equal to /example then any traffic to path /example will return a response from the existing mapping and traffic to other paths will still be recorded.

Deleting mappings while recording

You can delete a recorded mapping while a recording session is still active — for example to prune noise as it is captured. When you delete a mapping during recording, Traffic Parrot remembers that endpoint for the rest of the current recording session, so the same request is not recorded again if it is proxied a second time.

The endpoint is matched by HTTP method and normalised URL path, so query-string variants and numeric-id variants (for example /orders/123 and /orders/456) of the deleted request are suppressed as well.

While a recording session is active, the mappings list shows a Recording active banner above the table as a reminder that deleting a mapping here also stops that endpoint being re-recorded for the rest of the session. The banner is shown only while recording is running.

Note

This suppression is scoped to the current recording session. It is cleared when you stop recording (and at the start of each new recording session), so a previously deleted endpoint becomes recordable again in a fresh recording session. This applies to HTTP recording.

Live coverage while recording

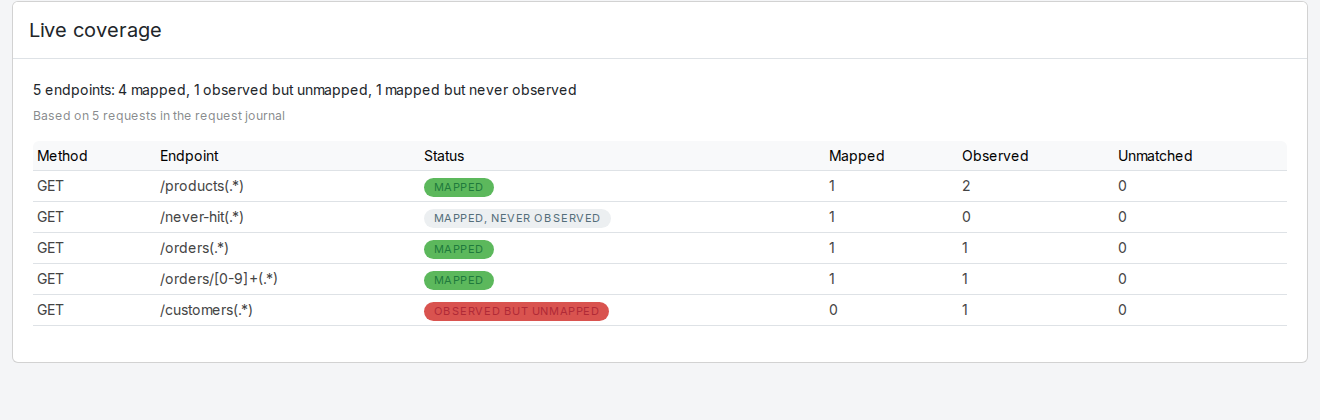
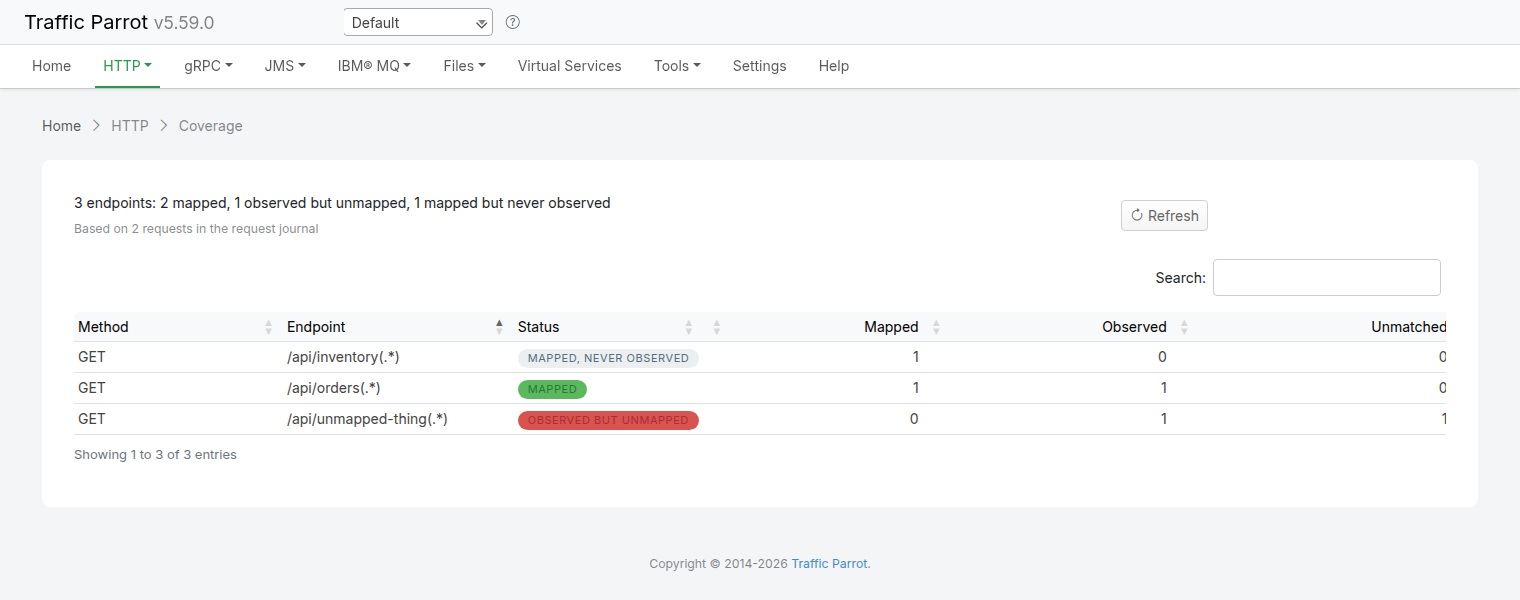
While a recording session is active, the Record page shows a Live coverage panel that refreshes about once a second. It answers the question “has this recording captured the endpoints I expected, and do they all have mappings yet?” without waiting for the session to finish. The panel is empty when you are not recording — it shows Start recording to see live coverage — and fills in as traffic is proxied through Traffic Parrot.

An endpoint is one HTTP method plus a normalised URL path. Numeric and variable path segments are collapsed using the same convention that Mapping cleanup uses (for example /orders/123 and /orders/456 are counted as the one endpoint /orders/[0-9]+), and query-string variants of the same path are not counted as separate endpoints. This means the coverage tally and cleanup always agree about what “the same endpoint” is.

The summary line above the table reports the totals for the current scenario: how many distinct endpoints have been seen, how many of those now have a mapping, how many were observed but have no mapping yet, and how many mappings exist that have not been observed during this session.

Each row in the table shows one endpoint:

Column Meaning
Method The HTTP method (GET, POST, …).
Endpoint The normalised request path.
Status Mapped (observed and a mapping now exists), Observed but unmapped (requests were seen but no mapping has been recorded for them yet), or Mapped, never observed (a mapping exists but no request hit it during this session).
Mapped How many mappings exist for the endpoint.
Observed How many requests to the endpoint are in the request journal.
Unmatched How many of those requests did not match any existing mapping.

Watch the Observed but unmapped rows: those are endpoints your traffic hit that have not produced a mapping yet (for example a request that was answered by an existing mapping rather than recorded, or one that was filtered out). They are the “you hit this but it didn’t get a mapping” case.

Coverage reflects the request journal

Coverage is calculated from the requests still held in the in-memory request journal, so the panel shows a Based on N requests in the request journal note. The journal is bounded (see trafficparrot.virtualservice.maxRequestJournalEntries in trafficparrot.properties), so on a very long recording session the oldest requests can age out and the tally then reflects only what is still in the journal rather than every request ever proxied. This monitor covers HTTP recording.

Live coverage REST API

The Live coverage panel reads from an endpoint on the Traffic Parrot GUI/admin port that you can also poll yourself. Send a GET request to /api/http/currentRecordingCoverage:

curl http://localhost:8080/api/http/currentRecordingCoverage

While recording is active, the response carries "recording": true and the per-endpoint coverage for the current scenario:

{
  "recording": true,
  "coverage": {
    "endpoints": [
      {
        "method": "GET",
        "path": "/orders/[0-9]+",
        "mapped": true,
        "mappedCount": 1,
        "observedCount": 3,
        "unmatchedCount": 0
      },
      {
        "method": "POST",
        "path": "/orders",
        "mapped": false,
        "mappedCount": 0,
        "observedCount": 1,
        "unmatchedCount": 1
      }
    ],
    "totalEndpoints": 2,
    "mappedEndpoints": 1,
    "observedButUnmappedEndpoints": 1,
    "mappedButNeverObservedEndpoints": 0,
    "totalRequestsInJournal": 4
  }
}

When no recording session is running, the response is well defined: the flag is false and the coverage totals are zeroed with an empty endpoint list. This is the same idle state the panel renders as Start recording to see live coverage.

{
  "recording": false,
  "coverage": {
    "endpoints": [],
    "totalEndpoints": 0,
    "mappedEndpoints": 0,
    "observedButUnmappedEndpoints": 0,
    "mappedButNeverObservedEndpoints": 0,
    "totalRequestsInJournal": 0
  }
}

Filter by URL path

If the Recording URL includes a path, only traffic to this path will be recorded, however all traffic will still be proxied.

For example, if the Recording URL is set to http://example.com/aSampleResource then only traffic to paths staring with /aSampleResource will be recorded and all other traffic will be proxied to http://example.com without saving mappings.

Filter by Content-Type

In order to record only specified content types go to trafficparrot.properties file and change the value of the property:
trafficparrot.virtualservice.recordOnlyContentTypesContaining=TP_RECORD_ALL_CONTENT_TYPES
to include content types you would like to record, for example:
trafficparrot.virtualservice.recordOnlyContentTypesContaining=application/javascript,application/xml

Recording multiple APIs

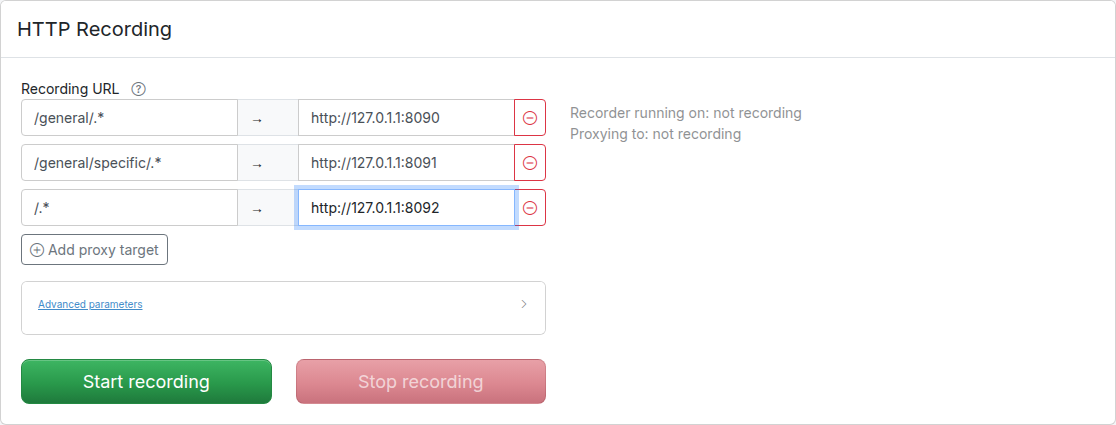
By default the Record page shows a single Recording URL input for the common case of recording one backend. To record from multiple backends in a single session, click Record from multiple URLs below the input. This reveals a URL pattern field alongside the target field and adds a second row so you can route different paths to different backends. Use Add proxy target to add more rows, or click the remove button on a row to delete it. Removing rows until only one row remains with an empty pattern returns the form to the simple single-URL mode.

Each row consists of a URL pattern (a regular expression matched against the request path) and a target URL. For example:

Record multiple HTTP URLs in Traffic Parrot

The path is used to determine which API should be used to provide the recorded response. The expression .* is used as a wildcard matcher.

In the example above:
  • /general/something will route to http://127.0.1.1:8090
  • /general/specific/something will route to http://127.0.1.1:8091
  • /something will route to http://127.0.1.1:8092

Recording headers for matching

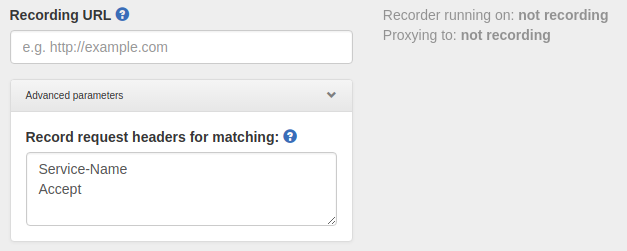
In order to record HTTP request headers that can be later used for matching request go to the HTTP->Record page, click on "Advanced parameters" and fill in "Record request headers for matching" text area. It should contain a list of headers, one per line, for example:
screenshot

Keeping JSON response bodies inline

By default, every response body captured during recording is written to a separate file in the __files/ directory and the recorded mapping references it by name. You can instead keep JSON response bodies inline in the mapping itself, so a recorded JSON API produces a single self-contained mapping file with no companion body file.

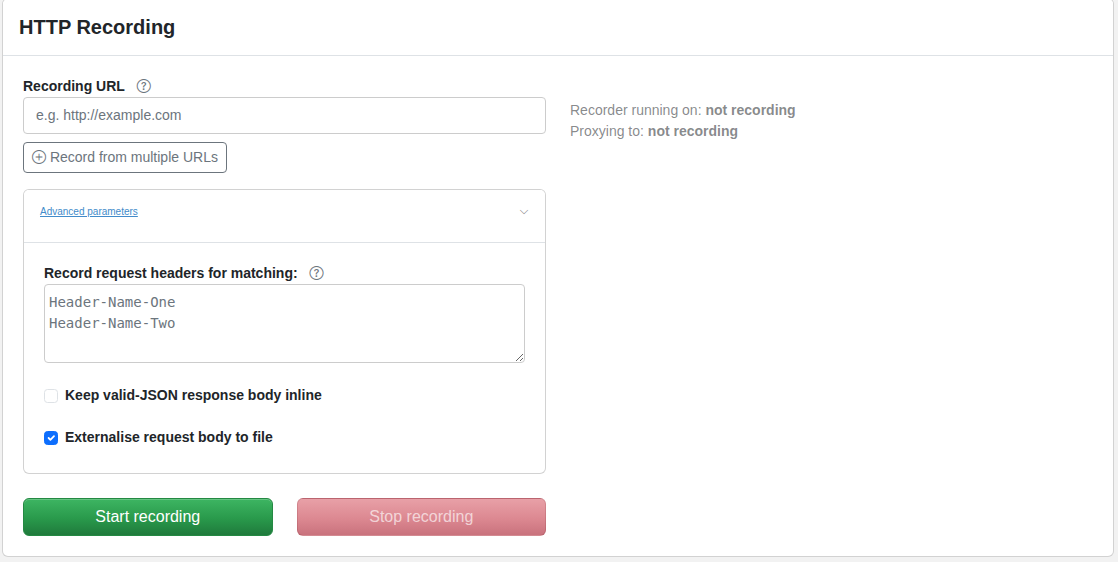
On the HTTP → Record page, click Advanced parameters and tick Keep valid-JSON response body inline, then start recording as usual.

The Advanced parameters accordion on the HTTP Record page with the Keep valid-JSON response body inline checkbox ticked

The checkbox appears below the Record request headers for matching field in the same Advanced parameters accordion.

When the option is on, a recorded response body is kept inline in the mapping (as a structured jsonBody) when both of these are true:

  • the response is served with a text content type (for example application/json); and
  • the response body is valid JSON.

Any other response body is still written to a __files/ file exactly as before. In particular:

  • a non-JSON text body (HTML, XML, plain text, …) is externalised to a file;
  • a binary body is externalised to a file — even if its bytes happen to parse as JSON, a body served with a binary content type such as application/octet-stream is written to a file, because the declared content type is honoured.

The inline JSON is stored byte-for-byte as it was received; it is not reformatted. When the option is off (the default), all response bodies are externalised to __files/ exactly as in earlier releases, so existing recording workflows are unchanged.

No size limit on inlined JSON

There is no size cap on inlining: any valid-JSON text response is kept inline regardless of how large it is. A very large JSON response is therefore embedded directly in the mapping file rather than in a separate __files/ file, which can make that mapping file large. Leave the option off if you prefer large JSON responses to remain in their own body files.

The checkbox controls a single recording session. To change the default state of the checkbox for everyone (for example to have it ticked out of the box), set the trafficparrot.http.recording.response.inlineJson property in trafficparrot.properties. The property only seeds the checkbox's initial state — whatever the checkbox is set to when you start recording is what takes effect for that session.

Externalising request bodies to files

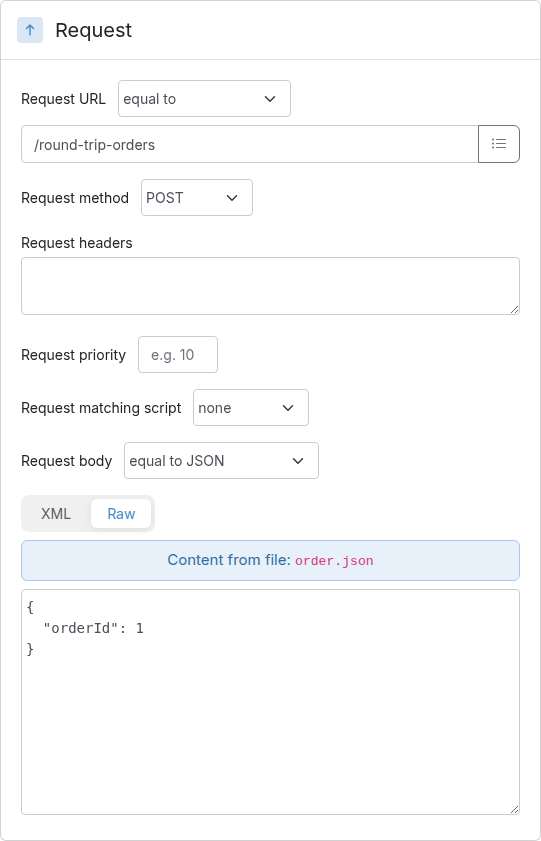
By default, when a recorded request has a body, that body is written inline into the recorded mapping as the request body matcher (a bodyPatterns value). You can instead have the request body externalised to a file in the __files/ directory, with the recorded mapping's request matcher carrying a bodyFileName reference to that file instead of the inline value — the request-side counterpart of a file-backed request body matcher.

On the HTTP → Record page, click Advanced parameters and tick Externalise request body to file, then start recording as usual.

The Advanced parameters accordion on the HTTP Record page with the Externalise request body to file checkbox ticked

The checkbox appears below the Keep valid-JSON response body inline checkbox in the same Advanced parameters accordion.

When the option is on, a recorded request body is written to a __files/ file and the mapping's request matcher references it by name. The matcher form is chosen from the request's content type, so the externalised body still matches on replay exactly as an inline one would:

  • a JSON request body produces {"equalToJson":{"bodyFileName":"…"}};
  • an XML request body produces {"equalToXml":{"bodyFileName":"…"}};
  • a binary request body produces {"binaryEqualTo":{"bodyFileName":"…"}} (the file is written byte-for-byte);
  • any other body (plain text, or a request with no Content-Type) produces {"equalTo":{"bodyFileName":"…"}}.

Two kinds of request body are always kept inline, regardless of the checkbox, and are never externalised:

  • an empty request body; and
  • a multipart request body.

When the option is off (the default), request bodies are recorded inline exactly as in earlier releases, so existing recording workflows are unchanged.

Externalised request bodies are editable in the GUI

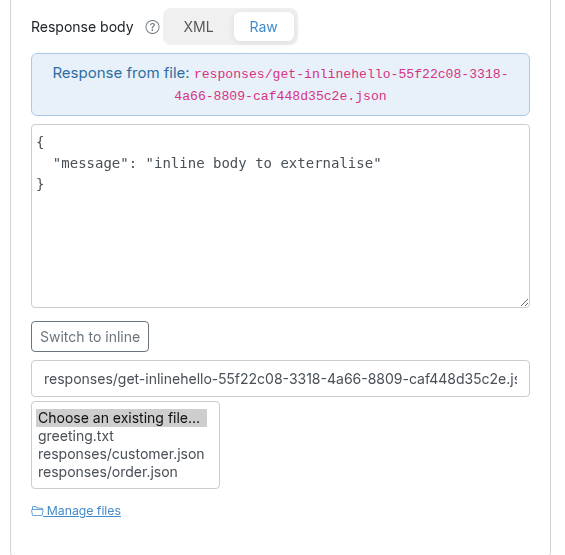
A recorded request body that was externalised to a file loads, matches on replay, and is editable in the Add/Edit mapping editor exactly like a manually file-backed request body matcher — a Content from file note names the file and the request body field is pre-filled with its contents.

The checkbox controls a single recording session. To change the default state of the checkbox for everyone (for example to have it ticked out of the box), set the trafficparrot.http.recording.request.externaliseToFile property in trafficparrot.properties. The property only seeds the checkbox's initial state — whatever the checkbox is set to when you start recording is what takes effect for that session.

URL rewriting during recording

Traffic Parrot can automatically rewrite URLs in response bodies during recording. This is useful when recording from production systems where responses contain absolute URLs that need to be changed to point to your test environment.

Configuration

Configure URL rewriting by setting the trafficparrot.http.recording.response.rewrite.regex property in trafficparrot.properties. The format is:

trafficparrot.http.recording.response.rewrite.regex=pattern->replacement,pattern2->replacement2

Examples

Simple string replacement:

trafficparrot.http.recording.response.rewrite.regex=https://api.example.com->http://localhost:8081

Regex with capture groups:

trafficparrot.http.recording.response.rewrite.regex=(https?://[^/]+)(.*)->http://localhost:8081$2

Multiple rules:

trafficparrot.http.recording.response.rewrite.regex=(https://api.example.com)(.*)->http://localhost:8081$2,(https://cdn.example.com)(.*)->http://localhost:8082$2

How it works

  • URL rewriting is applied only during recording mode
  • The live response the client receives is transformed by trafficparrot.http.recording.response.rewrite.regex; the body written to the saved mapping file is transformed separately by trafficparrot.http.recording.storage.rewrite.regex (often in the opposite direction, to preserve Handlebars templates)
  • Works with gzip, brotli, and uncompressed responses
  • Only text-based response bodies are processed (JSON, XML, HTML, etc.)

Note

URL rewriting only applies during recording. The transformed URLs are saved in the recorded response files, so during replay mode, the already-transformed responses are served.

Handling HTTP redirects during recording

There are two unrelated things people call "redirects" in Traffic Parrot, and they are controlled separately. Read this first so you know which one applies to you.

1. Serving a stubbed 3xx (always available)

You can define a mapping that returns a 301 or 302 response with a Location header. This is standard mock behaviour: Traffic Parrot returns the redirect to the client exactly as you defined it. This is always available and is not affected by the trafficparrot.virtualservice.enableRedirectHandling property.

For example, a mapping that redirects clients calling /old-path to /new-path:

{
  "request": {
    "method": "GET",
    "url": "/old-path"
  },
  "response": {
    "status": 302,
    "headers": {
      "Location": "/new-path"
    }
  }
}

Clients calling /old-path receive HTTP/1.1 302 Found with Location: /new-path, just like any other stubbed response.

2. Following a backend redirect in proxy/record mode (property-controlled)

When Traffic Parrot is recording by proxying to a real backend and that backend returns a 3xx redirect (e.g. 302 with a Location header), the trafficparrot.virtualservice.enableRedirectHandling property decides whether the redirect itself is recorded, or whether Traffic Parrot follows it and records the final response instead.

The property defaults to false. It is read once at startup (it is a server setting, not a per-recording-session option, so there is no toggle on the Record page). Set it in trafficparrot.properties:

trafficparrot.virtualservice.enableRedirectHandling=true

The following table summarises the recording behaviour for a backend that answers a request with 302 + Location, where the target of the Location returns a terminal 200:

Setting What the proxy does What gets recorded What replay returns
false (default) Passes the backend's 3xx straight through to the client. The 302 (with its Location header). 302 + Location.
true Follows the backend's Location and reads the final response. The final response (e.g. the terminal 200 and its body) instead of the redirect. The final 200.

When to use each

  • Leave enableRedirectHandling at its default false when you want the redirect itself reproduced in your virtual service, so replay returns the 302 + Location exactly as the backend did.
  • Set it to true for transparent recording where you only care about the final response: Traffic Parrot follows the redirect hop while recording and saves only the terminal response, so your mocks contain no redirect.

Note

Setting enableRedirectHandling does not change how your own stubbed 3xx mappings behave — it only changes what is recorded when proxying to a backend that redirects.

Mapping cleanup

Overview

Mapping cleanup is a page in the Traffic Parrot admin UI. To open it, go to the HTTP menu in the top navigation bar and choose Cleanup. It rewrites a scenario's HTTP mappings into a clean, convention-following form.

Recording a real API (or importing a HAR) typically produces dozens of near-identical per-request stubs — one each for /users/1, /users/2, /users/3 and so on — each carrying noisy response headers and over-strict matchers. The result is hard to maintain. Cleanup consolidates these stubs into a small set of pattern-based mappings.

Cleanup is non-destructive. It never modifies the source scenario. The cleaned mappings are written to a new scenario named by the targetScenario parameter; the original scenario is left untouched.

Cleanup is convention-only today. The standard cleanup applies a fixed set of conventions — there are no configurable parameters or rule toggles. The only input is the target scenario name.

For a step-by-step walkthrough, see the tutorial How to clean up recorded HTTP mappings.

What cleanup does

Standard cleanup applies these conventions to every mapping in the scenario:

Transform Before After
Consolidate specific URLs into patterns separate stubs for /users/1, /users/2, /users/3 one stub matching /users/[0-9]+. Numeric segments become [0-9]+, alphanumeric segments become [0-9a-zA-Z-]+, and hex segments become [0-9a-f]+.
Remove noisy response headers the response returns Date, Server, Connection, Content-Type, … keeps only Content-Type and id-style headers (names ending in “id”, e.g. Request-Id)
Remove request body-matching constraints the stub only matches one exact request body the stub matches regardless of request body
Consolidate duplicate mappings three identical /health stubs a single stub (the simplest response is kept)
Standardize file naming get-users1-8ee16f88-….json and ad-hoc body files mapping files are named after their URL pattern; response body files are renamed to <base>_response.<ext>
Make response URLs portable the response body contains an absolute URL such as https://api.example.com/users/1 the host is replaced with the {{request.baseUrl}} template ({{request.baseUrl}}/users/1)
Add response templates /users/7 always returns "id": 7 the response echoes the requested id via {{request.path.[1]}}

The last two transforms — making response URLs portable and adding response templates — correspond to the urlsReplaced and templatesAdded result counters described below.

Using the cleanup page

  1. From the HTTP menu in the top navigation bar, choose Cleanup. The page shows the current scenario and how many mappings it contains.
  2. The Target scenario name field is pre-filled with a suggested name (the current scenario name with _cleaned appended). Change it if you like.
  1. Click Apply Standard Cleanup.
  2. The Results panel shows the before/after counts; click switch to the cleaned scenario to start using the simplified mappings.

The results panel reports six counters: Original Mappings, Cleaned Mappings, Mappings Consolidated, Headers Stripped, Body Patterns Removed, and Files Renamed.

When cleanup consolidates near-duplicate mappings (same method and URL pattern, only the smallest-body mapping is kept), a warning panel lists exactly which mappings were consolidated away — for example GET /api/store/[0-9]+/items(.*) (response: body 61 chars). Cleanup is no longer silent about what it drops: review this list before discarding the original recording, in case a consolidated-away mapping carried a response you still need.

Below the summary counters, expand Per-endpoint detail to see, for every recorded endpoint, exactly what cleanup did to it. Each row is tagged Kept, Consolidated, Headers stripped, Body match removed, URL pattern applied, Response template added, or Removed. A consolidation groups block underneath makes the grouping explicit, listing which specific recorded URLs were collapsed into each surviving pattern. Because cleanup is intentionally lossy, this view lets you confirm what changed before you discard the original recording.

REST API

The cleanup endpoints run on the Traffic Parrot GUI/admin port. You can use them to inspect the current scenario and run cleanup programmatically.

Send a GET request to /api/http/cleanup/mappings to return the current scenario and its mapping count:

curl http://localhost:8080/api/http/cleanup/mappings

The response includes a short preview list (sampleMappings) of up to 10 file names:

{
  "scenario": "Default",
  "mappingCount": 42,
  "sampleMappings": ["get-users1-….json", "get-users2-….json"]
}

Send a GET request to /api/http/cleanup/suggestedName to return a suggested target name. The response is a JSON object, not a bare string:

curl http://localhost:8080/api/http/cleanup/suggestedName
{
  "suggestedName": "Default_cleaned",
  "currentScenario": "Default"
}

Send a POST request to /api/http/cleanup/execute?targetScenario=<name> to run the standard cleanup and write the result to the new scenario. The targetScenario query parameter is required; there is no request body.

curl -X POST "http://localhost:8080/api/http/cleanup/execute?targetScenario=cleaned-api"

On success, the response is the cleanup result:

{
  "targetScenario": "cleaned-api",
  "originalMappingsCount": 42,
  "cleanedMappingsCount": 18,
  "mappingsConsolidated": 20,
  "headersRemoved": 15,
  "bodyPatternsRemoved": 8,
  "filesRenamed": 5,
  "urlsReplaced": 12,
  "templatesAdded": 0,
  "consolidatedAwayMappings": [
    "GET /api/store/[0-9]+/items(.*) (response: body 61 chars)",
    "GET /api/store/[0-9]+/items(.*) (response: body 36 chars)"
  ],
  "removedEndpoints": [],
  "endpointDispositions": [
    { "endpoint": "GET /users/[0-9]+", "actions": ["CONSOLIDATED", "HEADERS_STRIPPED"] },
    { "endpoint": "GET /health", "actions": ["KEPT"] }
  ],
  "consolidationGroups": [
    {
      "pattern": "GET /users/[0-9]+",
      "consolidatedUrls": [
        "GET /users/123 (response: body 61 chars)",
        "GET /users/456 (response: body 36 chars)"
      ]
    }
  ],
  "errors": []
}

The result fields are:

  • originalMappingsCount / cleanedMappingsCount — the mapping count before and after cleanup.
  • mappingsConsolidated — stubs merged into patterns or deduplicated.
  • headersRemoved — mappings whose response headers were trimmed.
  • bodyPatternsRemoved — request body matchers that were dropped.
  • filesRenamed — response body files that were renamed.
  • urlsReplaced — response bodies where an absolute URL was replaced with {{request.baseUrl}}.
  • templatesAdded — responses where a dynamic {{request.path.[…]}} template was inserted.
  • consolidatedAwayMappings — the identity of each near-duplicate mapping that consolidation removed, formatted as METHOD url-pattern (response: body N chars | file <name> | none). Empty when nothing was consolidated.
  • removedEndpoints — any endpoint (method and normalised path) that was mapped before cleanup but has no mapping afterwards. Normally empty, because consolidation always keeps one survivor per endpoint; it is a safety guard that only fires if a transform were to remove an endpoint entirely.
  • endpointDispositions — one entry per recorded endpoint, each { "endpoint": "GET /users/[0-9]+", "actions": […] }, where every action is one of KEPT, URL_PATTERN_APPLIED, HEADERS_STRIPPED, BODY_PATTERN_REMOVED, TEMPLATE_ADDED, CONSOLIDATED, or REMOVED. This is the per-endpoint view behind the Per-endpoint detail table in the GUI.
  • consolidationGroups — one entry per surviving pattern, each { "pattern": "GET /users/[0-9]+", "consolidatedUrls": […] }, listing which recorded URLs were collapsed into that pattern. Empty when nothing was consolidated.
  • errors — any mappings that could not be cleaned (empty on success).

The standard cleanup is convention-driven and is not currently configurable.

Endpoint coverage

Overview

Endpoint coverage tells you, for the current scenario, which HTTP endpoints Traffic Parrot knows about and how the real traffic it has seen lines up with your stub mappings. Every endpoint is classified as exactly one of three states:

  • Mapped — at least one stub mapping exists for the endpoint and it has been observed in traffic.
  • Observed but unmapped — requests for the endpoint appear in the request journal but no stub matched them, so they fell through to the unmatched HTTP 900 No responses matched response. These are gaps in the virtual service.
  • Mapped, never observed — a stub exists but no request has exercised it yet. This is a candidate for cleanup (possibly an obsolete mapping).

Endpoint coverage complements Mapping cleanup: after consolidating mappings, coverage answers the question “did consolidation accidentally drop an endpoint that real traffic still hits?”. An endpoint that becomes Observed but unmapped after a cleanup is a regression signal. Coverage and cleanup use the same endpoint normalisation — URL patterns collapse concrete URLs such as /orders/123 and /orders/456 into a single endpoint — so the two pages always agree on what counts as one “endpoint”.

“Observed” is derived from the HTTP request journal — the serve events the virtual service records as requests arrive. Traffic Parrot's HTTP engine is based on WireMock, so this is the same request journal described in the WireMock verifying / request-journal documentation.

Using the coverage page

Open the coverage page from the top navigation bar: go to the HTTP menu and choose Coverage (direct URL /http/coverage.html). It is available when virtual services are enabled.

The page header shows a summary line — for example 3 endpoints: 2 mapped, 1 observed but unmapped, 1 mapped but never observed — and a caveat line stating how much traffic the figures are based on, for example Based on 2 requests in the request journal. A Refresh button reloads the data, and the table refreshes live.

The table has six columns, in this order:

Column Meaning
Method The HTTP method.
Endpoint The normalised URL pattern, for example /api/orders(.*).
Status One of three badges: Mapped (green), Observed but unmapped (red), or Mapped, never observed (grey).
Mapped How many stub mappings exist for the endpoint.
Observed How many requests for the endpoint were seen in the journal.
Unmatched How many of those observed requests matched no mapping.

The table is searchable using the Search: box, and each column is sortable.

How to read it:

  • Red Observed but unmapped rows are gaps — traffic with no stub behind it.
  • Grey Mapped, never observed rows are cleanup candidates — stubs no request has exercised.
  • A non-zero Unmatched count on an otherwise-mapped endpoint means some requests to that path did not match any of its stubs — for example matchers that are stricter than the real traffic. See the request log for the per-request near-misses.

REST API

Send a GET request to /api/http/coverage on the Traffic Parrot GUI/admin port to return the same data as JSON for the current scenario. It takes no parameters and is always available, independent of whether a recording is in progress.

curl http://localhost:8080/api/http/coverage

A representative response (trimmed to two endpoints):

{
  "endpoints": [
    { "method": "GET", "path": "/api/orders(.*)",        "mapped": true,  "mappedCount": 1, "observedCount": 1, "unmatchedCount": 0 },
    { "method": "GET", "path": "/api/unmapped-thing(.*)", "mapped": false, "mappedCount": 0, "observedCount": 1, "unmatchedCount": 1 }
  ],
  "totalEndpoints": 3,
  "mappedEndpoints": 2,
  "observedButUnmappedEndpoints": 1,
  "mappedButNeverObservedEndpoints": 1,
  "totalRequestsInJournal": 2
}

The top-level aggregates are totalEndpoints, mappedEndpoints, observedButUnmappedEndpoints, mappedButNeverObservedEndpoints, and totalRequestsInJournal. Each entry in endpoints carries method, path, mapped, mappedCount, observedCount, and unmatchedCount.

/api/http/coverage is the standalone, always-available endpoint-coverage view — you can call it at any time, for any scenario. It shares this same per-endpoint model with the Live coverage REST API (/api/http/currentRecordingCoverage), which wraps the same data in a top-level recording flag but is scoped to an in-progress HTTP recording session; this endpoint is the live monitor during a recording, whereas /api/http/coverage is the always-on view.

HTTP request matchers

When Traffic Parrot receives a request, it will try to simulate the system it is replacing by sending back a response to the client that sent the request. To decide which response to send, it will go through all the request to response mappings it has available to find the response to be returned. For more details how request matching works, see Request matching.

There are several matchers available to match HTTP requests, depending on the attribute.

The most common matchers are shown below. All other WireMock request body patterns are also supported.

Request URL matchers
Matcher name Matcher Id Description
equal to urlEqualTo Check that the whole url (including query parameters, etc.) of the request received is equal to the url specified in the mapping
matches regex urlMatching Check that the url of the request received matches the regexp specified in the mapping
path equal to urlPathEqualTo Check that the url path of the request received is equal to the path specified in the mapping
path matches regex urlPathMatching Check that the url path of the request received matches the path specified in the mapping
Request HTTP method (verb) matchers
Matcher name Description
ANY When matching a request, do not pay attention to the request method
GET Check that the method of the request received is GET
POST Check that the method of the request received is POST
PUT Check that the method of the request received is PUT
HEAD Check that the method of the request received is HEAD
OPTIONS Check that the method of the request received is OPTIONS
DELETE Check that the method of the request received is DELETE
CONNECT Check that the method of the request received is CONNECT
TRACE Check that the method of the request received is TRACE
Request query parameter matchers

Each query parameter row in the Query parameters section of the Edit Mapping panel uses one of the matchers below. In the saved mapping JSON each row appears under the queryParameters object, keyed by the parameter name.

Matcher name Matcher Id Description
equal to equalTo Check that the named query parameter is present and its value is exactly the value specified in the mapping
contains contains Check that the named query parameter is present and its value contains the substring specified in the mapping
matches regex matches Check that the named query parameter is present and its value matches the regular expression specified in the mapping
absent absent Check that the named query parameter is not present on the request

Additional query parameter matchers supported by WireMock (doesNotMatch, equalToJson, matchesJsonPath, equalToXml, matchesXPath) can be added by editing the mapping JSON file directly. See the WireMock query parameter documentation for the full list.

Request headers

The Edit Mapping panel has a dedicated Request header matching card that offers two synchronised ways to match individual request headers: a free-text Request headers area for bulk, copy-paste-friendly editing, and per-header rows (the same click-to-add-rows editing the Query parameters card uses for query string parameters). The two views stay in two-way sync, so you can use whichever is more convenient and the most recent edit wins.

The Request headers area is a newline-separated list of header names and values, one matcher per line. By default each line uses an equalTo matcher:

Accept: text/html
Accept-Encoding: gzip, deflate
Accept-Language: en-US,en;q=0.5

You can specify a matcher type by adding a [matcherType] suffix to the header name (see the Format column below). This text area is the source of truth for the saved mapping and is well suited to pasting or editing many headers at once.

The per-header rows give the same matchers a structured, point-and-click view. When a mapping has no header matchers the card shows only its heading, the Request headers area and the Add request header button; click it to add a row, and each further click appends another. Each row has a header Name, a Matcher dropdown, a Value, and a remove (trash) button.

The rows and the text area are kept in two-way sync on a most-recently-changed-wins basis: editing, adding or removing a row regenerates the text area, and editing the text area re-syncs the rows to match its content. Loading a mapping that already contains request-header matchers populates both views, so editing and re-saving a mapping does not change or drop its existing header matchers. In the saved mapping JSON each matcher appears under the request headers object, keyed by header name.

By default a row (or line) uses the equal to matcher. The matcher dropdown offers the following types, each with its equivalent text-area Format:

Matcher Matcher Id Format Description
equal to (default) equalTo Header-Name: value Header value must be exactly equal to the specified value
contains contains Header-Name [contains]: value Header value must contain the specified substring
matches regex matches Header-Name [matches]: regex Header value must match the specified regular expression
does not match regex doesNotMatch Header-Name [doesNotMatch]: regex Header value must not match the specified regular expression
equal to date/time equalToDateTime Header-Name [equalToDateTime]: value Header value (a date/time) must equal the specified moment. The value is an ISO-8601 date-time (e.g. 2026-01-01T00:00:00Z) or a now offset (e.g. now +3 days)
before date/time before Header-Name [before]: value Header value (a date/time) must be before the specified moment (same ISO-8601 / now-offset value format)
after date/time after Header-Name [after]: value Header value (a date/time) must be after the specified moment (same ISO-8601 / now-offset value format)

For example, to match requests where X-Custom contains the word "partial", X-Id matches a numeric pattern, and X-Created-At is after a given moment, add three rows: X-Custom / contains / partial; X-Id / matches regex / [0-9]+; and X-Created-At / after date/time / 2026-01-01T00:00:00Z. The equivalent Request headers text-area content is:

X-Custom [contains]: partial
X-Id [matches]: [0-9]+
X-Created-At [after]: 2026-01-01T00:00:00Z
Request body matchers
Matcher name Matcher Id Description
any any Any request body will match.
equal to equalTo Check that the received request body is equal to the request body specified in the mapping
contains contains Check that the received request body contains the sequence of characters specified in the mapping
does not contain doesNotContain Check that the received request body does not contain the sequence of characters specified in the mapping
matches regex matches Check that the received request body matches the regexp specified in the mapping
does not match regexp doesNotMatch Check that the received request body does not match the regexp specified in the mapping
equal to JSON equalToJson Check that the received request body is JSON and that it is equal to the request body JSON specified in the mapping
matches JSON matchesJson

Check that the received request body matches (allowing for special wildcard tokens) JSON specified in the mapping.

Tokens allowed:
  • {{ anyValue }} - matches any value
  • {{ anyNumber }} - matches any whole or decimal number
  • {{ anyElements }} - matches any number of sub-elements (child-nodes)
For example a "matches JSON" request body matcher:
{
  "name": "{{ anyValue }}",
  "lastName": "{{ anyValue }}",
  "age": "{{ anyNumber }}",
  "children": "{{ anyElements }}"
}
will match a request body:
{
  "name": "Bob",
  "lastName": "Smith",
  "age": 37,
  "children": [{"name": "sam"}, {"name": "mary"}]
}
matches JSONPath matchesJsonPath Check that the received request body is JSON and that it matches JSONPath specified in the mapping. For example, if we use the following expression as the request body matcher
$[?(@.xyz.size() == 2)]
it will match this request body:
{"xyz":[{"a":true}, {"b":false}]}
but will NOT match this one:
{"xyz":["a":true, "b":false, "c":true]}
For more examples see the request matching documentation.
matches GraphQL matchesGraphQL Check that the received request body is a GraphQL-over-HTTP request whose query is semantically equal to the GraphQL query specified in the mapping — ignoring insignificant whitespace, selection-set field order, and argument order — or, in its object form, whose operation name (and, optionally, variables) match. Use it to stub a POST /graphql endpoint where many operations share one URL. See Matching GraphQL request bodies below for details and examples.
equal to XML equalToXml Check that the received request body is XML and that it is equal to the request body XML specified in the mapping
matches XML matchesXml

Check that the received request body matches (allowing for special wildcard tokens) XML specified in the mapping.

Tokens allowed:
  • {{ anyValue }} - matches any value
  • {{ anyNumber }} - matches any whole or decimal number
  • <tp:AnyElements/> - matches any number of sub-elements (child-nodes)
For example a matches XML request body matcher:
<example>
  <name>{{ anyValue }}</name>
  <age>{{ anyNumber }}</age>
  <children><tp:AnyElements/></children>
</example>
will match a request body:
<example>
  <name>Sam</name>
  <age>29</age>
  <children><child name="bob"/></children>
</example>
matches XPath matchesXPath Check that the received request body is XML and that it matches XPath specified in the mapping. For example, if we use the following expression as the request body matcher
/xyz[count(abc) = 2]
it will match this request body:
<xyz><abc/><abc/></xyz>
but will NOT match this one:
<xyz><abc/></xyz>

The following additional matchers are available when editing mapping JSON files directly:

  • matchesJsonSchema — validate the request body against a JSON Schema
  • absent — match when a header, query parameter, or cookie is absent from the request
  • before, after, equalToDateTime — match headers or parameters against date/time values
  • and, or — combine multiple matchers with logical operators
  • notnegate any matcher

Instead of inlining the body to match against, any of the request body matchers above can load its expected value from an external file in the __files directory. See Request body file.

Matching GraphQL request bodies

GraphQL services typically expose a single POST /graphql endpoint, and the operation the client actually wants lives inside the JSON request body rather than in the URL. Because of this, matching on the raw body text is brittle: two requests that ask for exactly the same data can differ in whitespace, in the order of the fields they select, or in the order of the arguments they pass, yet they should select the same stubbed response. The matchesGraphQL request body matcher understands the GraphQL request and matches it semantically, so you can stub a /graphql endpoint without worrying about exact formatting.

The matcher expects the standard single-operation GraphQL-over-HTTP application/json request body:

{
  "query": "...",
  "variables": { ... },
  "operationName": "..."
}

There are two ways to author a matchesGraphQL matcher, and they match on different things. Choose the one that fits what you want to assert.

Full-query form (semantic query matching)

Give the matcher a GraphQL query as a string. The incoming request's query field is then compared to it by canonical equality: the two queries match when they are semantically the same, even if they differ in

  • insignificant whitespace and indentation,
  • the order of fields within a selection set, and
  • the order of arguments passed to a field.

Aliases and directives are significant, because they change the response shape the client expects. This is the mode to use when you want true semantic query matching. In this form the request's variables and operationName are ignored.

For example, this mapping stubs the getUser query:

{
  "request": {
    "method": "POST",
    "url": "/graphql",
    "bodyPatterns": [
      { "matchesGraphQL": "query getUser { user { id name email } }" }
    ]
  },
  "response": {
    "status": 200,
    "jsonBody": { "data": { "user": { "id": "1", "name": "Ada", "email": "ada@example.com" } } },
    "headers": { "Content-Type": "application/json" }
  }
}

Both of the following request bodies match that stub, even though one expands the whitespace and reorders the selected fields:

{"query": "query getUser { user { id name email } }"}
{
  "query": "query getUser {\n  user {\n    email\n    name\n    id\n  }\n}"
}

Argument order is tolerated in the same way: a stub whose query selects orders(status: "OPEN", limit: 10) matches a request that sends orders(limit: 10, status: "OPEN").

Operation-name form (operation and variables matching)

Give the matcher an object with an operationName instead of a query string. The matcher then resolves the incoming request's operation name — the explicit operationName envelope field if present, otherwise the top-level operation name parsed from the query — and compares it as a literal string. This is the fast way to disambiguate the several operations that share one /graphql URL:

{ "matchesGraphQL": { "operationName": "getUser" } }

The operation-name form matches on the operation name alone. It does not compare query text or formatting in any way — if you need semantic query matching, use the full-query form above.

You can optionally add a variables object to also assert on the request's variables. The request's variables are then compared using Traffic Parrot's JSON matching (the same machinery as matches JSON): the named variables must be present and equal, extra variables on the request are ignored, and array element order is significant. So the same operation with different variable values can select different stubs:

{ "matchesGraphQL": { "operationName": "getUser", "variables": { "id": 42 } } }
Authoring in the editor

To add a matchesGraphQL matcher in the HTTP Add/Edit mapping editor, select matches GraphQL from the Request body matcher dropdown and enter your GraphQL query. The editor authors the full-query form. The operation-name form (operationName / variables) is authored by importing mapping JSON in this version.

Invalid or unsupported requests

A request whose body is not a valid GraphQL request — not JSON, missing the query field, or carrying a query that cannot be parsed — simply does not match. Traffic Parrot moves on to the next mapping (and the request appears in the near-miss diagnostics like any other unmatched request); it is never an error. When you save or import a mapping whose own configured GraphQL query is invalid, that mapping is rejected at save/import time so the problem surfaces immediately.

Limitations in this version
  • There is no schema-driven auto-mocking — you cannot import a GraphQL schema and have Traffic Parrot serve generated responses automatically; you stub specific operations as shown above.
  • GraphQL subscriptions and any streaming or websocket transport are not supported.
  • Batched requests (a JSON array of operations, [{ "query": ... }, ...]) are not matched; the matcher handles the single-operation request body only.
  • The operation-name form (operationName / variables) is authored by importing mapping JSON, not from the editor dropdown.

Request body file

A request body matcher can reference the value it matches against from an external file instead of inlining it in the mapping. This mirrors the response-side bodyFileName: the body to compare against lives in a file in the __files directory and is referenced from the mapping by name, and the same file is editable round-trip in the mapping editor (see In the GUI below).

Instead of giving a request body matcher an inline string value:

{
  "request": {
    "method": "POST",
    "url": "/orders",
    "bodyPatterns": [
      { "equalToJson": "{\"orderId\": 42}" }
    ]
  },
  "response": { "status": 200 }
}

you replace the inline value with an object containing a single bodyFileName key that names a file in the __files directory:

{
  "request": {
    "method": "POST",
    "url": "/orders",
    "bodyPatterns": [
      { "equalToJson": { "bodyFileName": "order-payload.json" } }
    ]
  },
  "response": { "status": 200 }
}

With the file __files/order-payload.json containing:

{"orderId": 42}

This keeps large or shared request payloads out of the mapping JSON, lets you reuse the same payload file across several mappings, and makes the matcher contents easy to edit and diff on their own.

How it works

  • File location. The file is resolved relative to the mapping's sibling __files directory, exactly like the response-side bodyFileName. A mapping in mappings/order.json that references "bodyFileName": "order-payload.json" loads __files/order-payload.json. A relative path such as "bodyFileName": "payloads/order.json" resolves to __files/payloads/order.json.
  • Loaded once, at mapping-load time. The file is read when the mapping is loaded, not on every request. The matcher then runs against the loaded contents on the hot path, so matching is just as fast as an inline value. If you change the file's contents, reload the mappings for the change to take effect.
  • Supported by any body matcher. Every request body matcher that takes a body value supports bodyFileName, including the Traffic Parrot custom matchers (matchesJson, matchesGraphQL, matchesSwiftField and matchesFixField).
  • Text vs. binary. The binaryEqualTo matcher reads the file as raw bytes. All other supported matchers read the file as UTF-8 text.
  • Inline value or bodyFileName, not both. Within a single matcher entry, bodyFileName must be the only key. Combining it with an inline value (or any other key) in the same entry is rejected at load time.
  • Editable in the editor. A single text-based file-backed matcher is editable in the Edit Mapping panel, and saving writes your change back to the file in __files. A binaryEqualTo matcher, or a mapping with more than one request body matcher, stays read-only and is edited on disk — see In the GUI.
  • Out of scope. The absent and anything matchers have no payload to externalise, so they do not support bodyFileName.

In the GUI

A file-backed request body matcher is edited in the same way as a file-backed response: the Edit Mapping panel shows a note naming the file the matcher value comes from and pre-fills the request body field with that file's contents. In the mappings list, the matcher shows its actual content, exactly like a matcher with an inline value.

Mappings list. In the HTTP Add/Edit mappings list, the Request body column shows the matcher line with the resolved body content (for example equalToJson '{"orderId":1}') — the same way an inline matcher of the same content is shown. A file-backed row is therefore indistinguishable from an inline one in the list.

Edit Mapping panel. When you open a mapping whose request body matcher is file-backed, a blue note reading Content from file: <name> appears above the request body area, naming the file the matcher value comes from. The request body field is pre-filled with the file's current contents (loaded from __files) so you can see what the matcher compares against. Because the list no longer distinguishes file-backed matchers from inline ones, this note is the only place the GUI surfaces that a matcher reads its value from a file.

The pre-filled field is editable in place: edit it, click Save, and Traffic Parrot writes your change back to the file in __files while the matcher keeps its bodyFileName reference (no inlining, no orphaned file). A binaryEqualTo matcher, or a mapping with more than one request body matcher, keeps the field read-only with a banner instead, and is edited on disk.

When the matcher is a single file-backed text matcher (the editable case above), the request body area also shows a Switch to inline button, mirroring the same control for a file-backed response. Clicking it detaches the bodyFileName reference and keeps the file's already-loaded contents as the inline matcher value, leaving the request body field editable. On Save the matcher is stored inline — with no __files reference and no orphaned file left behind; the file on disk is left untouched. A binaryEqualTo, multi-pattern, any or absent request body does not offer this button and keeps its read-only banner.

Simulating identical URLs

When using Traffic Parrot to simulate multiple HTTP services at the same time, you may encounter namespace issues if the services have name clashes in the context path.

For example, you may have two services that both have a GET /api/resources endpoint, and one might be hosted at http://service1/api/resources and the other at http://service2/api/resources.

The Traffic Parrot virtual service http://localhost:8081/api/resources would have two mappings associated with it.

There are a number of ways to deal with this situation, one of which is detailed below.

Using custom headers

One solution to having the same name resource URL /api/resources for different services is to make a change the system under test and start sending a custom header when communicating with those services. For example, a request to http://service1/api/resources could include a HTTP header Service-Name: service1, and a request to http://service2/api/resources could include a HTTP header Service-Name: service2. That way the HTTP requests are different and Traffic Parrot can map them to different responses.

If you would like to capture those headers during a recording, you need to tell Traffic Parrot to record those headers.

You can also add those headers manually by editing the mapping.

File-backed responses (bodyFileName and the __files directory)

Instead of pasting a response body inline into a mapping, you can keep the body in a separate file and point the mapping at it with the bodyFileName attribute. This is useful when you want to:

  • Serve large or binary bodies (a PDF, an image, a multi-kilobyte JSON or XML document) that would clutter the mapping if inlined
  • Reuse the same body across more than one mapping
  • Keep your mappings/*.json files small and readable, with the payload stored alongside them
  • Edit the response body in your editor of choice, or generate it from a build step, without touching the mapping

The same bodyFileName / __files convention also externalises a request body matcher — see Request body file.

Coming from WireMock? Traffic Parrot is a WireMock-compatible virtual service, so the bodyFileName response attribute and the __files directory convention work unchanged. Mappings you already have that use bodyFileName — including those you import as a WireMock ZIP — load and serve in Traffic Parrot without modification. This page is the Traffic Parrot equivalent of WireMock's "response from a file" / "body file location" documentation.

The __files directory and how bodyFileName is resolved

A bodyFileName is resolved relative to the __files directory that sits next to the directory the mapping lives in (a sibling of mappings), not relative to the mapping file itself. A mapping in mappings/foo.json with "bodyFileName": "data.json" loads __files/data.json.

The default layout looks like this:

trafficparrot-x.y.z/
├── mappings/
│   └── foo.json          ← "response": { "bodyFileName": "data.json" }
└── __files/
    └── data.json         ← the response body that is returned

Nested paths are allowed. A bodyFileName may contain forward-slash subdirectories, which resolve under __files:

"response": { "bodyFileName": "sub/data.json" }   →   __files/sub/data.json

Text bodies are read as UTF-8. Binary bodies (images, PDFs, archives) are read as bytes, so the file is returned exactly as stored — see Binary file in response and Serving static images for binary examples.

Step by step: a plain text file-backed response

This walkthrough creates a stub for GET /greeting whose response body comes from a file.

  1. Create the body file __files/body.txt with the text you want to return:
    Hello from a file-backed response!
  2. Create the mapping mappings/greeting.json that references it through bodyFileName:
    {
      "request": {
        "method": "GET",
        "url": "/greeting"
      },
      "response": {
        "status": 200,
        "bodyFileName": "body.txt",
        "headers": {
          "Content-Type": "text/plain"
        }
      }
    }
  3. Start Traffic Parrot (or, if it is already running, the mapping is picked up automatically). Then call the stub on the virtual service port (trafficparrot.virtualservice.http.port, 8081 by default):
    curl http://localhost:8081/greeting

    The response body is the contents of __files/body.txt:

    Hello from a file-backed response!

When you open this mapping in the Add/Edit page, a note above the response body field tells you the body is served from a file rather than typed inline, and the field is pre-filled with the file's contents so you can edit it in place (see Editing a file-backed response in the UI).

Editing a file-backed response in the UI

When you open a mapping whose response uses bodyFileName on the Add/Edit page, Traffic Parrot shows an information note directly above the response body field reading Response from file: followed by the file name. The response body field is pre-filled with the file's current contents (loaded from __files) and is editable in place, so you can change a file-backed response without leaving the form.

When you edit the body and click Save, Traffic Parrot writes your changes back to the body file in __files (through its file source, so the in-memory mapping cache stays in sync). The mapping keeps its bodyFileName reference — only the file's contents change. If the file cannot be read or written, see Troubleshooting: missing body file.

When the body file is an image (PNG, JPEG, GIF, SVG, WebP, BMP, ICO, APNG or AVIF), Traffic Parrot renders the image inline above the Response from file note, so you can see at a glance which image the mapping serves without opening the Static Files browser or the file on disk. Because an image is binary, the body field stays read-only and is edited on disk — the preview shows what the response is, while the file name in the note tells you which file to change. The same inline rendering is used in the Static Files browser preview. Non-image binary files (a PDF, an archive) keep the read-only body field with no preview.

If the same body file is referenced by more than one mapping, Traffic Parrot shows a warning above the field. Editing a shared file changes the response for every mapping that uses it, so the warning names how many other mappings are affected.

You can switch a response between inline and file-backed from the same form:

  • Switch to inline detaches the bodyFileName and keeps the current body as an inline response. The file on disk is left untouched.
  • Switch to file externalises an inline body to a file in a single click: the response body becomes file-backed straight away, a file name field appears pre-filled with a suggested name (for example responses/<name>.json), and the Response from file note is shown. There is no separate confirm step — clicking Save writes the body to that file under __files using the current file name (the suggested default, or whatever you typed) and points the mapping at it. The file name field stays editable; clearing it keeps the body inline.

When the file name field is shown (after Switch to file), a Choose an existing file… dropdown appears beside it, listing the files already in the scenario's __files directory (including any nested responses/<name>.<ext> files). Selecting an entry fills the file name field with that path, so you can point the response at an existing body file without typing — useful when you want to reuse a payload that another mapping already serves. The dropdown is a convenience only: the file name field stays editable, so typing the name by hand still works exactly as before, and clearing the field keeps the body inline. Picking an existing file does not load its contents into the editor — just as when you type the file name, clicking Save writes the response body currently in the editor to that file, so if the body differs from the file's existing contents Save overwrites the file.

A Manage files link in the response body area opens the Static Files browser in a new browser tab, so you can list, create, rename or delete the files in the __files directory without leaving — or losing — the mapping you are editing. The link is always shown, whether the response is inline or already file-backed.

File-backed responses in the mappings list

In the HTTP Add/Edit mappings list, the Response body column normally shows the response body content itself — whether the body is inline, recorded, or kept in a text body file whose contents are read as text. For these rows the column reads exactly the same as if the body had been pasted inline.

A binary body file is different: its bytes are not text (an image, a PDF, an archive — see Templating vs byte-for-byte), so there is no readable body to show in the column. For such a row the Response body column shows the bodyFileName path the body is served from (for example responses/sample-image.jpg) instead. Long paths are truncated to fit the column; hover over the cell to see the full path in a tooltip.

When the binary body file is an image (PNG, JPEG, GIF, WebP, BMP, ICO, APNG or AVIF), hovering the cell goes one step further: instead of the full-path tooltip it pops a small rendered preview of the image itself, so you can recognise which picture a mapping serves without opening the editor or the file on disk. The cell still shows the truncated bodyFileName path — the preview only replaces what the hover shows. The image is loaded on the first hover and capped to a small thumbnail; if it cannot be read the cell falls back to the plain full-path tooltip. This is the same image that is rendered inline when you open the mapping (see Editing a file-backed response in the UI). Non-image binary rows (a PDF, an archive) keep the full-path tooltip.

This lets you tell at a glance which mapping serves which binary file without opening each one. Only binary file-backed rows change — inline, recorded, and text file-backed rows show their body content as before.

Per-scenario __files

If you organise mappings into scenarios, each scenario has its own __files directory alongside its mappings directory. A bodyFileName on a scenario's mapping resolves against that scenario's __files:

scenarios/
└── my-scenario/
    ├── mappings/
    │   └── greeting.json   ← "bodyFileName": "body.txt"
    └── __files/
        └── body.txt        ← scenario-scoped response body

This keeps each scenario self-contained, so the bodies a scenario depends on travel with the scenario when you copy or share it.

Using a __files location other than the default

By default the files root is the Traffic Parrot working directory (file:.), so body files live under __files in the Traffic Parrot install directory (and under each scenario for scenario-scoped mappings). If you want your body files and mappings to live somewhere else — for example a shared data directory under version control, or a mounted volume — set the files root with a property in trafficparrot.properties:

trafficparrot.virtualservice.trafficFilesRootUrl=file:/path/to/data

The value is a file: URL pointing at the directory that contains your mappings and __files directories. Its default is file:. (the current working directory). With the files root pointed at /path/to/data, a mapping's bodyFileName resolves under /path/to/data/__files (or the matching scenario's __files). See the property reference for trafficparrot.virtualservice.trafficFilesRootUrl for the full description and further examples.

Templated file-backed responses

A body file is not limited to a fixed payload. It can contain the same Handlebars templating helpers you can use in an inline response body, so a single file-backed response can vary with the incoming request. This combines the readability of an external file with the flexibility of dynamic responses.

For example, a mapping that echoes back a list of ids from the request body:

{
  "request": {
    "urlPath": "/requestJsonPathList",
    "method": "ANY",
    "bodyPatterns": [ {
      "matchesJsonPath": "$.items"
    } ]
  },
  "response": {
    "status": 200,
    "bodyFileName": "requestJsonPathList.json"
  }
}

with the body file __files/requestJsonPathList.json using Handlebars to iterate over the request's items array:

{
    "type": "response",
    "items": [
        {{#each (jsonPathList request.body '$.items') }}
        { "id": {{ jsonPath this '$.id' }}, "status": "OK" }{{#unless @last}},{{/unless}}
        {{/each}}
    ]
}

A ready-to-run version of this example ships in the examples project. For the full list of helpers and request data you can reference from a templated body (whether inline or file-backed), see Generate responses and Use request data in response.

Response body files: templating vs byte-for-byte

When HTTP Handlebars response templating is enabled (the default, trafficparrot.http.handlebars.enabled=true), Traffic Parrot classifies each bodyFileName response as binary or text and treats the two differently:

  • Binary body files are served byte-for-byte and are never run through Handlebars. A body file is treated as binary when there is positive binary evidence — either the response Content-Type is a binary type (image/*, audio/*, video/*, font/*, application/pdf or application/octet-stream), or the body file has a known binary extension (jpg, png, gif, pdf, zip, woff, mp4, …). The bytes are returned exactly as stored, so an image or PDF is never corrupted by being read and re-encoded as text.
  • Everything else is treated as text and rendered through Handlebars. Text formats such as JSON, XML, plain text and SVG (SVG is XML, so it is text) are templated as before, and so is any body file with no recognised binary Content-Type and no binary extension.

This means a template body file with no Content-Type — for example a .hbs, .tpl or .md file that contains {{…}} placeholders — is still rendered, while a binary file such as sample-image.jpg is served byte-for-byte whether or not it has an image/jpeg Content-Type. No per-mapping configuration is needed for either case.

Forcing byte-for-byte for a file Traffic Parrot cannot auto-detect

If you serve a binary file with an unusual extension and no Content-Type, Traffic Parrot has no positive binary evidence, so it defaults to treating the file as text and running it through Handlebars (which can corrupt it). To force such a file to be served byte-for-byte, do either of the following:

  • Set "disableBodyFileTemplating": true in the response's transformerParameters, which turns off templating for that response:
    {
      "response": {
        "status": 200,
        "bodyFileName": "payload.dat",
        "transformerParameters": {
          "disableBodyFileTemplating": true
        }
      }
    }
  • Give the response a binary Content-Type (for example application/octet-stream) in its headers, which Traffic Parrot recognises as positive binary evidence:
    {
      "response": {
        "status": 200,
        "bodyFileName": "payload.dat",
        "headers": {
          "Content-Type": "application/octet-stream"
        }
      }
    }

Handlebars partials referenced with {{>name}} (for example a .hbs partial) are always rendered as part of templating — they are not bodyFileName responses, so this binary/text classification does not apply to them.

Per-file-type reference

The table below shows how some common body files are classified.

Body file Content-Type Result
.json / .xml / .txt any text type or none Templated
.jpg / .png / .pdf image/*, application/pdf, or none Served byte-for-byte
.bin application/octet-stream or none Served byte-for-byte
.svg image/svg+xml or none Templated (SVG is text)
.hbs / .tpl / .md (with {{…}}) none Templated
binary file, unusual extension none Templated — set disableBodyFileTemplating:true or a binary Content-Type to force byte-for-byte

Troubleshooting: missing body file

If a mapping references a bodyFileName that does not exist under the resolved __files directory, Traffic Parrot reports the problem rather than silently returning an empty body: the matched request returns an HTTP 500 error and a FileNotFoundException naming the expected path is logged. Check that:

  • The file name in bodyFileName matches the file on disk exactly, including case and any subdirectory prefix
  • The file is in the __files directory that is a sibling of the mapping's mappings directory (or the scenario's __files for scenario-scoped mappings)
  • If you have set trafficparrot.virtualservice.trafficFilesRootUrl to a non-default location, the __files directory is under that location

The same "resolve relative to the sibling __files" rule also applies when you externalise a request body to a file for matching, so request- and response-side body files live side by side under the same __files directory. (A missing request body file is reported earlier still — when the mapping is loaded — rather than at request time.)

Next steps

Static Files browser

The Static Files browser is an admin-UI page for the __files directory that holds your file-backed response bodies. Instead of dropping to the filesystem, you can list, preview, create, edit, rename, upload and delete the files that mappings refer to with bodyFileName — all from the browser, against the same files Traffic Parrot serves at run time.

Open it from the Traffic Parrot admin UI: HTTP menu → Static Files (the page is served at /http/files.html). This is a different menu item from the top-level Files entry, which is the file-based message protocol.

Which files you see: the active scenario

The browser lists the files under the active scenario's __files directory — the same directory a mapping's bodyFileName resolves against at serve time. The active scenario name is shown at the top of the page, so the file list always matches the files the current scenario's mappings actually read from. If you switch scenarios, the browser shows that scenario's own __files.

Files in sub-directories of __files are grouped under expandable folder rows rather than listed by their full relative path. Each folder has a caret you can click to collapse or expand its contents (all folders are expanded by default), and each file is labelled by its own name and indented under its folder. When the directory has no files, the browser shows an empty-state message instead of the table.

Referenced and orphaned files

The Reference column tells you, at a glance, whether each file is still in use. A file is marked referenced when at least one mapping in the active scenario serves it as a response body (the mapping's response.bodyFileName equals the file's relative name), and orphaned when no mapping serves it. This helps you spot body files that are safe to clean up and ones that a response depends on.

The badge inspects only response references. A file used as a request body matcher can therefore show as orphaned even though a mapping still depends on it. The delete and rename safety checks are more complete than the badge — they also consider request-body references — so a file the badge calls orphaned can still be refused for deletion or rename when it is genuinely in use.

Previewing a file

Click a file to preview its content in the right-hand Preview pane:

  • Text, JSON and XML files are shown as text; JSON and XML are pretty-printed so they are easy to read.
  • Image files (PNG, JPEG, GIF, SVG, WebP, BMP, ICO, APNG and AVIF) are rendered inline, so you can see at a glance which image a mapping serves.
  • Any other binary file shows a short note with its content type and size (for example Binary file — application/octet-stream, 2.3 KB) rather than dumping raw bytes.

You can drag the divider between the Files and Preview panes to widen either side to suit the file you are reading (the split stays between 20% and 80% so neither pane collapses), and double-click the divider to snap back to the default split. The split you choose is remembered in your browser across page reloads. On narrow screens the panes stack vertically.

Creating a file

Click New file to create a text file under the active scenario's __files directory without leaving the page. Enter a relative file name (for example responses/example.json — any forward-slash sub-directories are created for you) and the file content, then click Create. The new file appears in the list with an orphaned badge until a mapping references it. A name that already exists, or one that would escape the __files directory (an absolute path or a path containing ..), is rejected with an error rather than silently overwriting or escaping the root.

Uploading a file

Click Upload to add an existing file from your computer to the __files directory. Both text and binary files are accepted and their bytes are stored verbatim, so an uploaded image is listed and rendered inline in the preview pane, and any other uploaded binary file is listed with its content type and size. Uploading a file whose name already exists is refused so you never silently overwrite another file, and unsafe file names are rejected just as for New file.

The upload has a configurable size limit, set by the trafficparrot.multipart.upload.max.size.mb property (default 10 MB, shared by all admin-UI file uploads). A file larger than the limit is rejected with HTTP 413 and the message File exceeds the maximum upload size of N MB shown in the upload form. The limit applies only to file uploads through the admin UI and does not affect recorded traffic or mapping sizes.

Editing a text file

Select a text file and click Edit to replace the preview with an editable text area and Save / Cancel buttons. Saving overwrites the file's content in the __files directory. If the file is referenced by one or more mappings, a warning is shown above the editor, because saving changes the response for every mapping that serves it. Image and other binary files stay read-only and are edited on disk.

This is the same body file you can edit from the Add/Edit mapping form — see Editing a file-backed response in the UI. The Static Files browser lets you edit the file directly, even when you do not have the mapping open.

Renaming a file

Each row has a Rename button that reveals an inline editable target-name field with Confirm / Cancel (no browser pop-up). Renaming a file moves it to the new name, creating any intermediate sub-directories the new name implies. Renaming onto a name that already exists is refused, so you never silently overwrite another file.

Rename is reference-safe: if the file still backs a mapping, the rename is refused, a banner lists the referencing mapping(s), and the file keeps its old name — because renaming it would leave the mapping pointing at a name that no longer exists. The reference check covers both a file used as an HTTP response body (response.bodyFileName) and one used as a request body matcher. To rename a referenced file, first remove or repoint the mapping(s) that use it; Traffic Parrot does not automatically rewrite the referencing mappings to the new name.

Deleting a file

Each row has a Delete button that reveals an inline Confirm / Cancel step (no browser pop-up). Confirming the deletion of an unreferenced file removes it from disk and the row disappears.

Delete is reference-safe: if the file still backs a mapping, the deletion is refused, a banner lists the referencing mapping(s), and the file stays listed — so you cannot silently break a response or a request matcher by deleting the file it serves. As with rename, the check considers both response.bodyFileName and request-body references, so a file the orphaned badge reports as unreferenced can still be blocked from deletion when it is genuinely in use. To delete a referenced file, first remove or repoint the mapping(s) that use it.

CORS for stub responses

When a browser application (a single-page app, a front-end calling your mock from fetch/XMLHttpRequest) calls a mocked endpoint on a different origin, the browser enforces the same-origin policy: it first sends a CORS preflight (an HTTP OPTIONS request) and then expects the response to carry Access-Control-* headers — notably Access-Control-Allow-Origin. If those headers are missing, the browser blocks the call and you see a “blocked by CORS policy” error in the console, even though the request reached the mock and a response came back.

Traffic Parrot's virtual service is CORS-friendly out of the box. There is no flag to set and no manual stub to add: for every path on the virtual service (the port your browser app calls), Traffic Parrot automatically answers the CORS preflight and reflects the request's Origin into Access-Control-Allow-Origin on the actual response. Your browser clients are not blocked by the same-origin policy with no configuration at all.

This section is about stub / mock-response CORS — the CORS headers the virtual service sends to the browser apps that call your mocks. It is independent of the Traffic Parrot management API and web UI.

What you get out of the box

The behaviour below applies to the whole virtual service. It is global, not per-stub: an un-stubbed path returns the same CORS preflight as a stubbed one, so you do not have to remember to add CORS to each mapping.

  • CORS preflight is answered automatically. An OPTIONS request to any path that carries an Origin and an Access-Control-Request-Method header (what a browser sends as a preflight) is answered with HTTP 200 and the following headers:
    • Access-Control-Allow-Origin — set to the request's Origin, reflected back verbatim (for example a request Origin: http://localhost:3000 yields Access-Control-Allow-Origin: http://localhost:3000)
    • Vary: Origin
    • Access-Control-Max-Age: 60
    • Access-Control-Allow-Methods — the methods OPTIONS, GET, POST, PUT, PATCH and DELETE
    • Access-Control-Allow-Headers — the request headers X-Requested-With, Content-Type, Accept, Origin and Authorization
    The Access-Control-Allow-Methods and Access-Control-Allow-Headers values are returned as a set — all of the entries above are present, but do not rely on a fixed comma order, which is not guaranteed between runs.
  • The actual response reflects the Origin too. A real request (for example a GET) that carries an Origin header gets Access-Control-Allow-Origin: <the reflected Origin> and Vary: Origin added to its response — even when the matched stub sets no CORS headers itself. You do not have to add CORS headers to your mappings for browser clients to work.
  • No Origin, no reflection. A request that does not carry an Origin header (a server-to-server call, a curl without -H 'Origin: …') gets only Vary: Origin and no Access-Control-Allow-Origin. This is standard CORS: the header is reflected only when the caller is a browser sending an Origin.

Try it

You can reproduce the browser's two-step CORS exchange with curl against any path on the virtual service port (trafficparrot.virtualservice.http.port, 8081 by default). The path does not need a stub for the preflight to be answered; replace /your/path with one of your mapped endpoints.

1. The preflight. This is the OPTIONS request a browser sends first:

curl -i -X OPTIONS http://localhost:8081/your/path \
  -H 'Origin: http://localhost:3000' \
  -H 'Access-Control-Request-Method: GET'

Traffic Parrot answers it automatically (abbreviated):

HTTP/1.1 200 OK
Access-Control-Allow-Origin: http://localhost:3000
Vary: Origin
Access-Control-Max-Age: 60
Access-Control-Allow-Methods: OPTIONS, GET, POST, PUT, PATCH, DELETE
Access-Control-Allow-Headers: X-Requested-With, Content-Type, Accept, Origin, Authorization

The Access-Control-Allow-Origin echoes the Origin you sent. (The exact order of the methods and headers lists may differ between runs — treat them as sets.)

2. The actual request. This is the real call the browser makes once the preflight passes:

curl -i http://localhost:8081/your/path \
  -H 'Origin: http://localhost:3000'

The response carries the reflected origin and Vary alongside your stub's body:

HTTP/1.1 200 OK
Access-Control-Allow-Origin: http://localhost:3000
Vary: Origin
… (your stub's body and other headers) …

Drop the -H 'Origin: …' and you will see only Vary: Origin with no Access-Control-Allow-Origin — the reflection is keyed on the Origin a browser sends.

Pinning a specific origin instead of reflecting any

Reflecting any Origin is what makes mocks work for any browser client without configuration. If you would rather return a fixed Access-Control-Allow-Origin — a single allowed origin, or the wildcard * — set Access-Control-Allow-Origin yourself in the stub's response headers. When a stub supplies its own Access-Control-Allow-Origin, that value wins: the response carries exactly one Access-Control-Allow-Origin (your stub's value), and the auto-reflected one is suppressed, so the response stays CORS-compliant.

In a mapping JSON, set it under response.headers:

{
  "request": {
    "method": "GET",
    "url": "/your/path"
  },
  "response": {
    "status": 200,
    "headers": {
      "Access-Control-Allow-Origin": "https://app.example.org"
    },
    "body": "..."
  }
}

A request from any browser now receives Access-Control-Allow-Origin: https://app.example.org rather than its own reflected origin. Use "*" as the value to allow all origins explicitly.

You can set the same header from the GUI: open the mapping on the Add/Edit mappings page and add Access-Control-Allow-Origin in the response Headers field (the same field you use for any other response header). It serialises to the response.headers object shown above.

Note: this is not the optionsResponse.enabled property

The trafficparrot.http.optionsResponse.enabled property (described under Extension System Properties) is a separate mechanism. It controls an automatic HTTP OPTIONS response that emits the standard Allow header (the list of methods a resource supports) — it does not emit the Access-Control-* headers a browser CORS preflight needs. The out-of-the-box CORS behaviour described on this page is not provided by, and does not depend on, that property: your stub responses are CORS-friendly regardless of how optionsResponse.enabled is set.

Security note

By default the virtual service reflects any Origin. This is appropriate for a test double serving mock data — it lets any browser client call your mocks without configuration — but it is permissive. If you want to restrict which origins are allowed, set an explicit Access-Control-Allow-Origin (a specific origin) on the stub response, as shown in Pinning a specific origin above.

Next steps

Binary file in response

The simplest way to create a mock in Traffic Parrot that returns a binary file in the response is to create that mock by doing a recording. That assumes you have a real service that you can record. Refer to the recording section on how to create HTTP mocks using the recorder.

If you don't have a real service that returns the binary file in the response, you can create a mapping manually. This is a binary example of the general file-backed response mechanism.

To create a mock that returns a binary file in a response manually, for example a PDF file:
  1. Create a file in trafficparrot-x.y.z/mappings directory called, for example mappings/mapping-dummy-file.json
  2. The mapping-dummy-file.json should contain the following (notice the reference to body-dummy-file.pdf):
    {
      "id": "5d6a8f32-914c-4b67-ae15-f2c9d7b3e091",
      "name": "mapping-dummy-file.json",
      "request": {
        "url": "/dummy.pdf",
        "method": "GET"
      },
      "response": {
        "status": 200,
        "bodyFileName": "body-dummy-file.pdf",
        "headers": {
          "Content-type": "application/pdf"
        }
      }
    }
  3. Create the binary response body file body-dummy-file.pdf in trafficparrot-x.y.z/__files. You can use any PDF file just make sure the filename is specified in the mapping json file in bodyFileName attribute as we already did above.
  4. Now if you visit http://localhost:8081/dummy.pdf then a PDF binary file will be returned.

Serving static images

Here are three options you have if you would like to serve static images in Traffic Parrot.

You can download sample mappings here: static_images_sample_mappings.zip

Generic Dummy Image (Simplest approach)

Use a single placeholder image for all image requests. This is ideal for basic testing where the actual image content doesn't matter (e.g., http://localhost:8080/images/any-skirt.jpg).

{
  "id": "a1b2c3d4-e5f6-7890-abcd-ef1234567890",
  "name": "Generic Image Response",
  "request": {
    "method": "GET",
    "urlPattern": "/images/.*"
  },
  "response": {
    "status": 200,
    "bodyFileName": "sample-image.jpg",
    "headers": {
      "Content-Type": "image/jpeg",
      "Cache-Control": "public, max-age=3600"
    }
  },
  "uuid": "a1b2c3d4-e5f6-7890-abcd-ef1234567890",
  "priority": 5
}

Size-Specific Dummy Images (More realistic)

Serve different images based on URL patterns, useful when your application expects images of specific dimensions. You can create these using tools like ImageMagick on a Mac or any image editor (e.g., http://localhost:8080/images/320x240-skirt.jpg).

{
  "id": "b2c3d4e5-f6a7-8901-cdef-012345678902",
  "name": "320x240 Image Response",
  "request": {
    "method": "GET",
    "urlPattern": "/images/320x240.*"
  },
  "response": {
    "status": 200,
    "bodyFileName": "sample-image-320x240.jpg",
    "headers": {
      "Content-Type": "image/jpeg",
      "Cache-Control": "public, max-age=3600"
    }
  },
  "uuid": "b2c3d4e5-f6a7-8901-cdef-012345678902",
  "priority": 1
}
{
  "id": "b1c2d3e4-f5a6-7890-bcde-f12345678901",
  "name": "640x480 Image Response",
  "request": {
    "method": "GET",
    "urlPattern": "/images/640x480.*"
  },
  "response": {
    "status": 200,
    "bodyFileName": "sample-image-640x480.jpg",
    "headers": {
      "Content-Type": "image/jpeg",
      "Cache-Control": "public, max-age=3600"
    }
  },
  "uuid": "b1c2d3e4-f5a6-7890-bcde-f12345678901",
  "priority": 1
}

Real Recorded Images (Most realistic)

Use actual images from your application, either recorded during a session or manually configured. This provides the most accurate simulation (e.g., http://localhost:8080/images/product-123.jpg).

{
  "id": "c1d2e3f4-a5b6-7890-def1-123456789012",
  "name": "Product 123 Image Response",
  "request": {
    "method": "GET",
    "url": "/images/product-123.jpg"
  },
  "response": {
    "status": 200,
    "bodyFileName": "images/product-123.jpg",
    "headers": {
      "Content-Type": "image/jpeg",
      "Cache-Control": "public, max-age=86400",
      "ETag": "\"3e25960a79dbc69b674cd4ec67a72c62\""
    }
  },
  "uuid": "c1d2e3f4-a5b6-7890-def1-123456789012",
  "priority": 1
}

Key Points serving static images

  • Store image files in the __files directory or __files/images
  • Use bodyFileName to reference the files
  • Set appropriate Content-Type headers (image/jpeg, image/png, etc.)
  • Consider adding Cache-Control headers for better performance
  • Use priorities when combining multiple approaches

HTTP Passthrough Proxy

Overview

The HTTP passthrough proxy lets you forward requests that do not match any stub mapping to a real backend service. This is useful during development when you want to selectively mock only certain endpoints while letting all other traffic pass through to the real system.

When passthrough is enabled, Traffic Parrot automatically creates a low-priority catch-all proxy mapping on startup. Any request that does not match a higher-priority stub is forwarded to the configured target URL, and the real response is returned to the caller.

You can then inspect proxied requests in the Request Log and create stubs from them with a single click, allowing you to incrementally build up your virtual service.

Setting up passthrough

To enable passthrough proxy mode, set the trafficparrot.virtualservice.proxy.defaultTargetUrl property to the base URL of the real backend service. You can set this in trafficparrot.properties or as a system property (e.g. via -Dtrafficparrot.virtualservice.proxy.defaultTargetUrl=http://backend:8080).

For example:

trafficparrot.virtualservice.proxy.defaultTargetUrl=http://my-backend:8080

On startup, Traffic Parrot creates a catch-all proxy mapping named "Default proxy to http://my-backend:8080" with priority 10. Because user-created stubs use default priority 5 (which is higher), any stub you create will automatically take precedence over the proxy.

The auto-created proxy mapping is visible in the HTTP Add/Edit mappings list. It cannot be edited or deleted from the UI because it is managed by the property. An info button appears in the actions column explaining the configuration.

To change the target URL, update the property value and restart Traffic Parrot. To remove passthrough entirely, clear the property value and restart.

Disabling passthrough

To temporarily disable passthrough without removing the target URL configuration, set the trafficparrot.virtualservice.proxy.enabled property to false:

trafficparrot.virtualservice.proxy.enabled=false

When disabled, the auto-proxy mapping is not created on startup even if defaultTargetUrl is set. Requests that do not match any stub will return an unmatched response (status 900) instead of being forwarded.

The default value is true, so passthrough is enabled whenever defaultTargetUrl is configured.

Proxied requests in the request log

When passthrough proxy mode is active, proxied requests appear in the Request Log with a blue "Proxied" badge in the Matched column instead of the green "Yes" badge. Hovering over the badge shows a tooltip with the proxy target URL (e.g. "Proxied to http://my-backend:8080").

This visual distinction makes it easy to see which requests were handled by stub mappings and which were forwarded to the real backend.

Creating stubs from proxied requests

Each proxied request in the request log has a "Create Stub" button in its expanded detail view. Clicking it creates a new stub mapping based on the captured request and the actual response from the backend.

The created stub uses:

  • The request HTTP method and an exact URL match (urlEqualTo)
  • An exact request body match (when a request body is present)
  • The actual response status code, headers, and body from the backend

Transport-specific headers such as Host, Connection, Transfer-Encoding, and Content-Length are automatically excluded from the stub because they are managed by the HTTP transport layer.

After the stub is created, a green notification appears with the message "Stub created for GET /your-path" (showing the actual method and URL). The notification includes a "View in Add/Edit" link that takes you to the HTTP Add/Edit page and opens the mapping editor for the new stub, where you can review and adjust the stub before use.

Once the stub is saved, subsequent requests to the same URL will be served by the static stub instead of being proxied to the backend. This allows you to incrementally build up your virtual service by exercising your application normally and converting real responses into stubs one at a time.

The "Create Stub" button only appears for proxied requests. It is not shown for requests that matched an existing stub or for unmatched requests.

Verifying requests: was a request made (or NOT made)?

Coming from WireMock's verify(...) DSL? In a WireMock JUnit test you assert that your code under test called a stub by writing, in the same JVM, something like verify(getRequestedFor(urlEqualTo("/x"))) or verify(exactly(0), getRequestedFor(urlEqualTo("/x"))). Traffic Parrot is a standalone virtual service, not an embedded library — there is no in-JVM WireMock.verify() client API to call. Instead you assert against the running server's request journal, the same __admin/requests journal WireMock's client calls under the hood.

You can do this two ways, and they read from the same journal:

  • The Request Log GUI page (menu HTTP → Requests, served at /http/requests.html) — browse every received request, expand a row to read its headers and body, and see why an unmatched request did not match. This is the interactive, point-and-click equivalent of findAll(...) and the near-miss report.
  • The admin REST API under /api/http/… — copy-paste curl recipes you can run from a test, a CI step, or a terminal to assert a request was made, was made exactly N times, or was NOT made. This is the scriptable equivalent of verify(...) and getAllServeEvents().

The admin API is reachable on the Traffic Parrot management port (trafficparrot.gui.http.port, 8080 by default) under the /api/http/… prefix, which the GUI proxies through to the virtual service's /__admin/… journal. The recipes below all use the /api/http/… form. This section reframes verification around the WireMock mental model and gives runnable recipes; for the full GUI walkthrough and screenshots, it cross-links the Request Log section below rather than repeating it.

WireMock verify() to Traffic Parrot translation table

Each WireMock JUnit-client call maps onto either an admin-API recipe or a place to look in the Request Log GUI:

WireMock (JUnit client) Traffic Parrot — admin REST API Traffic Parrot — GUI (Request Log)
verify(getRequestedFor(urlEqualTo("/x"))) POST /api/http/requests/count with {"url":"/x"} → expect count >= 1 (or use /requests/find) Row for /x present, Matched = Yes
verify(exactly(0), getRequestedFor(urlEqualTo("/x"))) POST /api/http/requests/count with {"url":"/x"} → expect count == 0 No matching row in the Request Log
verify(exactly(3), getRequestedFor(...)) POST /api/http/requests/count → expect count == 3 Three matching rows / request-count badge
findAll(getRequestedFor(...)) POST /api/http/requests/find with a request-matcher body → matching requests and their bodies Expand the matching rows to read the body
getAllServeEvents() GET /api/http/requests{"requests":[...],"meta":{"total":N}} The full Request Log table
findUnmatchedRequests() GET /api/http/requests/unmatched Rows with Matched = No
findNearMissesForAllUnmatched() GET /api/http/requests/unmatched/near-misses Near-miss diff on row-expand
resetRequests() / reset() DELETE /api/http/requests The Clear button

Note — count and find are POST, never GET. The match criteria travel in the request body, so /api/http/requests/count and /api/http/requests/find are POST endpoints. A GET to /requests/count is interpreted as a lookup of a single request whose id is the literal string count and will not return a count.

Assert a request was made

The equivalent of verify(getRequestedFor(urlEqualTo("/x"))) is to count the journal entries that match a set of criteria and assert the count is at least one. Send a POST to /api/http/requests/count with the criteria in the body:

curl -X POST http://localhost:8080/api/http/requests/count \
  -H 'Content-Type: application/json' \
  -d '{"method":"GET","url":"/x"}'

The response is the number of journal entries that matched:

{ "count": 1, "requestJournalDisabled": false }

A count of one or more means the request was made — your test asserts on the count field (the response also carries a requestJournalDisabled flag, which is false whenever the request journal is enabled, the default). The criteria body is a WireMock request pattern, so as well as method and url you can match on urlPath, urlPattern, headers, queryParameters, and bodyPatterns — the same matchers you use in a mapping (see Request matching). An empty body {} counts every request in the journal.

In the GUI, open the Request Log and look for the row: a matching request shows a green Matched = Yes badge.

Traffic Parrot Request Log verifying requests: a 3 requests count badge above a journal table with two matched GET /example rows (Matched = Yes) and one unmatched POST /orders row (Matched = No)

The Request Log above is a live verification result: the count badge reads 3 requests, the two GET /example rows are Matched = Yes, and the unmatched POST /orders row is Matched = No. The Status column shows the status recorded in the journal (an unmatched request is journalled with WireMock's internal 404); the status returned to the client for an unmatched request is the configured no-match code HTTP 900 (see near misses below).

Assert a request was NOT made

This is the direct answer to the most common WireMock verification question — "verify that a request of a given URL has NOT been made", the equivalent of verify(exactly(0), getRequestedFor(urlEqualTo("/x"))). Use the same POST /api/http/requests/count call and assert the count is zero:

curl -X POST http://localhost:8080/api/http/requests/count \
  -H 'Content-Type: application/json' \
  -d '{"method":"GET","url":"/x"}'

If the request was never received, the count is zero:

{ "count": 0, "requestJournalDisabled": false }

A test can therefore assert "this endpoint was not called" by checking that count equals 0. In the GUI, the same conclusion is that no row matching that method and URL appears in the Request Log.

Assert a request was made exactly N times

The equivalent of verify(exactly(3), getRequestedFor(...)) is the same POST /api/http/requests/count call — you just assert the exact number returned:

curl -X POST http://localhost:8080/api/http/requests/count \
  -H 'Content-Type: application/json' \
  -d '{"method":"GET","url":"/x"}'
{ "count": 3, "requestJournalDisabled": false }

There is one endpoint for "at least once", "exactly N", and "never" — the assertion lives in your test (count >= 1, count == 3, or count == 0), not in a different URL.

Inspect a captured request body or headers

When you need more than a count — the equivalent of findAll(getRequestedFor(...)) followed by reading request.getBodyAsString() — use find to return the matching requests in full, including their bodies and headers. Send a POST to /api/http/requests/find with a request-matcher body:

curl -X POST http://localhost:8080/api/http/requests/find \
  -H 'Content-Type: application/json' \
  -d '{"method":"POST","url":"/orders"}'

The response lists each matching request with its method, URL, headers, and captured body, so you can assert on the exact payload your code under test sent. To pull back the whole journal (the equivalent of getAllServeEvents()) use:

curl http://localhost:8080/api/http/requests
{ "requests": [ ... ], "meta": { "total": 7 }, "requestJournalDisabled": false }

In the GUI, click the expand arrow on a row to read the request headers and body (JSON and XML bodies are pretty-printed, with a Copy button for the original bytes) — see Viewing request details and Pretty-printed bodies.

Page or filter the journal (limit and since)

When the journal holds a lot of requests you can narrow what GET /api/http/requests returns with two optional query parameters. Both are off by default — a plain GET /api/http/requests with neither parameter returns the whole journal exactly as before, so existing scripts and integrations are unaffected.

  • limit — a non-negative integer that bounds the response to the first N entries in journal order. limit=0 returns no rows; a negative value is rejected with HTTP 400.
  • since — an ISO-8601 timestamp (for example 2026-07-16T10:00:00Z). Only requests recorded strictly after that instant are returned — the boundary instant itself is excluded — compared against each entry's recorded time. A value that is not a valid ISO-8601 timestamp is rejected with HTTP 400.

For example, to fetch only the first two entries in journal order, or only the requests received after a known point in time:

curl 'http://localhost:8080/api/http/requests?limit=2'
curl 'http://localhost:8080/api/http/requests?since=2026-07-16T10:00:00Z'

limit and since can be combined, and either may be used on its own. The meta.total field always reports the full number of entries in the journal before limit or since is applied — it is deliberately independent of both parameters — so it stays a reliable count of everything recorded even when the requests array has been trimmed:

{ "requests": [ ...at most 2 rows... ], "meta": { "total": 7 }, "requestJournalDisabled": false }

Why didn't my request match? (near misses)

If a request did not match any mapping, Traffic Parrot serves an HTTP 900 response ("No responses matched") rather than throwing an exception, and records the request as unmatched in the journal. To list the unmatched requests — the equivalent of findUnmatchedRequests():

curl http://localhost:8080/api/http/requests/unmatched

To find out why each unmatched request missed — the equivalent of findNearMissesForAllUnmatched() — ask for the near misses, which report the closest mappings and a per-field comparison of expected vs actual:

curl http://localhost:8080/api/http/requests/unmatched/near-misses

The GUI presents the same near-miss diagnosis interactively: expand an unmatched row in the Request Log to see a field-by-field comparison table (Method, URL, Headers, Body) with match/mismatch indicators, the closest stub's name and match percentage, and a link to edit that stub — see Near misses for unmatched requests.

Reset the journal between tests

So that each test verifies only the requests it made, clear the journal first — the equivalent of resetRequests(). Send a DELETE to /api/http/requests:

curl -X DELETE http://localhost:8080/api/http/requests

In the GUI, the red Clear button on the Request Log does the same thing (with a confirmation prompt) — see Clearing the request log.

Admin API endpoint reference

The verification endpoints, all on the management port (8080 by default) under the /api/http/… prefix:

Method & path What it does
GET /api/http/requests List the whole journal as {"requests":[...],"meta":{"total":N}}. Accepts optional limit and since query parameters to page or filter the result
GET /api/http/requests/{id} Fetch a single journal entry by id
POST /api/http/requests/count Count journal entries matching a request pattern body → {"count":N}
POST /api/http/requests/find Return journal entries (with bodies) matching a request pattern body
GET /api/http/requests/unmatched List requests that matched no mapping
GET /api/http/requests/unmatched/near-misses List the closest mappings for each unmatched request
DELETE /api/http/requests Clear the journal

These are reachable through the management port's /api/http/… write-through prefix shown above. The corresponding raw journal routes on the virtual service port are /__admin/requests and friends; prefer the /api/http/… form, which is the supported management surface. For an interactive catalogue of the management APIs, see Management APIs in the user guide (Postman workspace and OpenAPI specification).

Next steps

  • Request Log — the GUI page that shows every received request, with screenshots of the table, expandable details, and near-miss diagnosis
  • Request matching — the matchers (URL, headers, query parameters, body patterns) you can put in a count or find criteria body, the same ones you use in a mapping
  • Management APIs — the Postman workspace and OpenAPI specification for the full set of Traffic Parrot management endpoints

Request Log

Overview

The Request Log page shows all HTTP requests received by the virtual service. You can access it from the HTTP dropdown menu in the top navigation bar by clicking "Requests".

Each row in the table displays the request timestamp, HTTP method, URL, response status code, and whether the request was matched to an existing stub mapping. Matched requests show a green "Yes" badge, unmatched requests show a red "No" badge, and proxied requests show a blue "Proxied" badge (see HTTP Passthrough Proxy).

The page header shows the total number of requests and a "Last updated" timestamp indicating when the data was last refreshed.

Viewing request details

Click the expand arrow on any row to view full details of the request and its response. The expanded section shows the request headers, request body, response status, response headers, and response body.

For matched requests, a "Matched Stub" section displays the full JSON definition of the stub mapping that was used to generate the response. This is useful for understanding which mapping handled the request.

Pretty-printed request and response bodies

When a request or response body is JSON or XML, it is automatically pretty-printed (indented and shown over multiple lines) in the expanded detail section, so that you can read the structure at a glance instead of scanning a single long line.

Each body block is collapsible: click the heading ("Request Body" or "Response Body") to fold it away when you want to focus on the rest of the detail panel. A Copy button next to each body copies the original, unformatted body to your clipboard, so what you paste matches the bytes that were actually sent or received, not the pretty-printed version shown on screen.

The same pretty-printing and Copy button are available wherever request bodies are logged, including the gRPC requests page and the JMS, IBM MQ, and file messaging requests pages.

Bodies are shown exactly as received (raw, on a single line) when they cannot be safely formatted — for example when the body is not well-formed JSON or XML, is not a JSON or XML content type, or is large enough to be truncated for display (bodies over 10 KB are truncated, with a note showing the total size).

Near misses for unmatched requests

When you expand an unmatched request (one with a red "No" badge), the detail section shows a "Near Misses" list instead of a matched stub. Near misses are the existing stub mappings that came closest to matching the request, along with a percentage indicating how close each match was.

Each near miss displays a per-field comparison table that shows exactly which fields matched and which did not. The table compares the stub's expected values against the actual request values for each field: Method, URL, Headers, and Body.

Each row in the comparison table has an indicator on the right:

  • A green checkmark means the field matched the stub's expected value
  • A red cross means the field did not match — mismatched rows are highlighted with a red background so you can quickly spot the problem
  • A grey question mark means the match could not be evaluated in the browser (for example, JSONPath, XPath, or XML body patterns)

In the example above, a request to GET /api/users-wrong with an Accept: text/html header is compared against a stub expecting GET /api/users with Accept: application/json. The Method matches (green checkmark), but both the URL and Accept header are mismatched (red crosses), making it immediately clear why the request was not matched.

Near miss stub name and match percentage

Each near miss entry shows the stub's human-readable name as its heading, when one has been set. If the stub does not have a name, the heading displays the stub's method and URL pattern instead. Next to the name, an orange badge shows the match percentage (for example, "92% match"), which indicates how closely the request matched that stub.

View Stub link

Each near miss entry includes a "View Stub" link next to the stub name. Clicking this link navigates directly to the HTTP Stubs page and opens the edit dialog for that specific stub mapping. This allows you to quickly fix the stub's request pattern when you can see which field did not match.

Viewing the full stub JSON

Below the comparison table, a "Show full stub JSON" link is available for users who need to see the complete stub mapping definition. Clicking this link toggles a collapsible section that displays the raw JSON of the stub, including the response body, metadata, and UUID. This is hidden by default to keep the near miss display focused on the comparison table.

Auto-refresh

The request log automatically refreshes every second, so new requests appear in the table without requiring a manual page reload. This is useful when monitoring live traffic to the virtual service.

You can pause auto-refresh by clicking the "Stop auto reload" button. When paused, the button changes to "Start auto reload" and no further automatic updates occur until you resume. The manual "Refresh" button continues to work at any time.

Auto-refresh also pauses automatically when you expand a detail row, select text in the table, or hover over a tooltip. This prevents the data from changing while you are inspecting it.

Clearing the request log

Click the red "Clear" button to delete all recorded requests from the journal. A confirmation dialog appears asking you to confirm before the requests are permanently removed.

Configuration

See configuration in the user guide.

Typical environments

See typical environments in the user guide.

Proof of concept with on-premises installation at a large enterprise

See proof of concept in the user guide.

Dynamic responses and custom extensions