HTTP 900 response, and nothing in the response tells you which field differs. You will reproduce that failure with a stub that requires a specific request header and a request that omits it, then open Traffic Parrot's Request Log, find the row with the red “No” Matched badge, and read the “Near Misses” diff — a per-field comparison of what the stub expected versus what the request actually sent. By the end you will know how to go from “it doesn't match” to “the Accept header is wrong, here is the exact stub to fix” in under a minute, without guessing or re-reading raw JSON by hand.
When a request reaches Traffic Parrot and no stub matches it, Traffic Parrot does not throw an error or guess. It serves an HTTP 900 response — the “No responses matched” status — and records the request as unmatched. That is deliberate: a deterministic “nothing matched” result is safer than silently returning the wrong stub. But from the calling application's point of view, an HTTP 900 is opaque. Your integration test fails, your application sees an unexpected status, and the response body tells you nothing about which part of the request was off.
A request that you expected to match can miss for several common reasons:
Accept: application/json but the caller sent Accept: text/html, or omitted the header entirely./api/users-wrong while the stub expects /api/users.POST arriving at a stub that only matches GET.Without tooling, finding the culprit means eyeballing the stub JSON next to the captured request and comparing them field by field. Traffic Parrot does that comparison for you. Its near-miss diff takes the request that missed, finds the stubs that came closest, and shows a per-field table of expected versus actual so the differing field jumps out. That is what the rest of this tutorial walks through.
To make this concrete, set up a stub that matches a GET on /api/users but only when the request carries an Accept: application/json header. A minimal stub mapping looks like this:
{
  "name": "Get all users",
  "request": {
    "method": "GET",
    "url": "/api/users",
    "headers": {
      "Accept": { "equalTo": "application/json" }
    }
  },
  "response": {
    "status": 200,
    "headers": { "Content-Type": "application/json" },
    "jsonBody": [ { "id": 1, "name": "Ada" } ]
  }
}
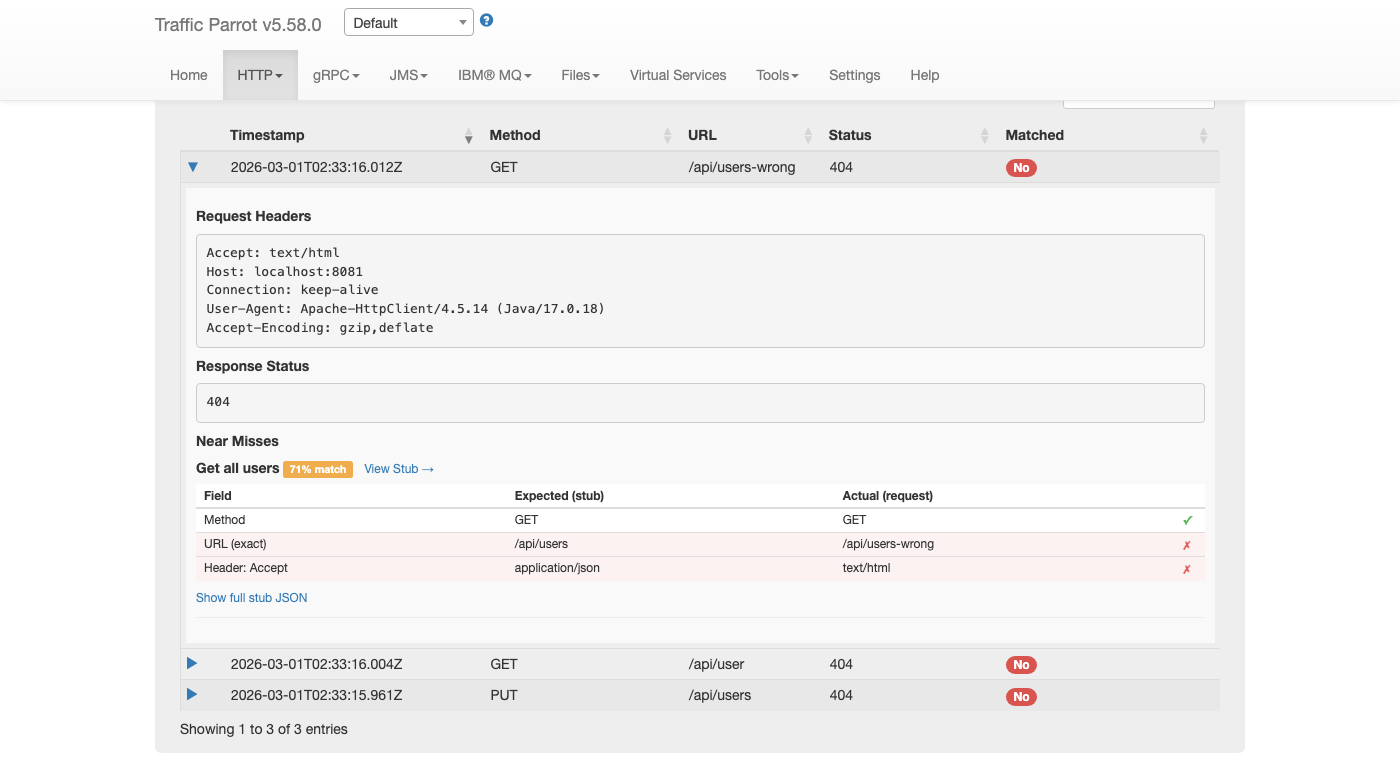
With that stub loaded as the current scenario, send a request that should match it — but deliberately get one field wrong. Here the caller hits the wrong path /api/users-wrong and sends the wrong header value Accept: text/html:
$ curl -i -H "Accept: text/html" http://localhost:8081/api/users-wrong
The response confirms the miss — Traffic Parrot returns the unmatched status rather than your 200:
HTTP/1.1 900 No responses matched
That HTTP 900 is the symptom. It tells you the request matched no stub, but not why. The same outcome happens for any of the failure modes listed above — a typo'd URL, the wrong method, or a body pattern stricter than the request. To diagnose it, move from the calling side to Traffic Parrot's Request Log.
Open a web browser and navigate to http://localhost:8080. From the HTTP dropdown menu in the top navigation bar, choose Requests to open the Request Log (the page also lives at /http/requests.html).
The Request Log lists every HTTP request Traffic Parrot has received, newest first. Each row shows the timestamp, HTTP method, URL, response status code, and — in the Matched column — a coloured badge that tells you at a glance how the request was handled:
HTTP 900 response. This is the one you are hunting.
Find the row for your request — the GET /api/users-wrong call — with the red “No” badge, and click the expand arrow on that row to open its details.
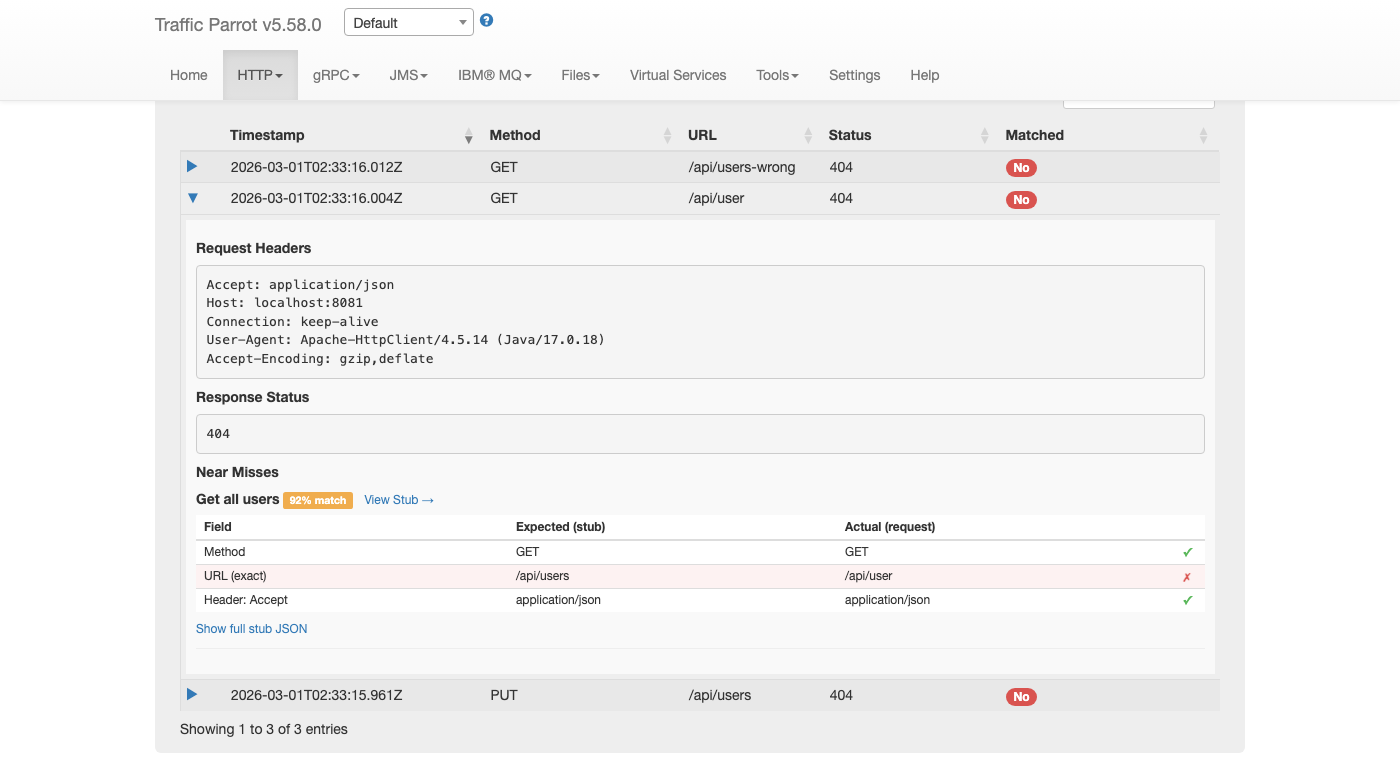
When you expand an unmatched row, the detail section shows a “Near Misses” list instead of a matched stub. A near miss is one of your existing stubs that came closest to matching the request. Each near miss is headed by the stub's name (or its method and URL pattern, if it has no name) and an orange badge showing how close it was — for example, “92% match”. The percentage is derived from the match distance, so a higher number means the stub was nearly right and only a field or two differed.
Below the badge, each near miss displays a per-field comparison table. It lines up the stub's expected values against what the request actually sent, one row per field:
| Field | Expected (stub) | Actual (request) | Indicator |
|---|---|---|---|
| Method | What method the stub matches (for example GET) |
The method the request used | ✓ / ✗ / ? |
| URL | The stub's expected URL or URL pattern | The URL the request hit | ✓ / ✗ / ? |
| Header | The header value the stub requires | The header value the request sent | ✓ / ✗ / ? |
| Body | The body pattern the stub matches | The body the request sent | ✓ / ✗ / ? |
The indicator in the last column is how you spot the problem instantly:
Accept header are mismatched (red ✗).
In this worked example, the request GET /api/users-wrong with Accept: text/html is compared against the “Get all users” stub, which expects GET /api/users with Accept: application/json. The Method row shows a green ✓ — both are GET — but both the URL row and the Accept header row show a red ✗. The red rows are your answer: the path is wrong and the header value is wrong. Scan for the red ✗ rows and you have the differing fields, no JSON reading required. For the full reference on every column and indicator, see the
Near misses for unmatched requests section of the Traffic Parrot HTTP documentation.
Once the diff has told you which field is wrong, you usually have two choices: correct the request you are sending, or relax the stub so it accepts what the request actually sends. When the request is correct and the stub is too strict (a typo'd expected URL, an over-specific header requirement, or a body pattern that is stricter than intended), fix the stub directly from the near miss.
Each near miss entry has a “View Stub →” link next to the stub name. Clicking it navigates straight to the HTTP Stubs page and opens the edit dialog for that exact stub mapping — no hunting through the stub list to find the right one.
In the edit dialog, make the smallest change that fixes the real problem. If the stub's expected header was simply too strict, relax or correct it — for example, broaden the Accept matcher or remove the header requirement if it should not gate matching. If the expected URL had a typo, correct it. Then Save the stub. If, on the other hand, the diff shows that the request is at fault (a genuine bug in the caller, like the /api/users-wrong typo), leave the stub alone and fix the calling code instead. The near miss has told you which side is wrong; the fix follows.
If you need to inspect the complete mapping before editing — response body, metadata, and UUID — use the “Show full stub JSON” toggle below the comparison table to expand the raw stub definition inline.
With the stub corrected (or the caller fixed), re-send the request and watch it match. Sending the correct path and header against the “Get all users” stub now returns your 200 response:
$ curl -i -H "Accept: application/json" http://localhost:8081/api/users
HTTP/1.1 200 OK
Content-Type: application/json
Refresh the Request Log and expand the new row. The Matched column now shows a green “Yes” badge, and the detail section shows the matched stub instead of a “Near Misses” list. The badge flipping from red “No” to green “Yes” is your confirmation that the mismatch is resolved.
Everything you did in the GUI is also available over the management API on port 8080: GET /api/http/requests lists the journal and GET /api/http/requests/unmatched/near-misses returns the same near-miss diagnosis as JSON. Those endpoints proxy WireMock's native admin API — the equivalents of findUnmatchedRequests() and findNearMissesForAllUnmatched() — and are documented in full in the
Traffic Parrot HTTP near-miss reference.
GET /api/http/requests/unmatched/near-misses for the server-side result.Need stubs to debug against first? Work through Chapter 2: How to record and replay HTTP and SOAP requests and responses, then come back and use near misses whenever a request misses. For the full field-by-field reference, the badge meanings, and the backing admin API, see the Near misses for unmatched requests section of the Traffic Parrot HTTP documentation.