curl on your PATH for the optional step that sends a message without a JMS client.A system that talks to a back end over ActiveMQ is only as testable as that back end is available. When the consumer of your request queue is owned by another team, still being built, or unreachable from a laptop or a CI agent, the application under test sends its message and waits for a reply that never comes. Every test of the code that handles the reply is blocked, and the error paths, a rejected order or a malformed confirmation, are the hardest to reproduce on demand.
Traffic Parrot removes the dependency by playing the back end. It connects to the broker as a JMS client, consumes from the request queue, matches each message against the mappings you define, renders a response and publishes it on the response queue. Your application connects to the same broker it always did and cannot tell the difference. Because Traffic Parrot uses the ActiveMQ client libraries over OpenWire, the application is free to use any client that ActiveMQ supports, including AMQP, STOMP or MQTT clients in other languages.
Two things make the ActiveMQ case convenient. Traffic Parrot embeds an ActiveMQ Classic broker of its own, so on a developer machine there is nothing to install: one click starts a broker on the port you choose, and on 61616, the ActiveMQ default, an application configured for a local broker connects unchanged. And when you do have a broker, switching the mock to it is a single dropdown, because connections are defined in a file and mappings never mention the broker.
The example follows the shape used throughout these tutorials. An ordering application sends an order to the queue orders and expects an order confirmation on the queue confirmations. The order processing system that would normally sit between the two queues is what you will replace. Its documentation says a request looks like this:
{
  "orderItemName": "pear",
  "quantity": "4"
}
and a confirmation like this:
{
  "orderItemName": "apple",
  "quantity": "3",
  "date": "2026-09-14T09:15:21Z"
}
That is all a mapping needs: the request queue, the response queue and the response body. In the first version the confirmation will be fixed, whatever was ordered. The dynamic version comes later.
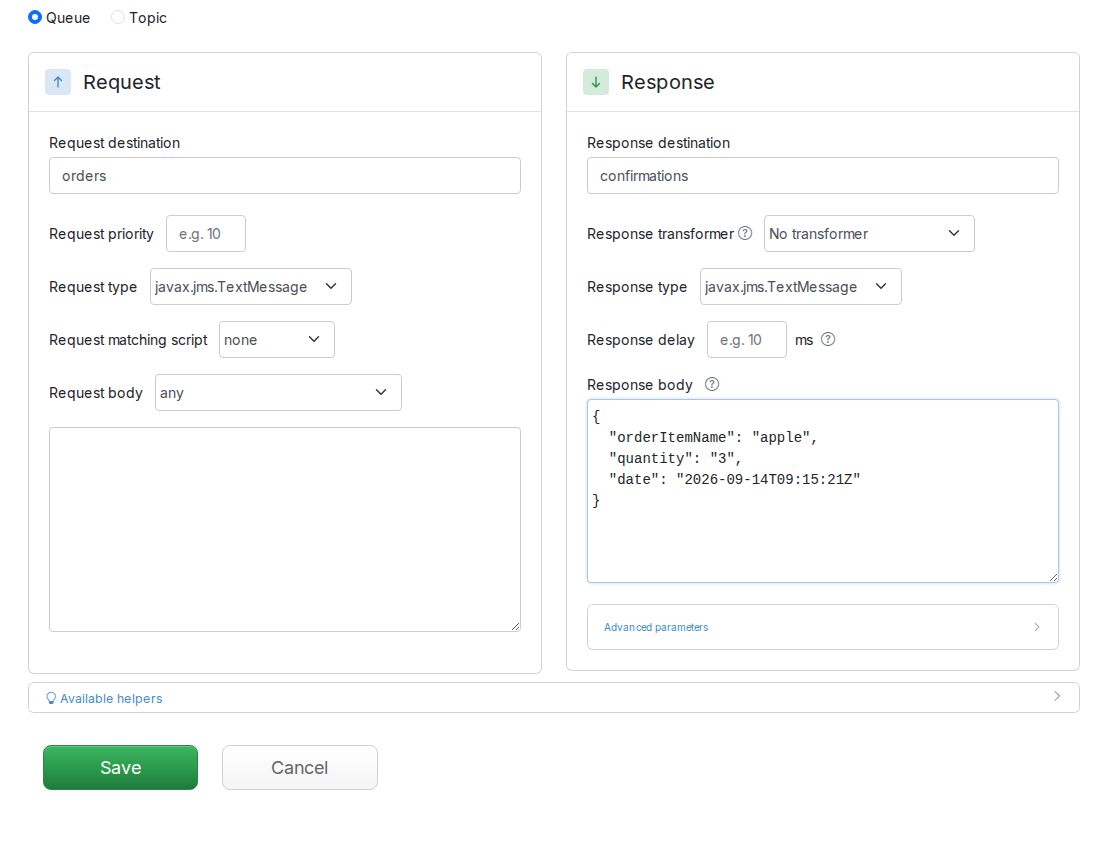
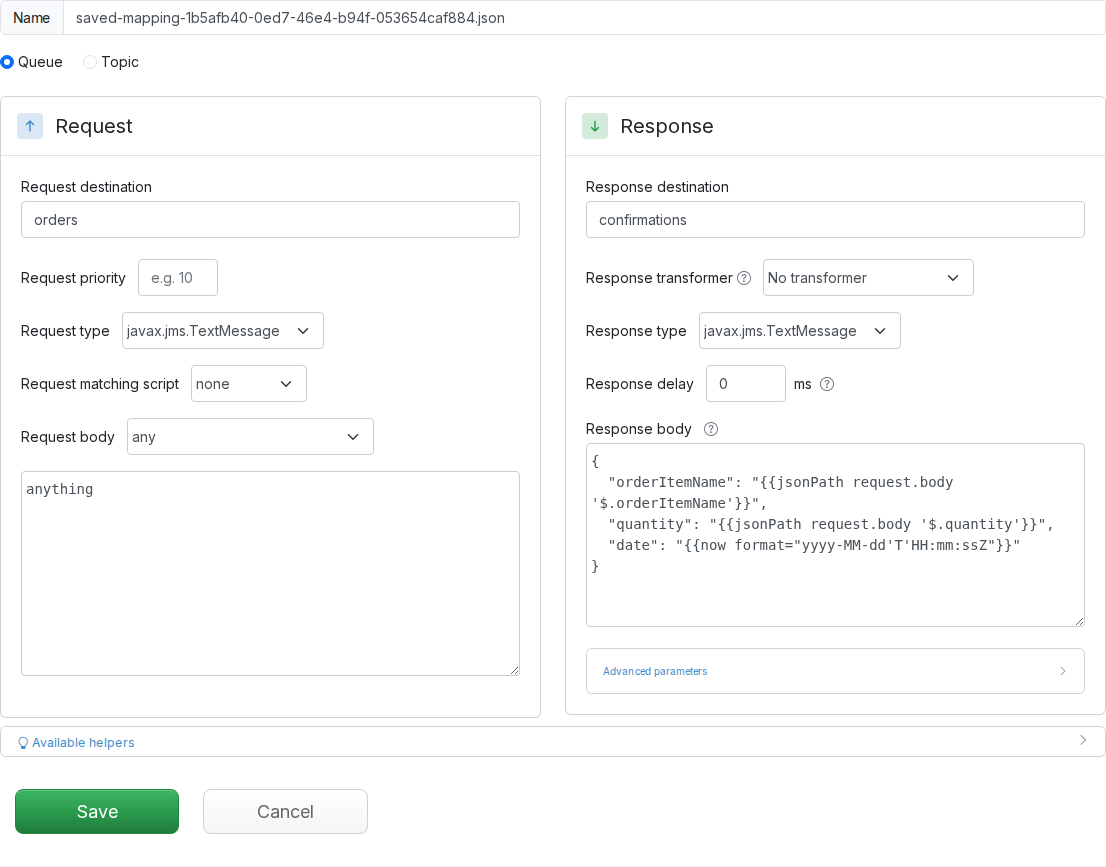
Start Traffic Parrot and open the web console at http://localhost:8080. From the JMS menu in the top navigation bar choose Add/Edit. The form has a request side and a response side. Leave Queue selected, type orders as the Request destination, leave Request body at any so every message on the queue matches, type confirmations as the Response destination, and paste the confirmation JSON into Response body.
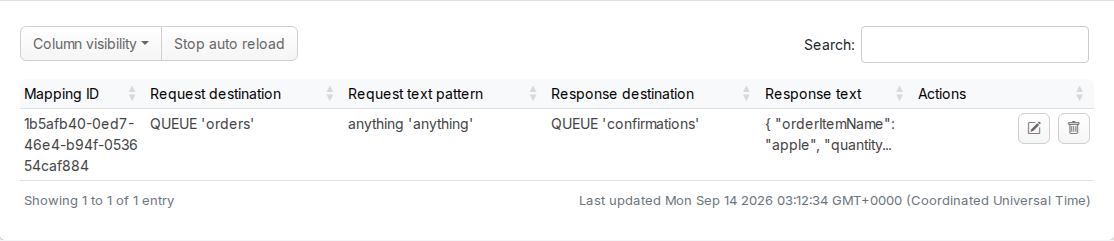
Press Save. The mapping appears in the Mappings table under the form, with its id, both destinations, the body matcher and the response text.
Traffic Parrot stores the mapping as a JSON file in the jms-mappings directory of your installation, named saved-mapping-<id>.json. Nothing in it refers to a broker, which is what lets the same mapping serve the built-in broker now and a real one later:
{
  "id" : "76ca7e9d-46d5-48ae-8a0a-3b5e49c1afd8",
  "request" : {
    "destination" : {
      "name" : "orders",
      "type" : "QUEUE",
      "skipDeclare" : false,
      "declareArguments" : { }
    },
    "bodyMatcher" : {
      "anything" : "anything"
    },
    "bodyType" : "TEXT",
    "jmsMessageType" : "javax.jms.TextMessage"
  },
  "response" : {
    "destination" : {
      "name" : "confirmations",
      "type" : "QUEUE",
      "skipDeclare" : false,
      "declareArguments" : { }
    },
    "jmsResponseTransformerClassName" : "NO_TRANSFORMER",
    "text" : "{\n  \"orderItemName\": \"apple\",\n  \"quantity\": \"3\",\n  \"date\": \"2026-09-14T09:15:21Z\"\n}",
    "bodyType" : "TEXT",
    "jmsMessageType" : "javax.jms.TextMessage",
    "properties" : [ ],
    "fixedDelayMilliseconds" : 0,
    "destinationLookup" : null
  },
  "mappingName" : ""
}
You can write files like this yourself and copy them into jms-mappings, which is how a team keeps its mocks in version control and rebuilds them on a CI agent. Traffic Parrot reads the directory again for every message it matches, so a file dropped in while the mock is running is used straight away. The one exception is a file that introduces a new request queue: Traffic Parrot decides which queues to consume when replay is turned on, so after adding one, turn replay off and on again.
A mapping does nothing until Traffic Parrot is connected to a broker and consuming. From the JMS menu choose Replay. The page reports JMS virtual service is OFF and shows two cards: Broker, which decides where the messages flow, and Replay, which decides what is replayed.
In the Broker card select Internal. The card changes to read Start Active MQ broker on port … using protocol tcp. Set the port to 61616, the port every ActiveMQ client defaults to, and leave the protocol as tcp, which is OpenWire. In the Replay card tick Queue and leave Topic unticked; the two connection dropdowns that appear are set to Internal broker for you. Press Turn ON.
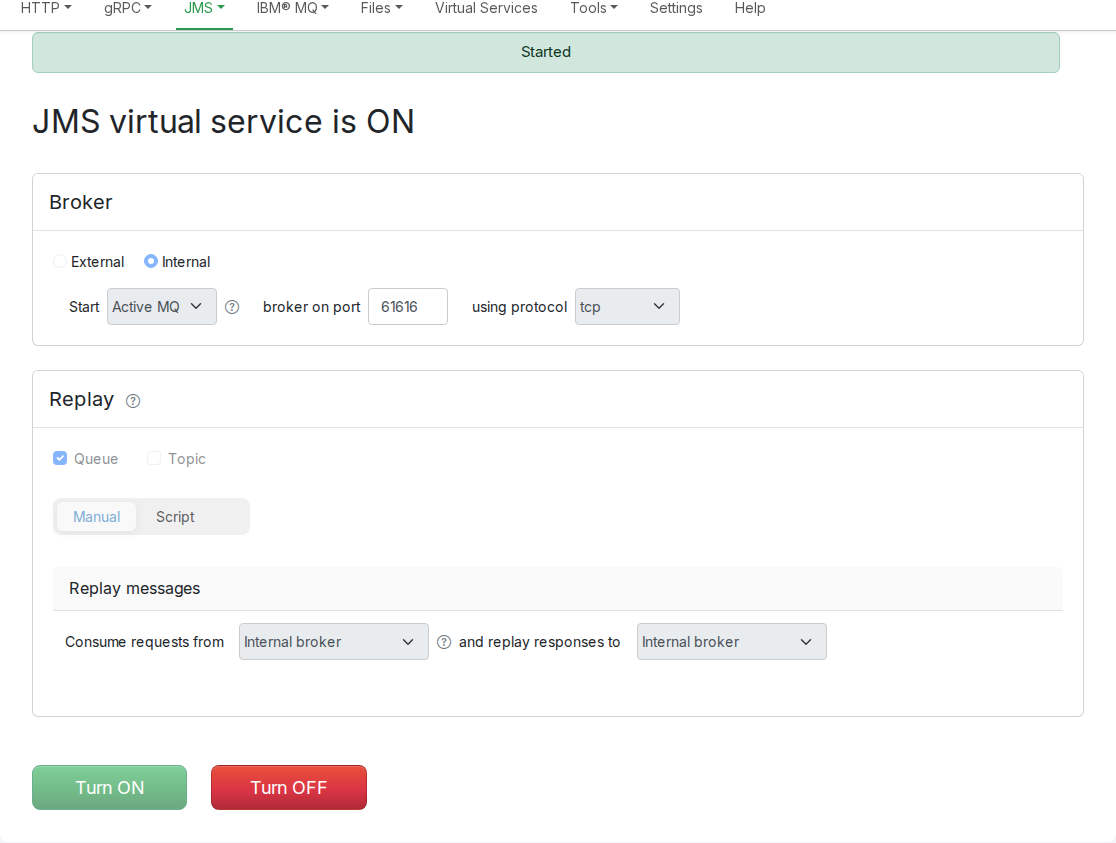
The heading changes to JMS virtual service is ON. Behind it, Traffic Parrot started an embedded ActiveMQ Classic broker bound to localhost, connected to it as a client, and began listening on every request queue named by a mapping. The log in logs/trafficparrot.log, which you can also open from JMS → Logs in the console, records the sequence:
INFO  Started ActiveMQ with connector tcp://localhost:61616?wireFormat.maxInactivityDurationInitalDelay=60000
INFO  Created shared JMS producer connection for JmsConnectionDefinition[…connectionId=USE-TRAFFIC-PARROT-INTERNAL-BROKER,connectionName=Internal broker]
INFO  Created shared JMS consumer connection for JmsConnectionDefinition[…connectionId=USE-TRAFFIC-PARROT-INTERNAL-BROKER,connectionName=Internal broker]
INFO  Waiting for messages on QUEUE:orders
The built-in broker keeps its queues in memory and disappears when replay is turned off, which is exactly what a test wants. It accepts connections only from the machine Traffic Parrot runs on.
When the application under test already talks to an ActiveMQ broker, point the mock at that broker rather than starting another. Connections are defined in jms-connections.json in the Traffic Parrot directory, and the shipped file already contains one for an ActiveMQ broker on the default port:
{
  "connectionId": "3",
  "connectionName": "Local ActiveMQ",
  "connectionData": {
    "jmsProvider": "ACTIVE_MQ",
    "hostname": "localhost",
    "port": 61616
  }
}
Change hostname and port to match your broker, add "username" and "password" if it requires them, and save; the console re-reads the file when you reload the page. Then, on the Replay page, leave External selected in the Broker card, tick Queue in the Replay card, and choose Local ActiveMQ in both dropdowns, Consume requests from and and replay responses to, before pressing Turn ON. The two can differ, which is how you mock a system that reads from one broker and writes to another.
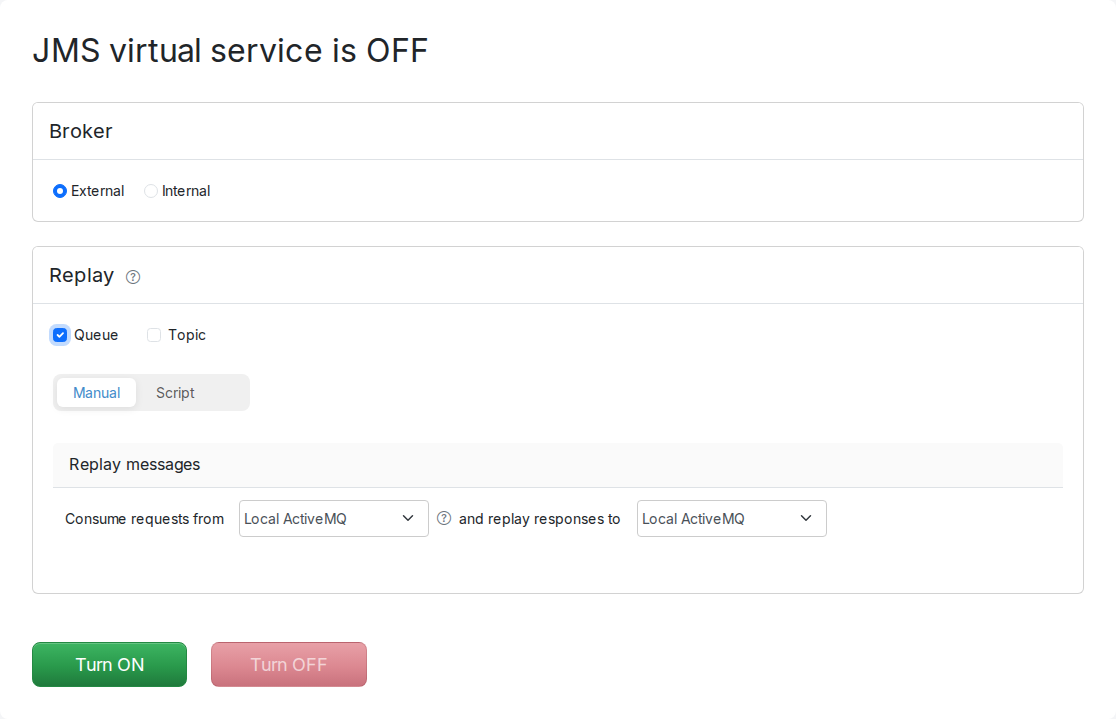
The JMS connections section of the documentation lists every field, including the "protocol": "amqp" setting for connecting to ActiveMQ over AMQP 1.0 instead of OpenWire. The rest of this how-to uses the built-in broker, and every step works the same way against an external one.
Any JMS client can now play the ordering application. The quickest one to hand is the pair of tools in the ActiveMQ Classic distribution, activemq producer and activemq consumer, which speak OpenWire to whatever broker URL you give them, the built-in broker included. From the ActiveMQ directory, publish one order to orders:
$ bin/activemq producer --brokerUrl tcp://localhost:61616 --destination queue://orders --messageCount 1 --message '{"orderItemName":"pear","quantity":"4"}'Then read one message from confirmations. The consumer prints the text of each message it receives and exits once it has received the count you asked for:
$ bin/activemq consumer --brokerUrl tcp://localhost:61616 --destination queue://confirmations --messageCount 1
Both tools default to 1000 messages and to a destination of queue://TEST, so always pass --messageCount and --destination. On Windows the launcher is bin\activemq.bat. If you would rather use the application under test itself as the producer, point its broker URL at tcp://localhost:61616 and send an order from it.
Whatever the client, Traffic Parrot logs both halves of the exchange. Open JMS → Logs and follow the link to logs/trafficparrot.log, or read the file directly. The message was consumed, matched and answered:
INFO  QueueReplayService-jms-vs-Default-0 Received message on request queue orders:
Class:            class org.apache.activemq.command.ActiveMQTextMessage
JMSMessageID:     ID:6f140b982972-46141-1789352851765-10:1:1:1:1
JMSDestination:   QUEUE(orders)
…
Text:             {"orderItemName":"pear","quantity":"4"}
----------------------------------------------------------------------
INFO  QueueReplayService-jms-vs-Default-0 Found 1 mappings for request destination QUEUE:orders
----------------------------------------------------------------------
INFO  QueueReplayService-jms-vs-Default-0 saved-mapping-76ca7e9d-46d5-48ae-8a0a-3b5e49c1afd8.json body matches: true
----------------------------------------------------------------------
…
INFO  QueueReplayService-jms-vs-Default-0 Sent response:
Class:            class org.apache.activemq.command.ActiveMQTextMessage
JMSMessageID:     ID:6f140b982972-46141-1789352851765-6:1:1:1:1
JMSCorrelationID: ID:6f140b982972-46141-1789352851765-10:1:1:1:1
JMSDestination:   QUEUE(confirmations)
…
Text:             {
  "orderItemName": "apple",
  "quantity": "3",
  "date": "2026-09-14T09:15:21Z"
}
Two details in the log matter to a real client. The response carries the request's JMSMessageID as its JMSCorrelationID, so an application that correlates replies to the requests it sent, the usual pattern over a shared response queue, works against the mock unchanged. And the confirmation is the fixed one from the mapping: four pears were ordered, three apples were confirmed. That is what the next section fixes.
If you are testing on a machine with no JMS client at all, Traffic Parrot can send the order for you. Its HTTP virtual service supports a post-serve action, send-jms-message, that publishes a JMS message after an HTTP stub has answered, so a plain curl becomes a JMS producer. The shipped Local ActiveMQ connection points at localhost:61616, which is where the built-in broker is listening, so it can be used as-is. Save this as fire-order.json:
{
  "request": { "method": "GET", "url": "/fire-order" },
  "response": { "status": 200, "body": "order message sent" },
  "postServeActions": [ {
    "name": "send-jms-message",
    "parameters": {
      "jmsConnectionId": "3",
      "destination": { "name": "orders", "type": "QUEUE" },
      "jsonBody": { "orderItemName": "pear", "quantity": "4" }
    }
  } ]
}
Register it through the management API on port 8080, then call the stub on the virtual service port, 8081:
$ curl -s -X POST http://localhost:8080/__admin/mappings -d @fire-order.json
$ curl -s http://localhost:8081/fire-order
order message sent
The first call answers with the stored stub as JSON. Each call to /fire-order then puts one order on orders, and the log shows the same received-matched-sent sequence as above. The action is described under Sending JMS messages from other protocols in the JMS documentation.
A confirmation that always says three apples will be caught by the first assertion that compares it to the order. The response body is a template, so it can copy values out of the request and generate the timestamp. Mappings cannot be edited in the console while the virtual service is running, so press Turn OFF on the Replay page first; until you do, the pencil and bin on the Mappings table are greyed out with the tooltip Turn off virtual service to enable editing. Then, under JMS → Add/Edit, press the pencil on the mapping's row and replace the Response body with:
{
  "orderItemName": "{{jsonPath request.body '$.orderItemName'}}",
  "quantity": "{{jsonPath request.body '$.quantity'}}",
  "date": "{{now format="yyyy-MM-dd'T'HH:mm:ssZ"}}"
}
request.body is the text of the JMS message that matched, jsonPath pulls a field out of it, and now formats the current time. Press Save, go back to the Replay page and press Turn ON. Send another order for four pears, by either route above, and the confirmation now describes the order it answers:
INFO  QueueReplayService-jms-vs-Default-0 Sent response:
Class:            class org.apache.activemq.command.ActiveMQTextMessage
JMSMessageID:     ID:6f140b982972-46141-1789352851765-6:1:1:1:2
JMSCorrelationID: ID:6f140b982972-46141-1789352851765-10:1:2:1:1
JMSDestination:   QUEUE(confirmations)
…
Text:             {
  "orderItemName": "pear",
  "quantity": "4",
  "date": "2026-09-14T02:29:24+0000"
}
The same helpers work in every Traffic Parrot response, HTTP and gRPC included. Chapter 3: Dynamic responses walks through them, and the request data and jsonPath sections of the documentation list the rest, including helpers for XML requests and for random values. To return a rejection for some orders, add a second mapping on orders whose Request body matcher is matches JSONPath with an expression such as $[?(@.quantity > 100)], and give it a rejection body; Traffic Parrot picks the mapping whose matcher fits the message.
Received message on request queue line. Traffic Parrot is not consuming that queue. Check that the Request destination of the mapping is spelled exactly as the client's destination, including case, and that the mapping existed when you pressed Turn ON: the set of queues to consume is decided at that moment, so after adding a mapping for a new queue, turn replay off and on.Received message but no Sent response. The message reached Traffic Parrot but no mapping matched it. Set Request body back to any to confirm the routing, then tighten the matcher. With trafficparrot.messaging.diagnostics.enabled=true in trafficparrot.properties, JMS → Requests lists every unmatched message with its nearest mappings.hostname and port in jms-connections.json, that the broker is running, and that its OpenWire connector is enabled; add "username" and "password" if the broker requires authentication.The same request-response pattern is covered for other brokers in Mocking and simulating JMS IBM® WebSphere MQ and Service virtualization and mocking of RabbitMQ. For topics, recording real traffic into mappings, byte messages and message properties, read the Traffic Parrot JMS documentation.